Create Advanced GoHighLevel Multi-Step Forms with Growform
GoHighLevel is the all-in-one platform for digital agencies, and has taken the SMMA (social media marketing agency) world by storm.
While GoHighLevel already offers a basic form builder, you might find yourself needing a touch more sophistication or customisation.
That’s where Growform comes into play.
Growform lets you to create advanced forms, featuring:
- Conditional logic to show/hide fields or entire steps
- 30+ field types, including zip codes and phone fields
- 100+ high-converting, psychology-backed form templates
- Highly customisable colors, custom fonts and branding
- Carefully designed progress bars and animations
- Advanced tracking & tagging integrations (Facebook pixels, GTM and more)
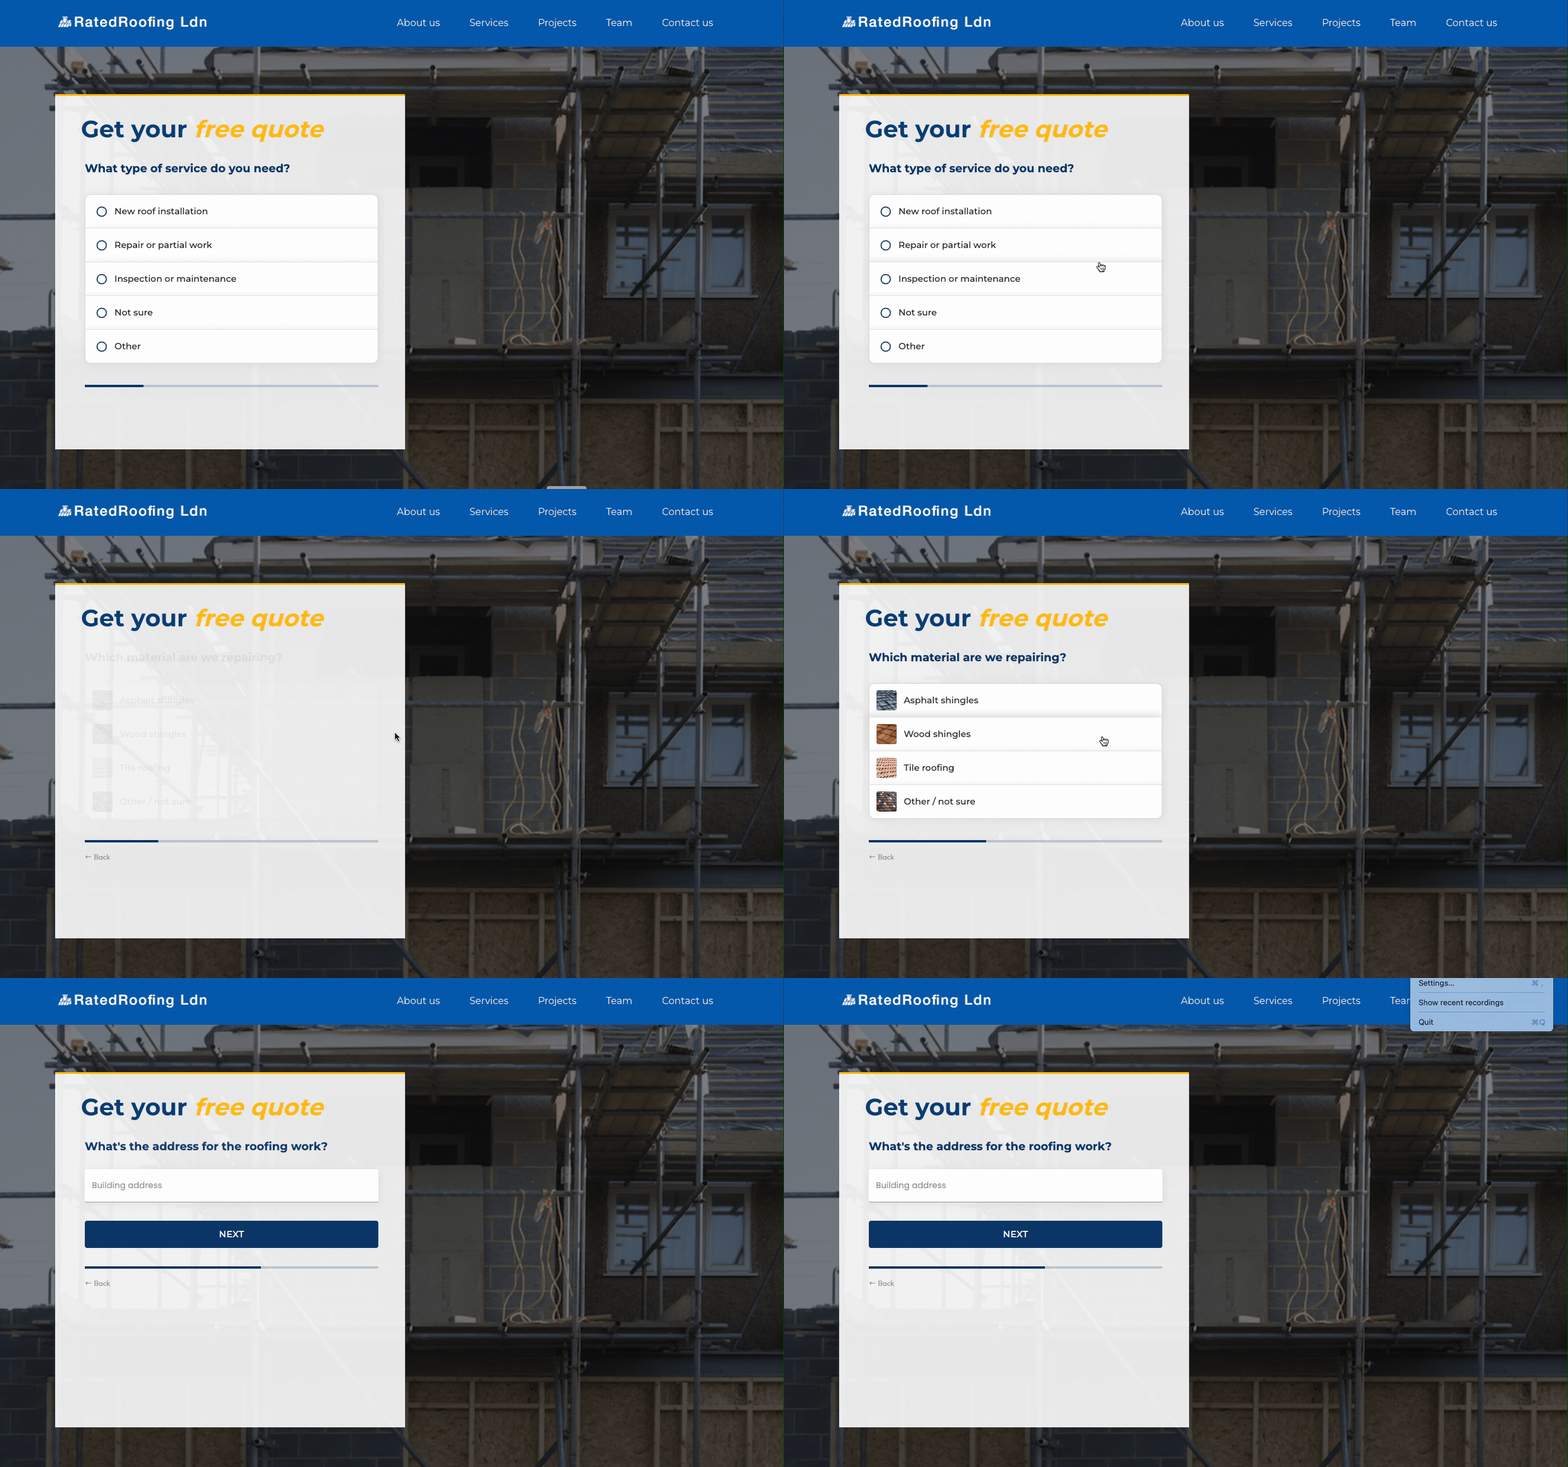
Of course, it integrates seamlessly into GoHighLevel, blending in perfectly with your GHL landing page:
Related: Must-Follow UX Best Practices When Designing A Multi Step Form
Table of Contents
How to create your advanced GHL form
This guide is also available in video format:
1 – Create a form on Growform
First, you’ll need to create a basic form on Growform. There’s a 14 day free trial (no credit card required), and you can sign up here.
We recommend starting with the “None – start with a blank slate” template to keep things simple.
Follow our getting started guide if you need help creating your first form.
Related: How To Add A Growform Multi Step Form To Webflow
2 – Configure Growform for GoHighLevel
There are a few settings to be aware of to make your GHL embedding experience even smoother:
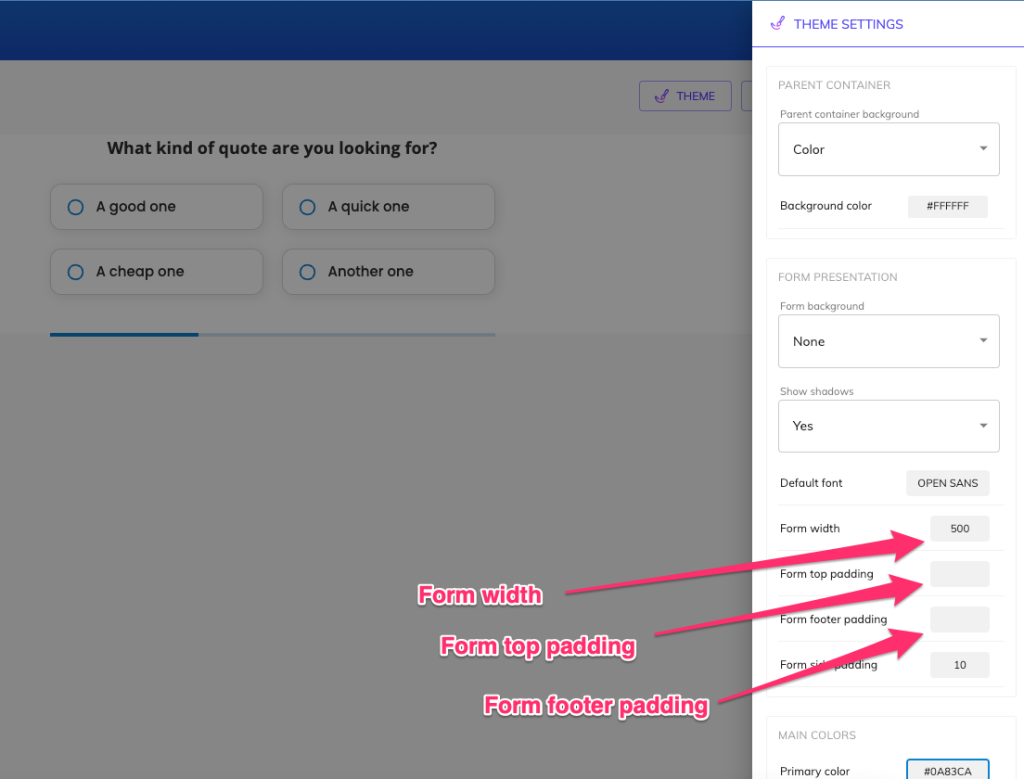
- Under “Theme settings”, you can set your form’s container background to “None”, so it blends in perfectly with the background behind it in GoHighLevel:

- Also under “Theme settings”, you may wish to set your form width to 520, top padding to 15 and form footer padding to 15. This will remove unnecessary padding and make your form fit more seamlessly into GHL:
You may also wish to update your form’s primary color and font settings to match your landing page’s brand.
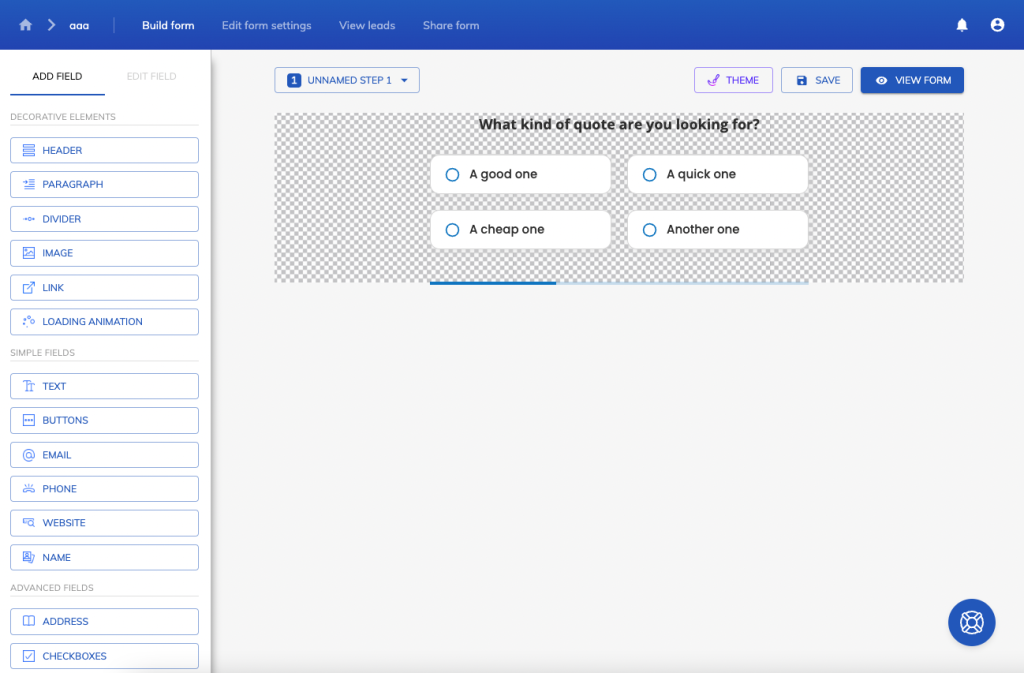
At this point, you should have a basic but serviceable form in Growform:
3 – Copy your embed code from Growform
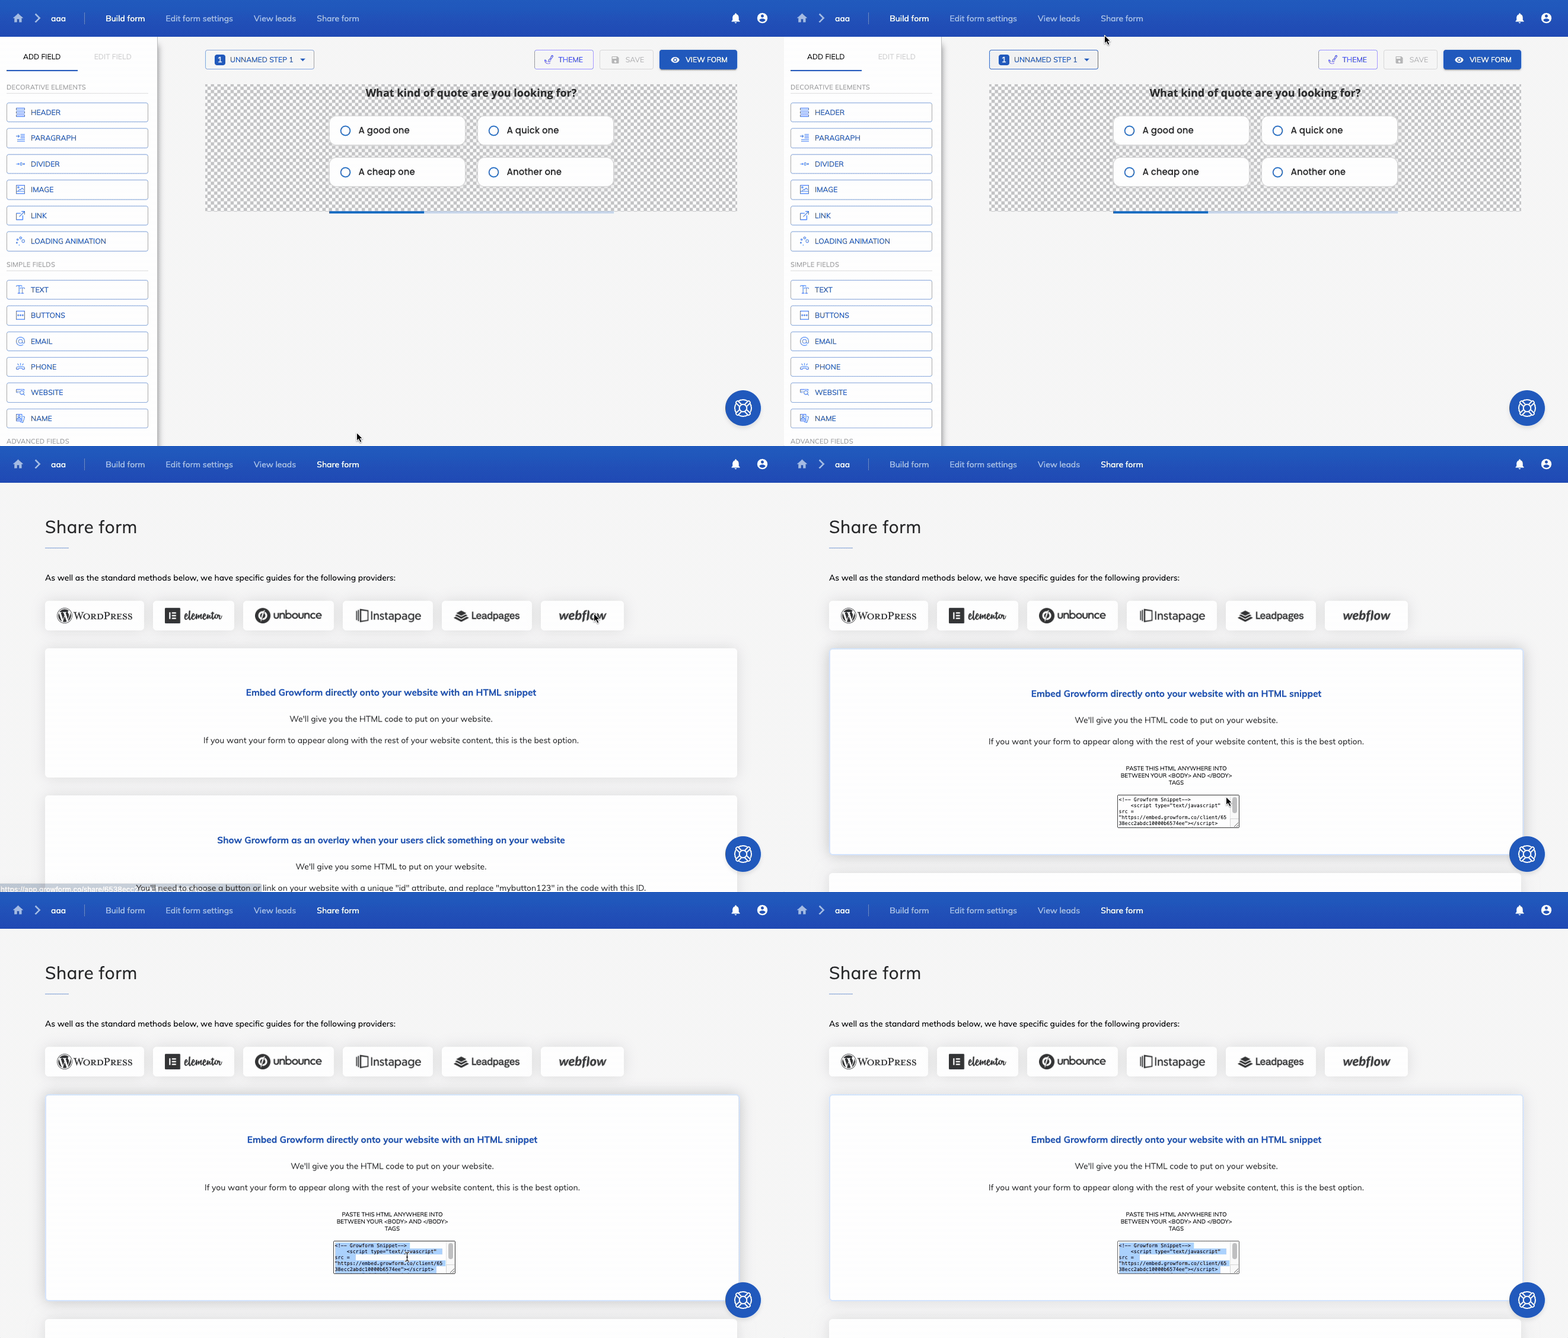
To grab your embed code, hit “Share form” in the top blue bar, then “Embed Growform directly onto your website with an HTML snippet”. Click inside the box and copy the code to your clipboard:
4 – Paste the embed code into GoHighLevel’s landing page builder
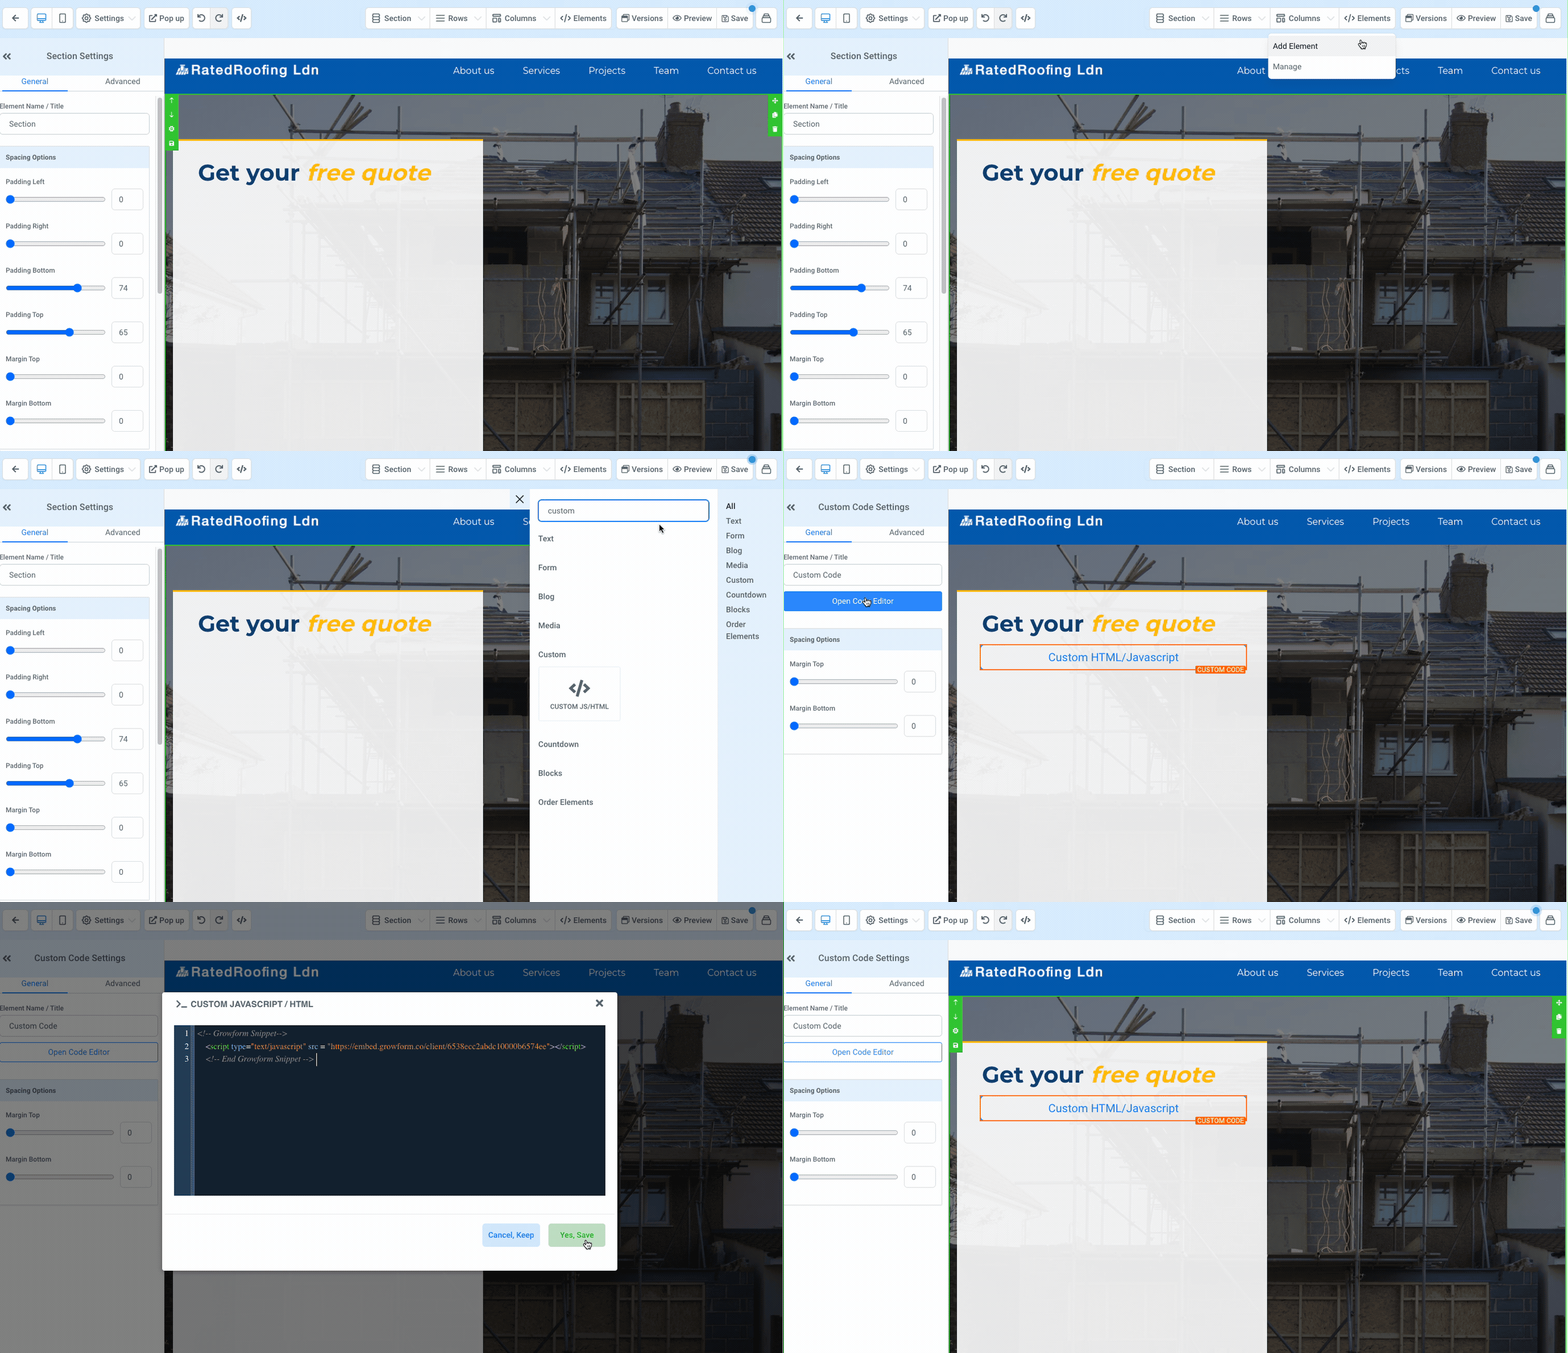
In the GoHighLevel landing page builder, hit “Elements” in the top bar, then “Add element”. Search “Custom” to find the “Custom JS/HTML widget” and insert that onto your page. Paste your code into the editor and save:
5 – Preview your new form and make finishing touches!
At this point, you should have a form embedded successfully in GoHighLevel:
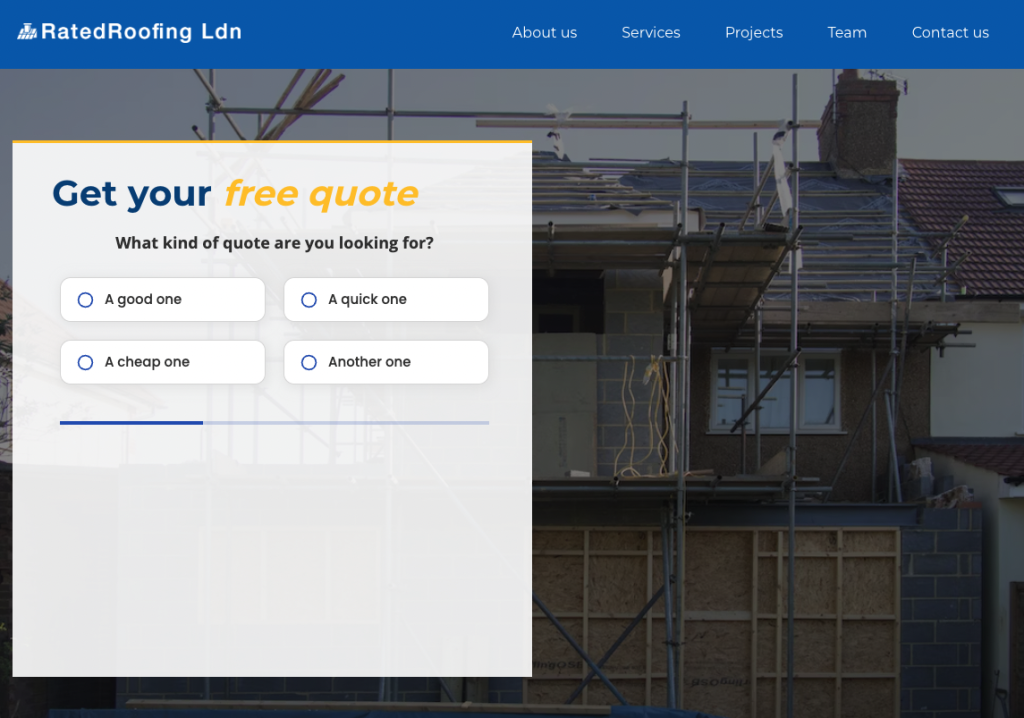
This is good enough for now – we’ll cover styling and troubleshooting later in this guide to get the form looking absolutely perfect.
6 – Connect your form to GoHighLevel via Webhooks
So far, we’ve embedded a form in our landing pages, but leads will appear in Growform rather than GoHighLevel. This is an easy fix – you just need to connect the two platforms via either Webhooks or LeadConnector via Zapier.
In this guide, we’ll configure the integration via Webhooks.
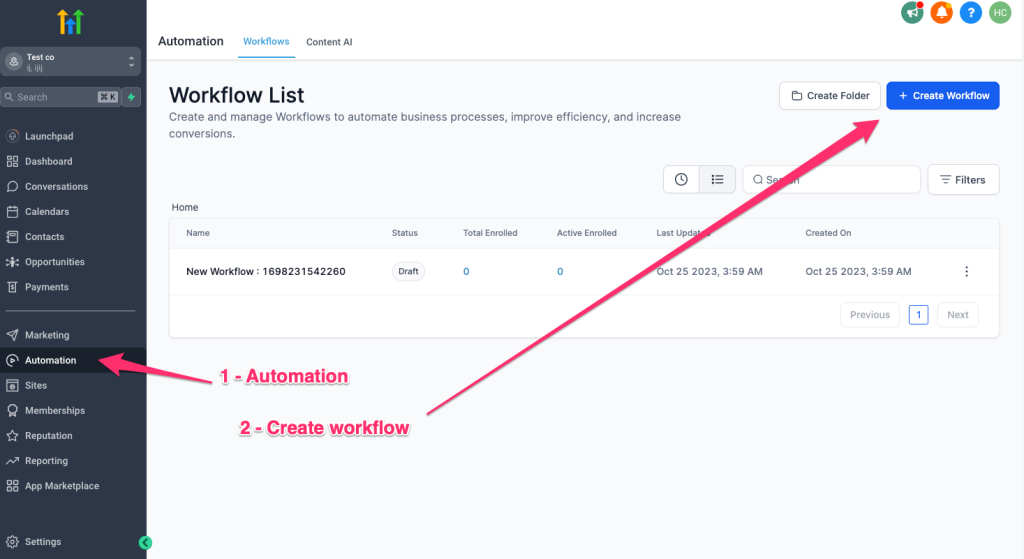
First, go to “Automation” in your relevant GHL sub-account, and hit “Create workflow”:
Choose “Start from scratch” on the next screen.
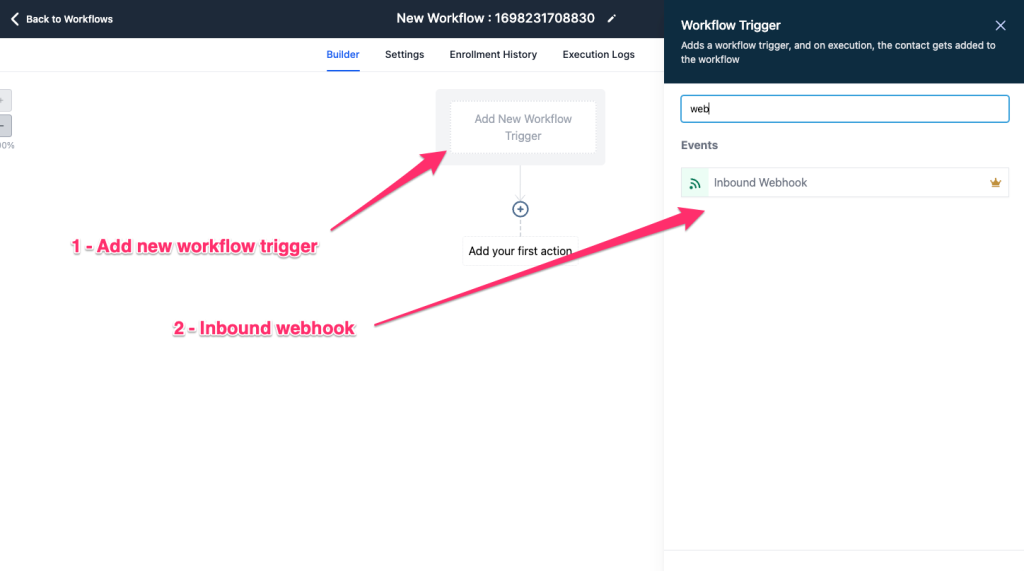
Hit “Add new workflow trigger”, then find and select “Inbound Webhook”:
Copy the Webhook URL given to you by GHL (it starts “https://services.leadconnectorhq…”), as we’ll need to tell Growform to send leads to this webhook:
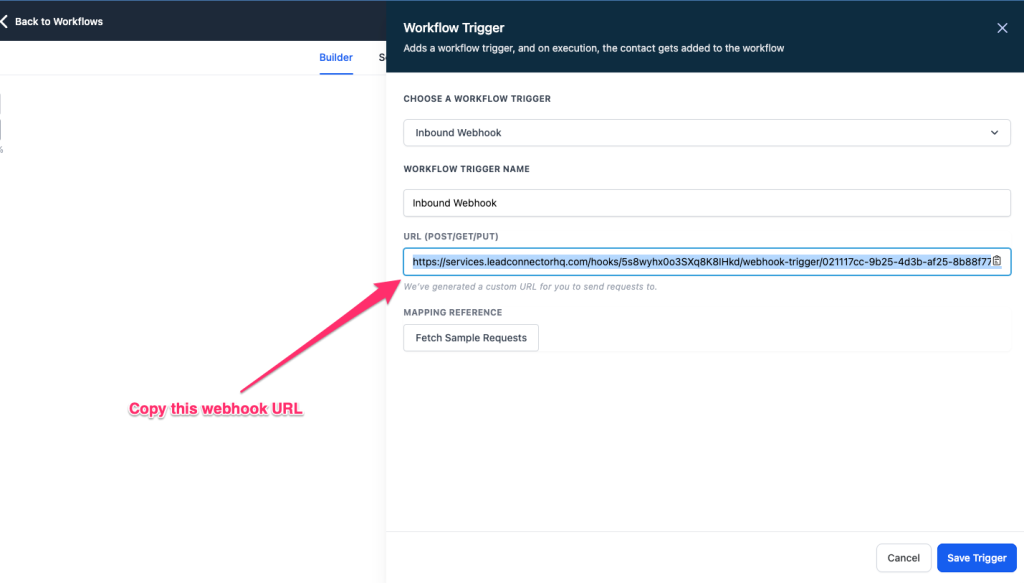
We now need to tell Growform to send leads to this URL as they come through.
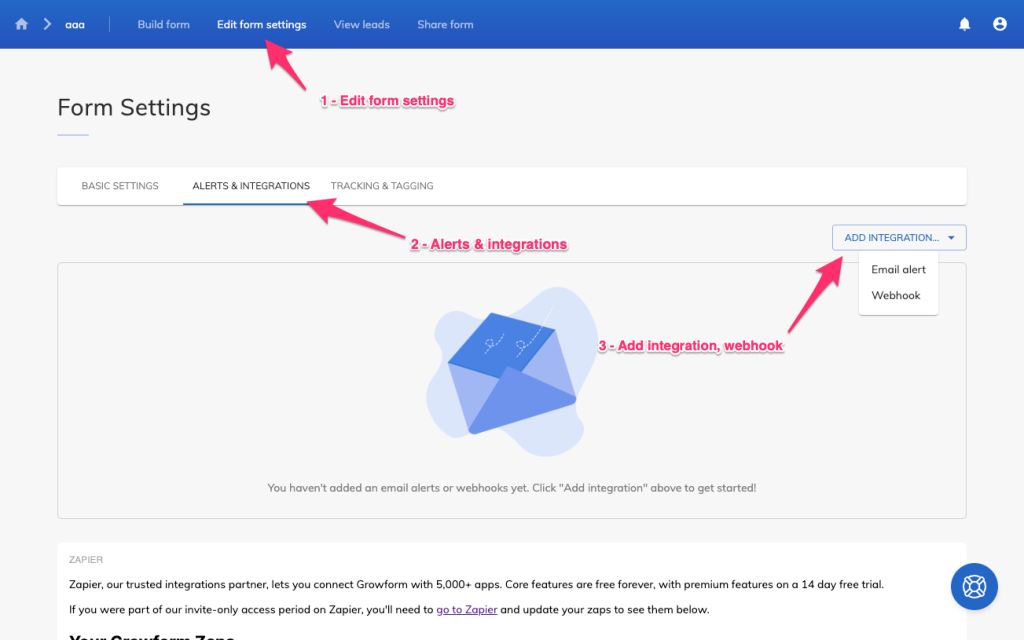
In Growform, go to “Edit form settings” > “Alerts & integrations”, and add a webhook integration:
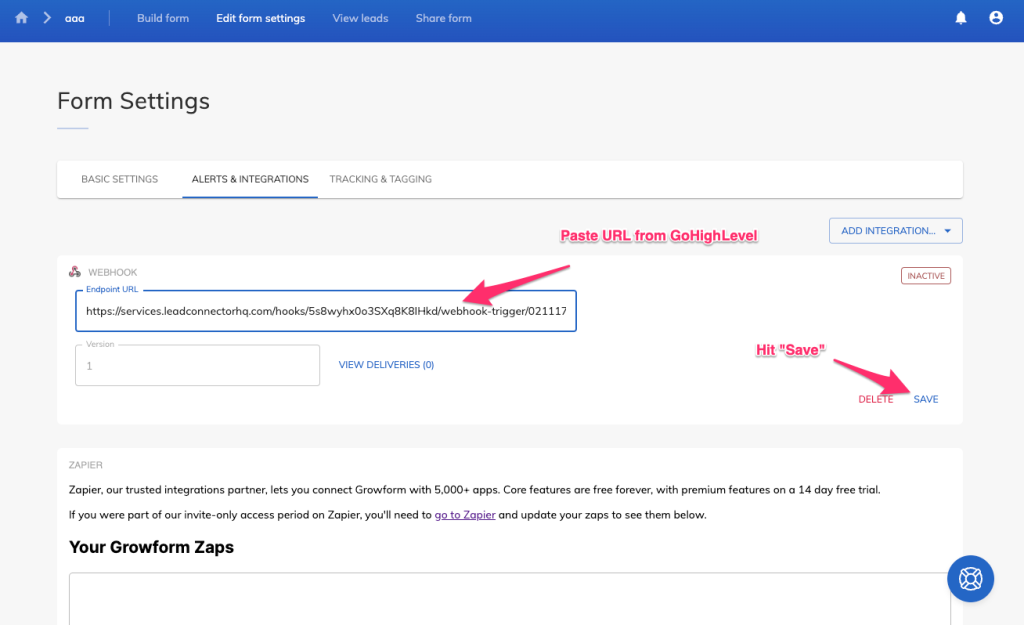
Now, paste the endpoint URL from GoHighLevel into the endpoint URL box and hit “Save”:
With this configured, you now need to create a sample submission in Growform (i.e. fill in your form), and then hit “Fetch submissions” in GHL. You will see a mapping reference like this, and can then hit “Save trigger”:

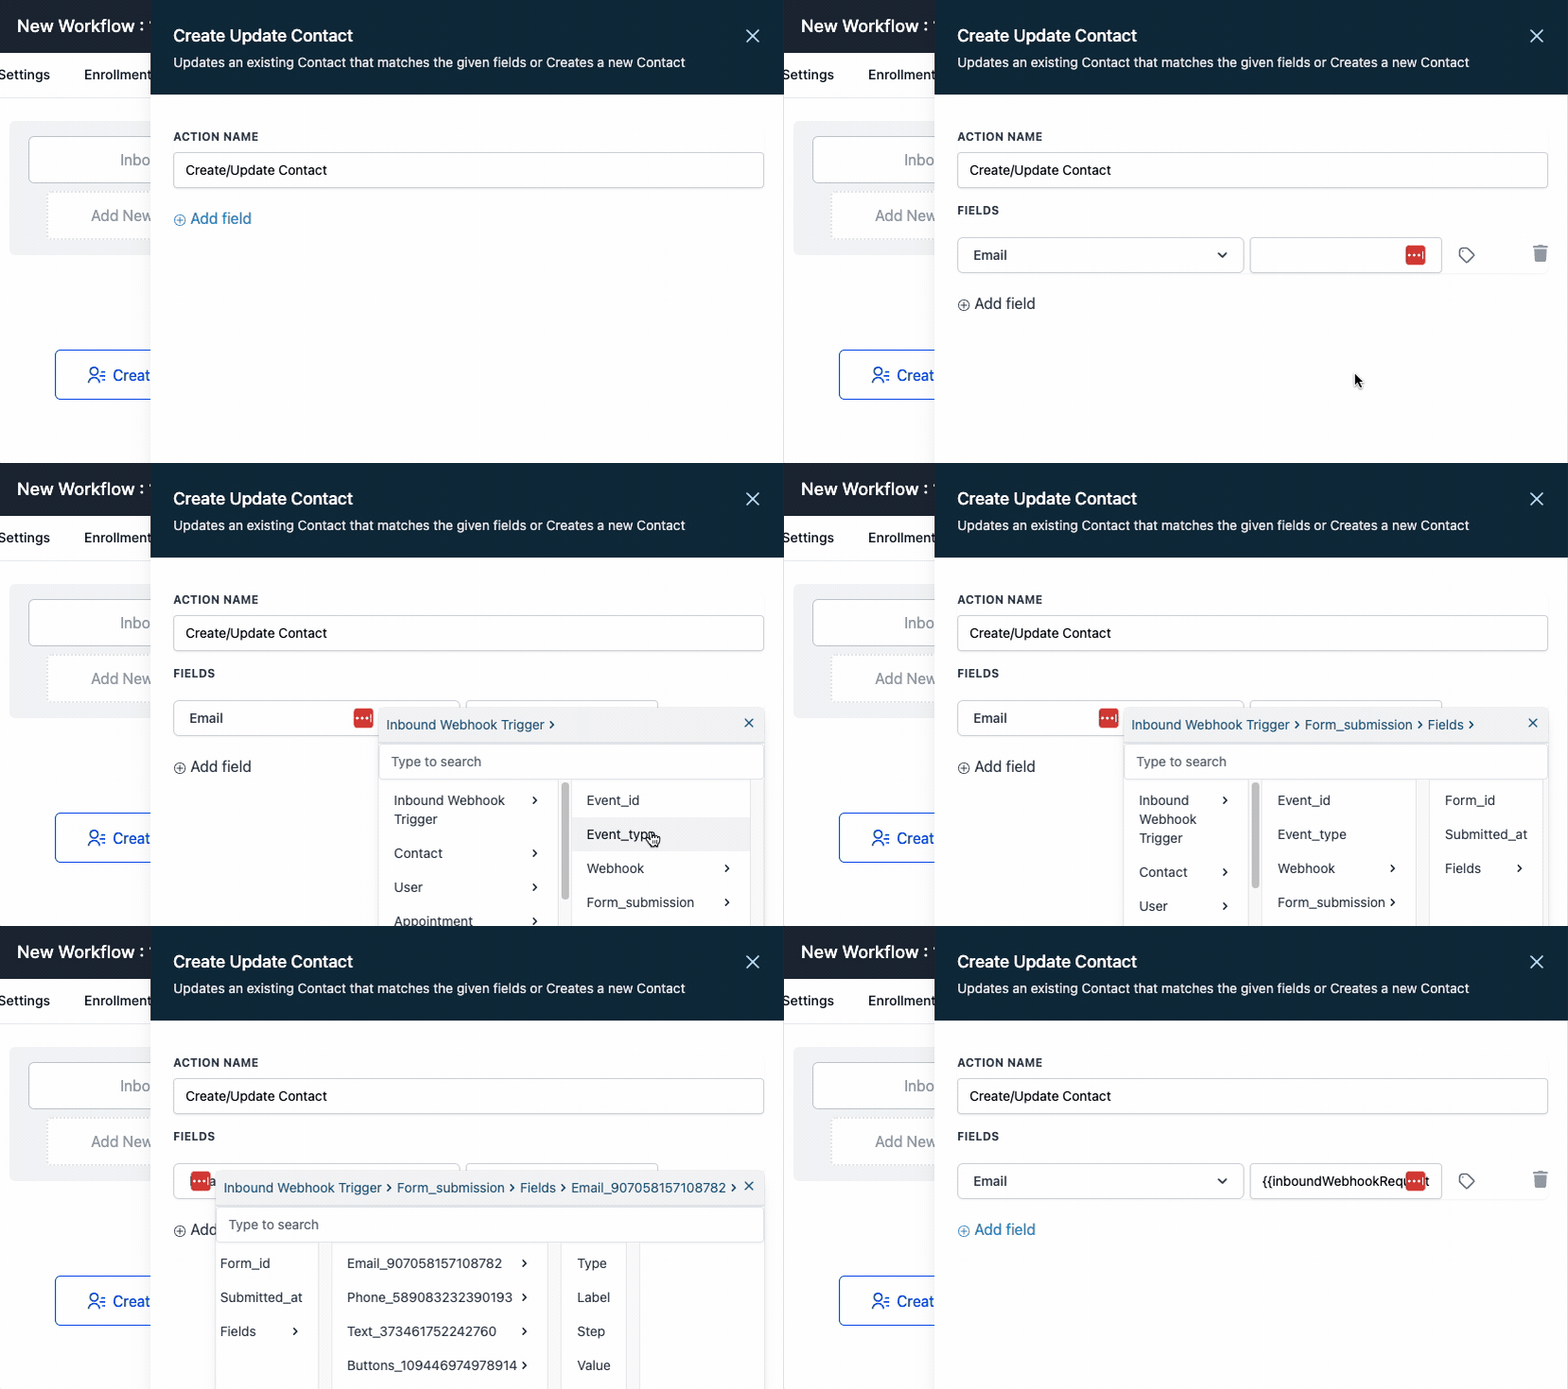
On the next step in GHL, you can map Growform’s fields to the contact data in GHL. For each field you wish to send over to GHL, simply choose the relevant field from the Webhook data.
In this example, we’ll map GHL’s “Email” field to the email field in our form.
We chooose: Inbound Webhook Trigger > Form_submission > Fields > (The email field name) > Value:
That’s it!
Once you save this workflow, leads will be created in GHL as soon as the lead is received in Growform.
7 – [Bonus] – Styling to perfection with GoHighLevel and advanced tips
This guide has shown you how to create and embed a basic form, but you may wish to make use of our advanced tips to achieve form perfection:
Avoiding background “jumps” or resizes between steps
Depending on the layout of your landing page, you may notice a jarring “background resize” as you progress through the form.
This is caused because Growform automatically resizes itself based on its content, which can cause GoHighLevel’s elements to resize.
To avoid this happening, we recommend applying a custom class to the box in GoHighLevel that contains Growform. Select the box, hit “Advanced”, then add a custom class name:
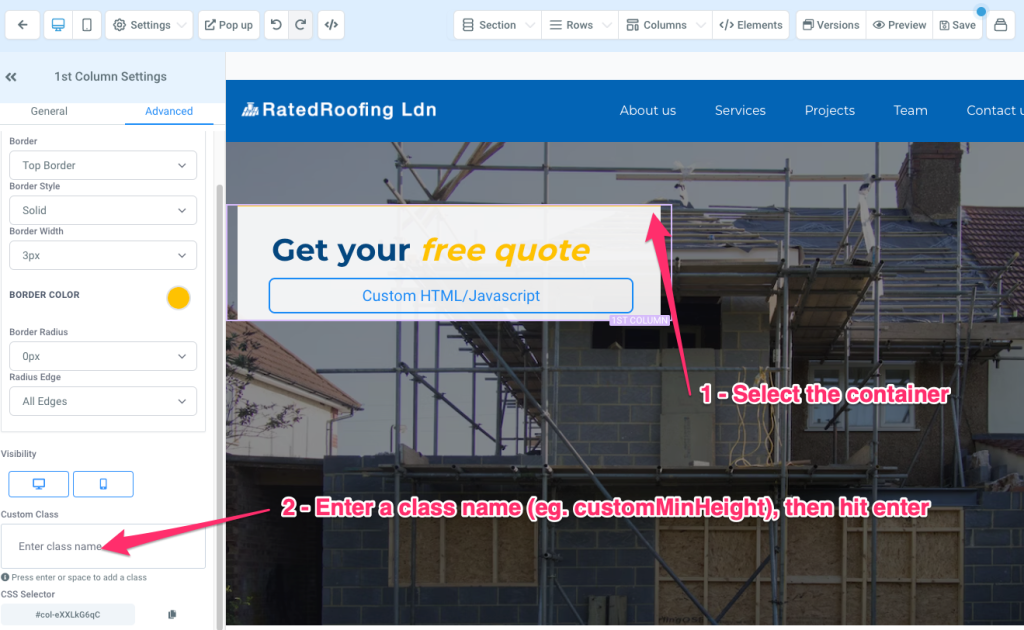
You can then go to “Settings” > “Custom CSS” in the GHL landing page editor add the following CSS:
.customMinHeight {
height: 600px !important;
display: block !important;
}
This CSS does 2 the following:
1.) Sets a height of 600px, so the box doesn’t resize as the form gets bigger/smaller
2.) Overwrites the default “display:flex” property, which causes elements in this box to gather from the middle outwards, rather than top-down. This makes it neater if you have steps of different sizes.
Of course, you’ll need to adjust the 600px value to suit your form, and ensure steps are of a similar size if using this tip.
Creating buttons to scroll back “Up” to the top of the page
Rather than placing the same form on the page multiple times, we recommend adding CTA’s (call-to-action’s) throughout your landing page to send the user back to the top.
To achieve this in GoHighLevel, follow this guide.
Getting the form width pixel-perfect in GoHighLevel
You may have noticed that the form doesn’t quite fit – the form isn’t wide enough, and the text is aligned in the center:

To get this absolutely perfect, go to “Theme settings” in Growform and gradually increase the “Form width” until it looks just right. You’ll need to save the form in Growform and then refresh the preview page in GoHighLevel to get this just right.
You should aim to get the form as large as possible, but without causing the buttons to collapse into mobile view. This form is about the right size:

Now, we can set that first header to align to the left:
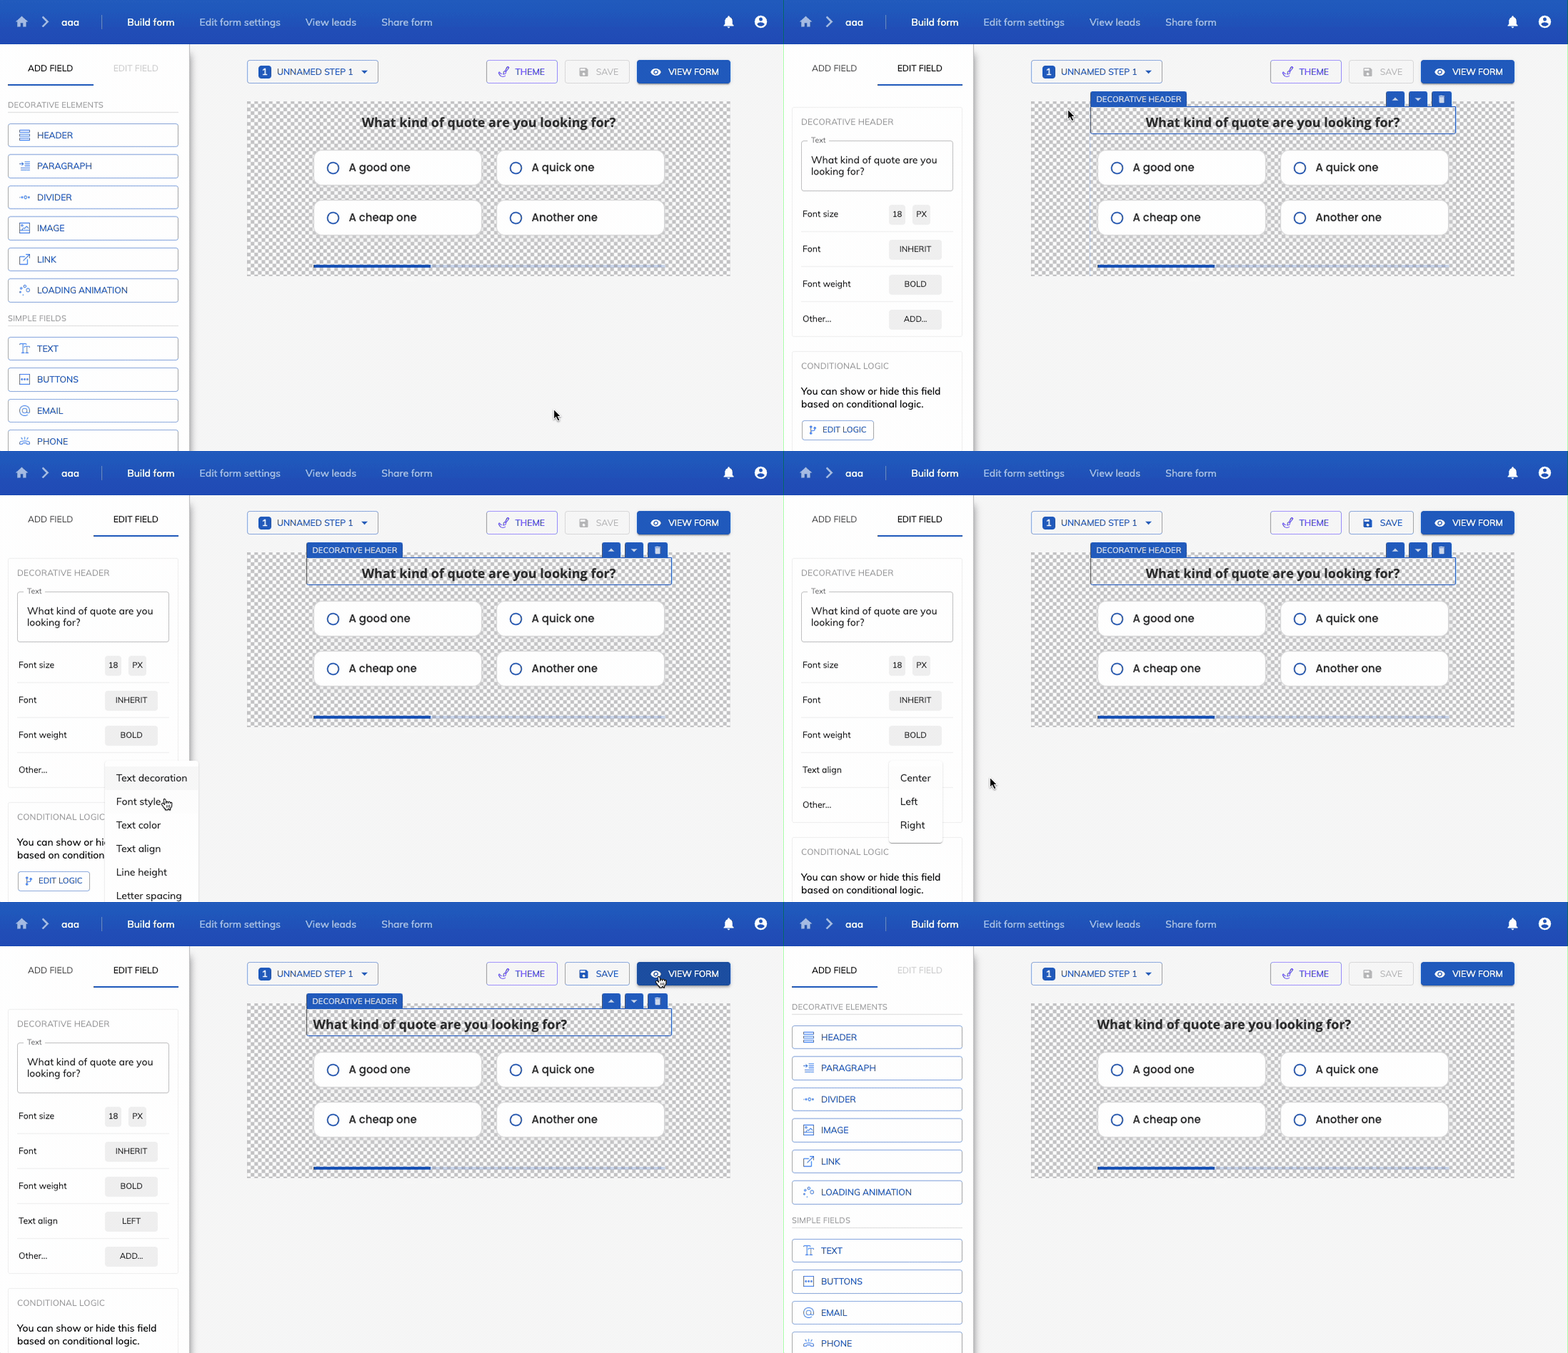
… and we have a perfect form:

Adding Growform forms to popup pages
If you wish to use GoHighLevel’s popup functionality, you can add a form to these pop-ups also! This is a good way of adding multiple CTAs throughout your landing page.
To add a form to your popups, simply create the popup as normal in GHL and add a “Custom HTML” widget as per the standard embed instructions above. You’ll see your form embedded in the popup like so:
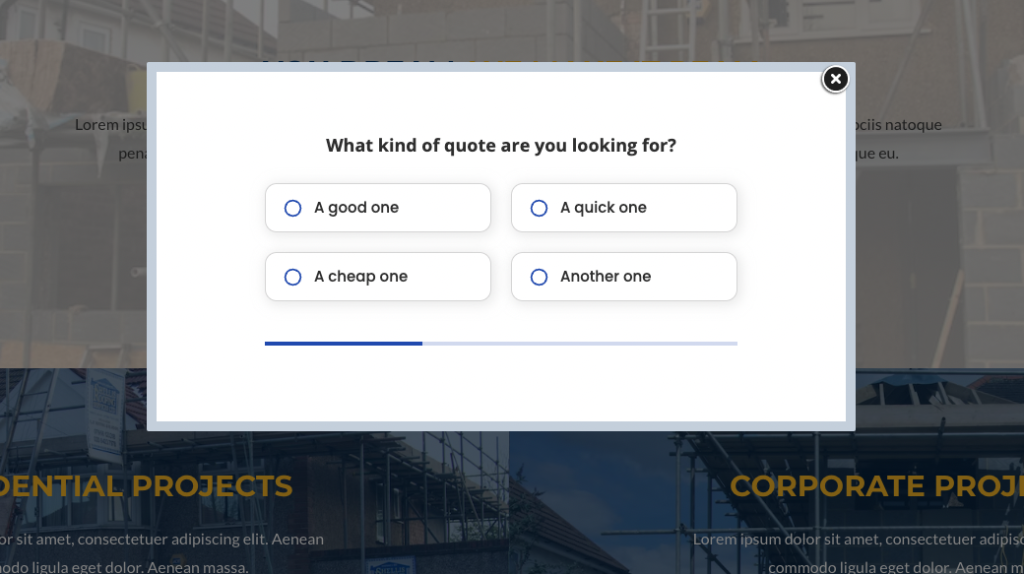
Of course, you can show/hide the popup by choosing a button on your landing page and setting “Show popup” as the action.
Recent Posts
- 6 Essential Mobile Form Design Best Practices for Higher Conversions
- We Review the Best B2B Lead Generation Tools to Supercharge Your Campaigns
- Typeform Pricing: Uncover Hidden Costs & a Better Alternative
- How to Optimize B2B Lead Scoring for Faster Sales Closures
- Here Are the Best Google Forms Alternatives for More Efficient Data Collection
