TrustedForm by ActiveProspect: The Ultimate Guide For 2024
Whether you’ve been asked by a lead buyer to provide lead certification or you’d just like to keep better track of lead origin and compliance, TrustedForm is a great solution.
Lead certification ensures lead buyers or third parties can be sure of the origin of their leads and their legitimacy.
TrustedForm by ActiveProspect is the leading lead certification solution, and has become something of an industry standard.
This comprehensive guide will provide you with an in-depth look at TrustedForm, what it does and how it can be integrated with your form and lead generation process.
Table of Contents
What is TrustedForm by ActiveProspect?
TrustedForm by ActiveProspect is a lead certification solution designed to help businesses verify the origin of their leads, and that consent or TCPA disclosure requirements have been met. This is becoming particularly important with the upcoming 1-to-1 consent rules from the FCC.
It’s often required by a lead buyer when purchasing leads from a lead generation service.
It allows you to provide proof of each lead’s origin by issuing a Trustedform certificate, which also proves that the necessary consents were obtained.
How TrustedForm works and key concepts
The TrustedForm certificate lifecycle can be summarised as follows:
- A user visits a form with TrustedForm enabled
- A certificate is issued automatically by TrustedForm
- The certificate claim URL is saved alongside the lead data
- The certificate can be accessed via its certificate claim URL
- The certificate can be claimed via the TrustedForm API or CRM integration
Issuing a certificate
TrustedForm provides a JavaScript snippet that must be placed on the same page as an online form, where customer data is collected.
This code allows TrustedForm to analyze the lead submission process in real-time and issue a TrustedForm Certificate.
The TrustedForm certificate acts as proof of origin, authenticity and compliance and contains valuable information about the lead, such as their IP address, browser, timestamp, and more.
With the TrustedForm code in place, a certificate is automatically issued for every lead, and should be stored along with other lead data:
Accessing a TrustedForm certificate
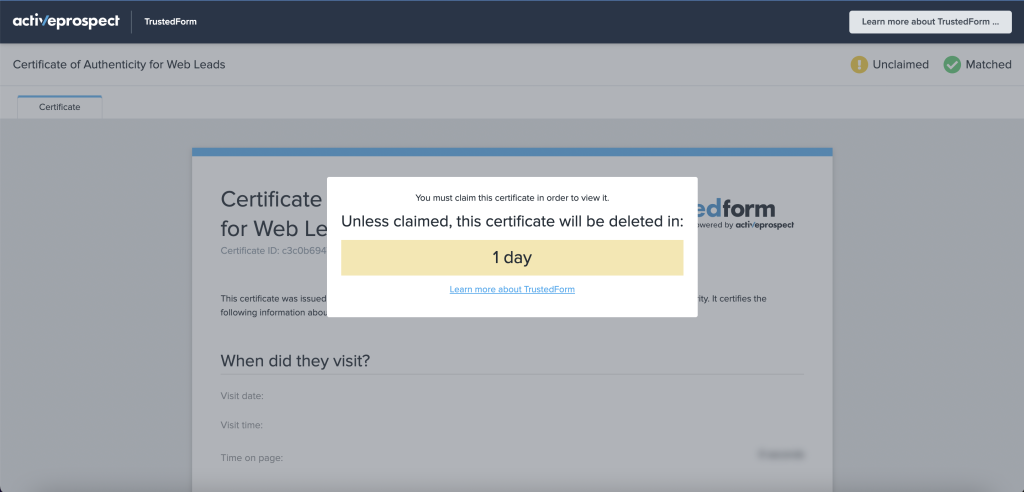
With the certificate claim URL saved alongside the lead information, it’s possible to access a very limited amount of information about a particular lead by navigating to this URL:

This URL is generated for every individual lead and is included in the lead data when it’s transmitted to your CRM or lead management system. The certificate URL can be easily shared with third parties to verify lead authenticity and compliance. The TrustedForm certificate contains comprehensive information, including a snapshot of the web page at the time of lead submission, the lead’s consent to terms and conditions, and privacy policies. This information is securely stored on TrustedForm servers and can be accessed at any time through the certificate URL.
Claiming a TrustedForm certificate
Claiming a TrustedForm certificate is the process of linking the certificate to a specific lead buyer, ensuring that the lead information and compliance data are properly attributed.
When a lead is sold or transferred, the lead buyer or recipient is required to claim the TrustedForm certificate using their unique API key.
This process associates the certificate with the buyer and ensures that they can access the compliance information as needed.
It also means the certificate can be retained indefinitely, rather than the standard 3 day retention period of unclaimed certificates.
To claim a TrustedForm certificate, the lead buyer must submit a claim request to the TrustedForm API, providing their API key and the certificate URL.
Many CRMs and lead management systems (such as LeadConduit) offer built-in integrations for claiming TrustedForm certificates – although you’ll usually need a TrustedForm API key to claim a certificate.
Once the claim is successful, the lead buyer will have full access to the certificate details and can use this information to verify the lead’s authenticity and compliance.
Step-by-step guides
The following guides focus on issuing TrustedForm certificates – i.e. integrating a form with TrustedForm so a certificate is issued whenever a user fills it out.
Broadly, there are 2 ways of achieving this:
- [Technical] – Issue TrustedForm certificates with an HTML form: For technical users who have an existing HTML form, value maximum flexibility and have previous coding experience, use this guide.
- [Easy] – How to issue TrustedForm certificates with Growform form builder: Growform is an online form builder with a 1-click TrustedForm integration. If you want to get set up quickly, use this guide.
[Technical] – How to issue TrustedForm certificates with an HTML form
We’ll start with a basic HTML form and implement the TrustedForm script.
By the end of this guide, we’ll have an HTML form that automatically requests a certificate from TrustedForm and submits the certificate URL along with form data.
1) Sign up for a TrustedForm certify account
To get started, you’ll need to sign up for a TrustedForm Certify account here. This will allow you to certify leads.
As this is an ActiveProspect product, you’ll need to create an ActiveProspect account, but it’s free of charge.
2) Grab the TrustedForm JavaScript snippet
Too technical? Try the easy guide instead.
Once you’re signed up, head to this page to grab your JavaScript snippet.
Find “JavaScript snippet”, and copy the code to your clipboard. Ours looks like this:

3) Create a basic HTML form
We’ll create a basic HTML form with just 3 fields for our demonstration:

Here’s the HTML:
<!DOCTYPE html>
<html lang="en">
<head>
    <meta charset="UTF-8">
    <meta name="viewport" content="width=device-width, initial-scale=1.0">
    <title>Simple Form</title>
</head>
<body>
    <h1>Simple Form</h1>
    <form action="submit_form.php" method="post">
        <label for="first_name">First Name:</label>
        <input type="text" id="first_name" name="first_name" required><br><br>

        <label for="surname">Surname:</label>
        <input type="text" id="surname" name="surname" required><br><br>

        <label for="phone_number">Phone Number:</label>
        <input type="tel" id="phone_number" name="phone_number" pattern="^\d{10}$" required><br><br>

        <input type="submit" value="Submit">
    </form>
</body>
</html>
4) Paste the JavaScript snippet into your HTML document
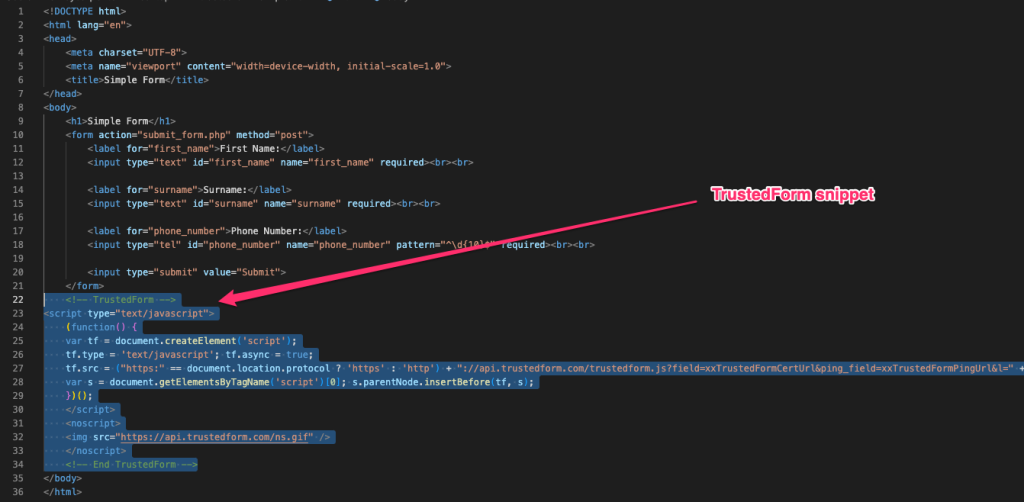
Now, paste the JavaScript snippet before the </body> tag, but after your form.
Here’s how it looks in our example:

5) Flag sensitive fields
With the script in place, add a “tf-sensitive” attribute to any sensitive fields you do not wish to appear in the certificate.
To mark a field sensitive, add the property with a “data-tf-sensitive=’true'” attribute.
Here’s how this looks on our form, making the phone field considered sensitive:

6) Inspect your form to check hidden fields are generated properly
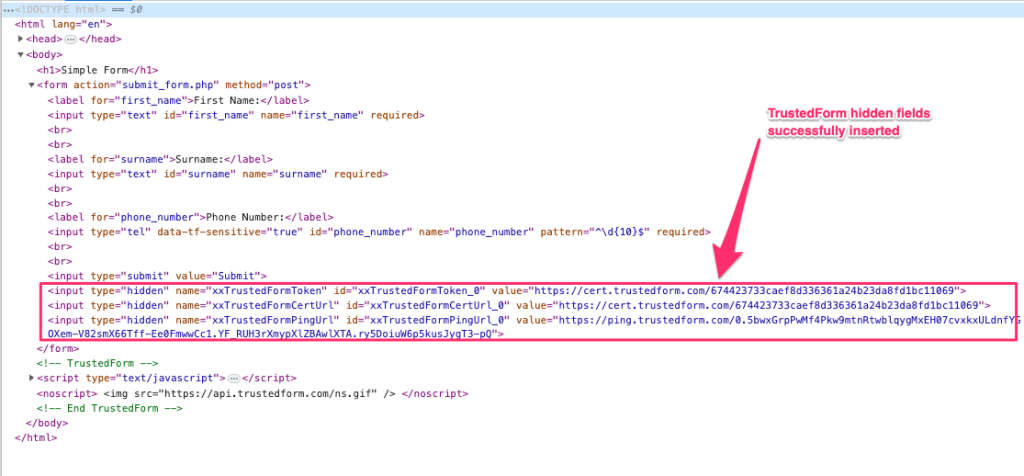
If implemented correctly, the TrustedForm snippet should have automatically added 2 hidden field inputs to our form: “xxTrustedFormCertUrl” and “xxTrustedFormPingUrl”.
Use Chrome’s developer tools to inspect the form and verify that these have been properly created:

7) Ensure your backend saves the TrustedForm hidden fields
So far, we’ve successfully used the TrustedForm script to generate the hidden fields and send the data along with our form data – but we also need to ensure it’s saved alongside our lead information.
This process will vary significantly depending on your backend, but we’ve provided a PHP example below that saves the above mentioned fields as well as the additional TrustedForm hidden fields:
<?php
$servername = "localhost";
$username = "your_database_username";
$password = "your_database_password";
$dbname = "your_database_name";

// Create connection
$conn = new mysqli($servername, $username, $password, $dbname);

// Check connection
if ($conn->connect_error) {
    die("Connection failed: " . $conn->connect_error);
}

// Get form data
$first_name = $_POST['first_name'];
$surname = $_POST['surname'];
$phone_number = $_POST['phone_number'];
$xxTrustedFormCertUrl = $_POST['xxTrustedFormCertUrl'];
$xxTrustedFormPingUrl = $_POST['xxTrustedFormPingUrl'];

// Insert form data into the MySQL database
$sql = "INSERT INTO form_data (first_name, surname, phone_number, xxTrustedFormCertUrl, xxTrustedFormPingUrl)
VALUES ('$first_name', '$surname', '$phone_number', '$xxTrustedFormCertUrl', '$xxTrustedFormPingUrl')";

if ($conn->query($sql) === TRUE) {
    echo "New record created successfully";
} else {
    echo "Error: " . $sql . "<br>" . $conn->error;
}

// Close the connection
$conn->close();
?>
[Easy] – How to issue TrustedForm certificates with Growform form builder
Growform is an online form builder, designed specifically to generate more leads. It’s used by lead generation professionals to easily build attractive forms, and includes a 1-click TrustedForm integration.
To see what the end result looks like, check out our TrustedForm demo form.
To use TrustedForm with Growform:
1) Sign up for a TrustedForm certify account
You’ll need to sign up for a TrustedForm Certify account here. This will allow you to certify leads.
As this is an ActiveProspect product, you’ll need to create an ActiveProspect account, but it’s free of charge.
2) Sign up for a Growform account
Create a Growform account here. There’s a free 14 day trial with no credit card required.
3) Create your form
To create a simple form, hit “Create new form”, and choose a template to get started with (the blank template is a good place to start).
Using the form builder is straightforward, but if you need more help, there’s documentation here.
3) Activate the TrustedForm integration
To activate the TrustedForm integration in Growform, navigate to “Edit form settings”, then the “tracking & tagging” tab. Find “TrustedForm” and toggle it to enabled.
Be sure to hit “Save form settings”.
4) Collect some leads, complete with certificate URLs!
Finally, test your form by heading back to the form builder and hitting “View form”.
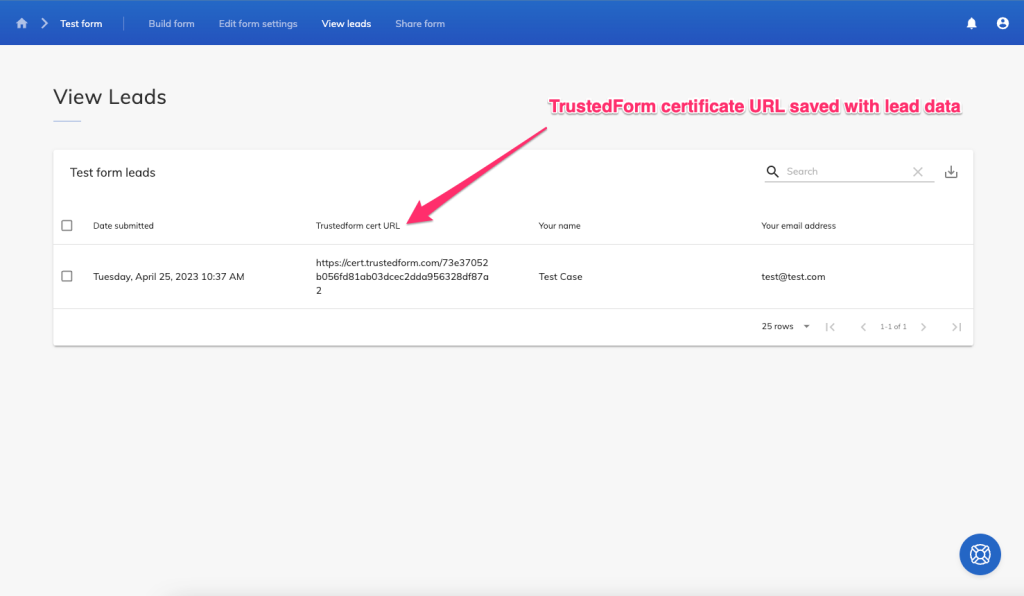
Once you’ve submitted a test lead, you’ll see the usual columns in the form results, as well as the TrustedForm certificate URL:

With the certificate URL now saved alongside the lead information, you can now use Growform’s Zapier integration to send the lead data to 300+ destinations, such as a CRM or system that will ultimately claim the certificate.
Troubleshooting common issues with TrustedForm
Here are some common issues you may encounter when using TrustedForm and how to troubleshoot them:
- TrustedForm Certificate not being generated: If you followed the HTML guide and are not receiving a TrustedForm Certificate upon form submission, check your form’s code to ensure the TrustedForm JavaScript and data attributes have been added correctly. Also, verify that your form is configured to send the TrustedForm Certificate upon submission.
- TrustedForm Video Replay not working: If the video replay feature isn’t working, check that the TrustedForm JavaScript has been added to your form correctly and that you have enabled video replay in your TrustedForm account settings.
- Outdated browser compatibility: Ensure that the browser you’re using supports the TrustedForm JavaScript. Some older browsers may not be fully compatible, causing issues with certificate generation.
- API integration issues: If you’re experiencing issues with the TrustedForm API, double-check your API credentials and ensure you’re using the correct API endpoints, as specified in the TrustedForm documentation.
- Form tags in incorrect order: The TrustedForm JavaScript snippet needs to be placed before the closing </body> tag, but after the form on your page – otherwise, TrustedForm will not be able to detect your form.
- Trouble with custom HTML forms? Try the easy integration instead of using the JavaScript snippet.
Recent Posts
- We List 9 Landing Page Best Practices to Maximize Conversions
- We Review the Best Lead Qualification Tools to Identify High-Intent Prospects
- We Breakdown 5 Lead Magnet Landing Page Examples (Plus Actionable Tips)
- Our Top Picks for Real Estate Lead Generation Companies to Boost Your Business
- How To Send Conversions To Facebook/Meta via Conversion API (CAPI)
