Master Conditional Logic Forms: A How-To Guide with Examples
There’s nothing worse than a boring, repetitive form that feels completely irrelevant.
With conditional logic forms, you’ll be able to supercharge your data collection, creating an interactive and personalized experience for your users.
No longer will every user have the exact same experience – instead, you can hide irrelevant questions, ask more questions when relevant, or even introduce entire steps based on previous responses.
In this complete guide, we’ll explore the ins and outs of conditional logic forms.
We’ll learn why they’re important, best practices – and of course, how to create your very own!
Table of Contents
What is a conditional logic form?
Conditional logic forms are web forms that change and adapt to user input.
They let you create personalized experiences by showing or hiding specific form fields, steps, or even different thank-you pages based on the answers provided by users.
This makes your forms more engaging, user-friendly, and efficient – making each visitor more likely to result in a form submission, leading to higher conversion rates and better data collection.
For example, if your user tells you they want ice cream, you could ask them which flavour they want:
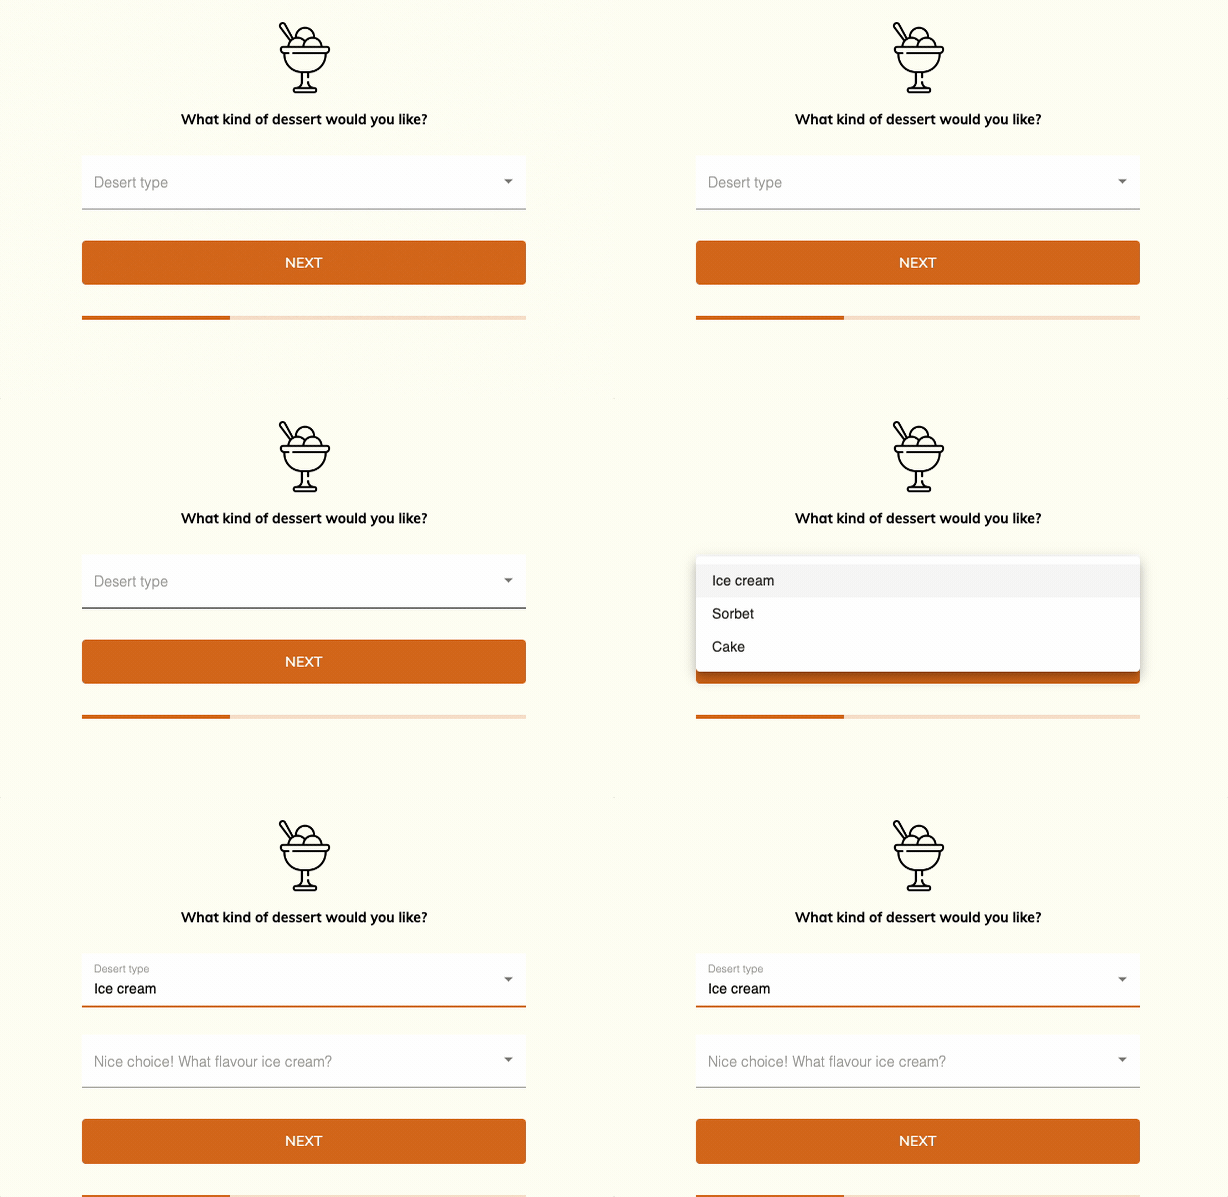
It’s also possible to show or hide entire steps based on previous responses – for example, we could add a whole step called “Customize your ice cream” – and enable conditional logic so it only shows when users choose “Ice cream!”.
Finally, you could send users to a completely different thank-you page based on their selection. Since different thank-you pages can have different tracking pixels on, this gets pretty powerful in the ad buying world!
What is conditional logic and how does it work?
Conditional logic, also known as form logic or logic jumps, is a set of rules and conditions that determine the behavior of a form based on user input. Conditional logic is basically a way of saying: “If this happens, do that”.
Conditional logic works like this: You define conditions like “If the user says X”, and add logic like “Show this step instead of that step”.
And vs or logic
Conditional logic rules can be based on “and” or “or” logic. “And” logic requires that all conditions are met for the rule to apply, while “or” logic requires that at least one of the conditions is met.
For example, consider a simple form that asks users for their age and whether they are students:

If you wanted to show a specific field only to users who are both over 18 years old and students, you would use “and” logic:

On the other hand, if you want to show the field to users who are either over 18 years old or students, you would use “or” logic:

The end result is we can show the form element based on the above like so:

Understanding the difference between “and” and “or” logic is crucial for designing effective conditional logic forms, as it allows you to create more complex and dynamic experiences for your users.
The benefits of using forms with conditional logic
There are several advantages to using conditional logic forms, including:
- Improved user experience: Conditional logic forms are more engaging and user-friendly, as they only display relevant fields and steps based on user input. This reduces the likelihood of users abandoning the form due to confusion or frustration, ultimately leading to higher conversion rates.
- Increased form completion: By only showing necessary fields, conditional logic streamlines the form-filling process, making it quicker and easier for users to complete. This increases the likelihood of users providing the information you need.
- Higher data quality: Conditional logic forms can help you collect more accurate and relevant data by guiding users through the form and ensuring they only see and complete the fields that are applicable to them.
- Reduced form abandonment: By making your forms more user-friendly and efficient, conditional logic can help reduce form abandonment rates, leading to more successful conversions.
Anecdotally, we’ve seen significant increases in conversion rates (as hearing plenty of positive feedback!) after enabling conditional logic, due to the more conversational feel it provides.
Conditional logic form examples
Now that we understand what conditional logic is and its benefits, let’s take a look at some examples to see how it works in practice.
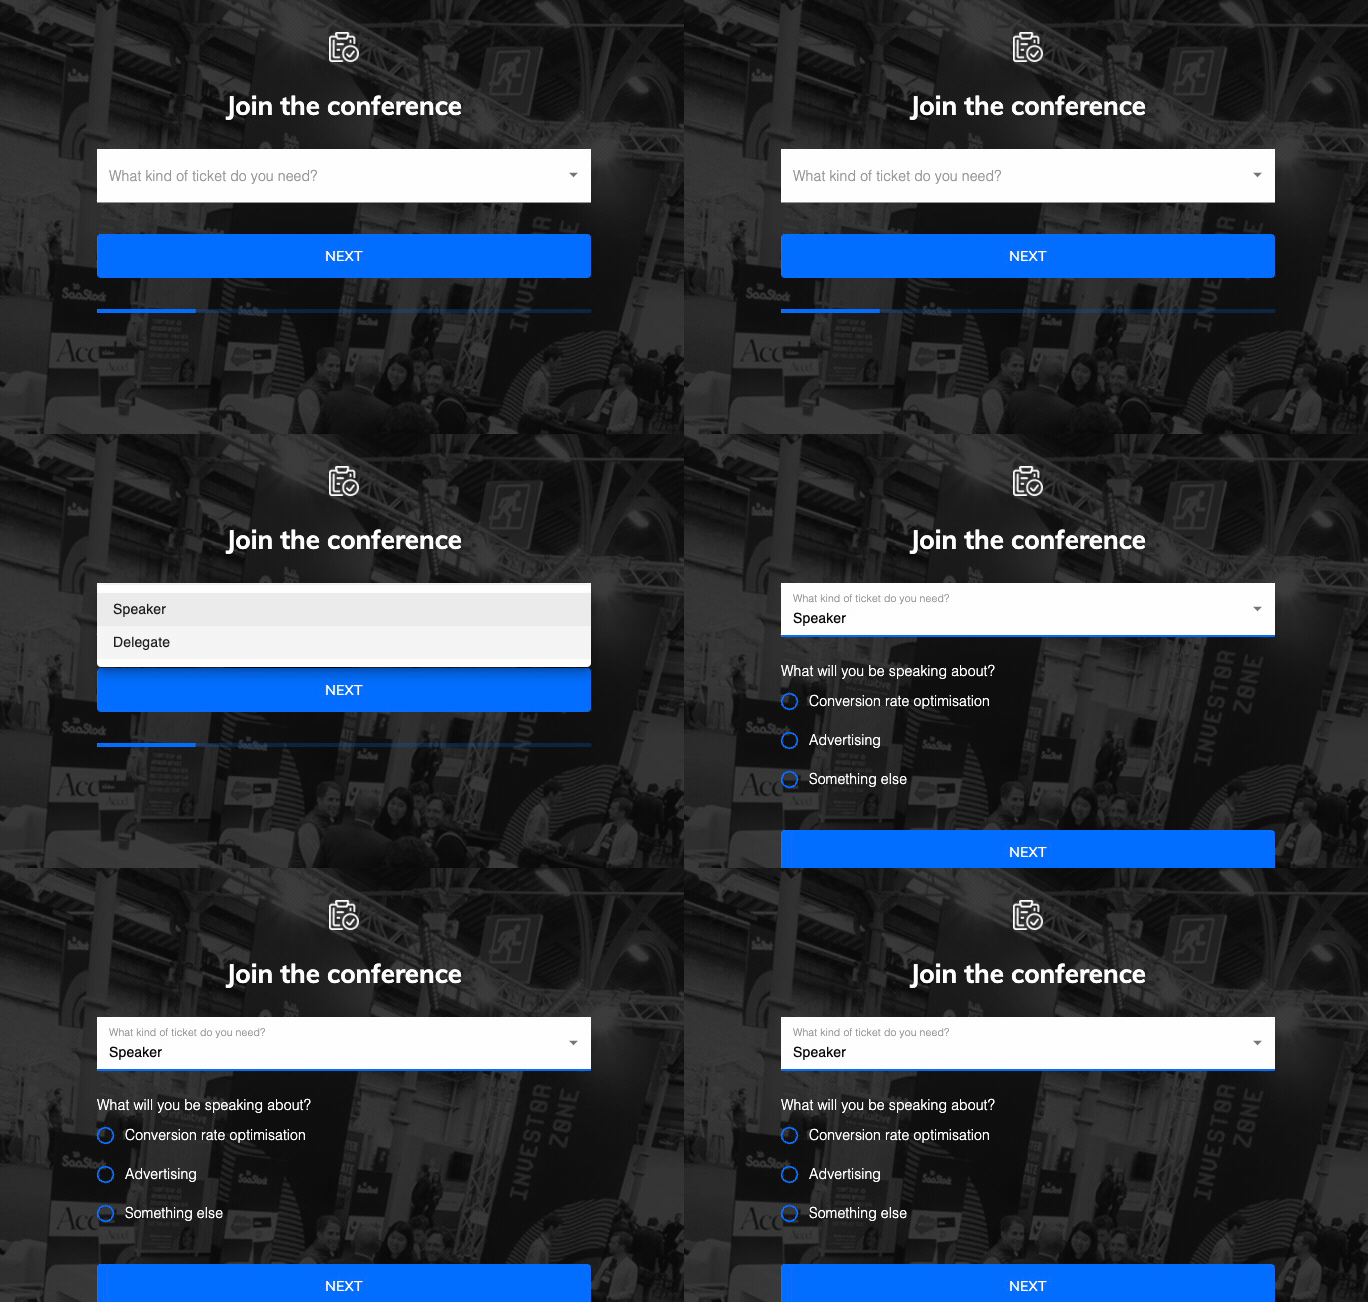
1) Event registration forms: Conditional logic can be used to show or hide fields related to specific event types, ticket options, or additional services based on the user’s selections. This makes the registration process more personalized and efficient:
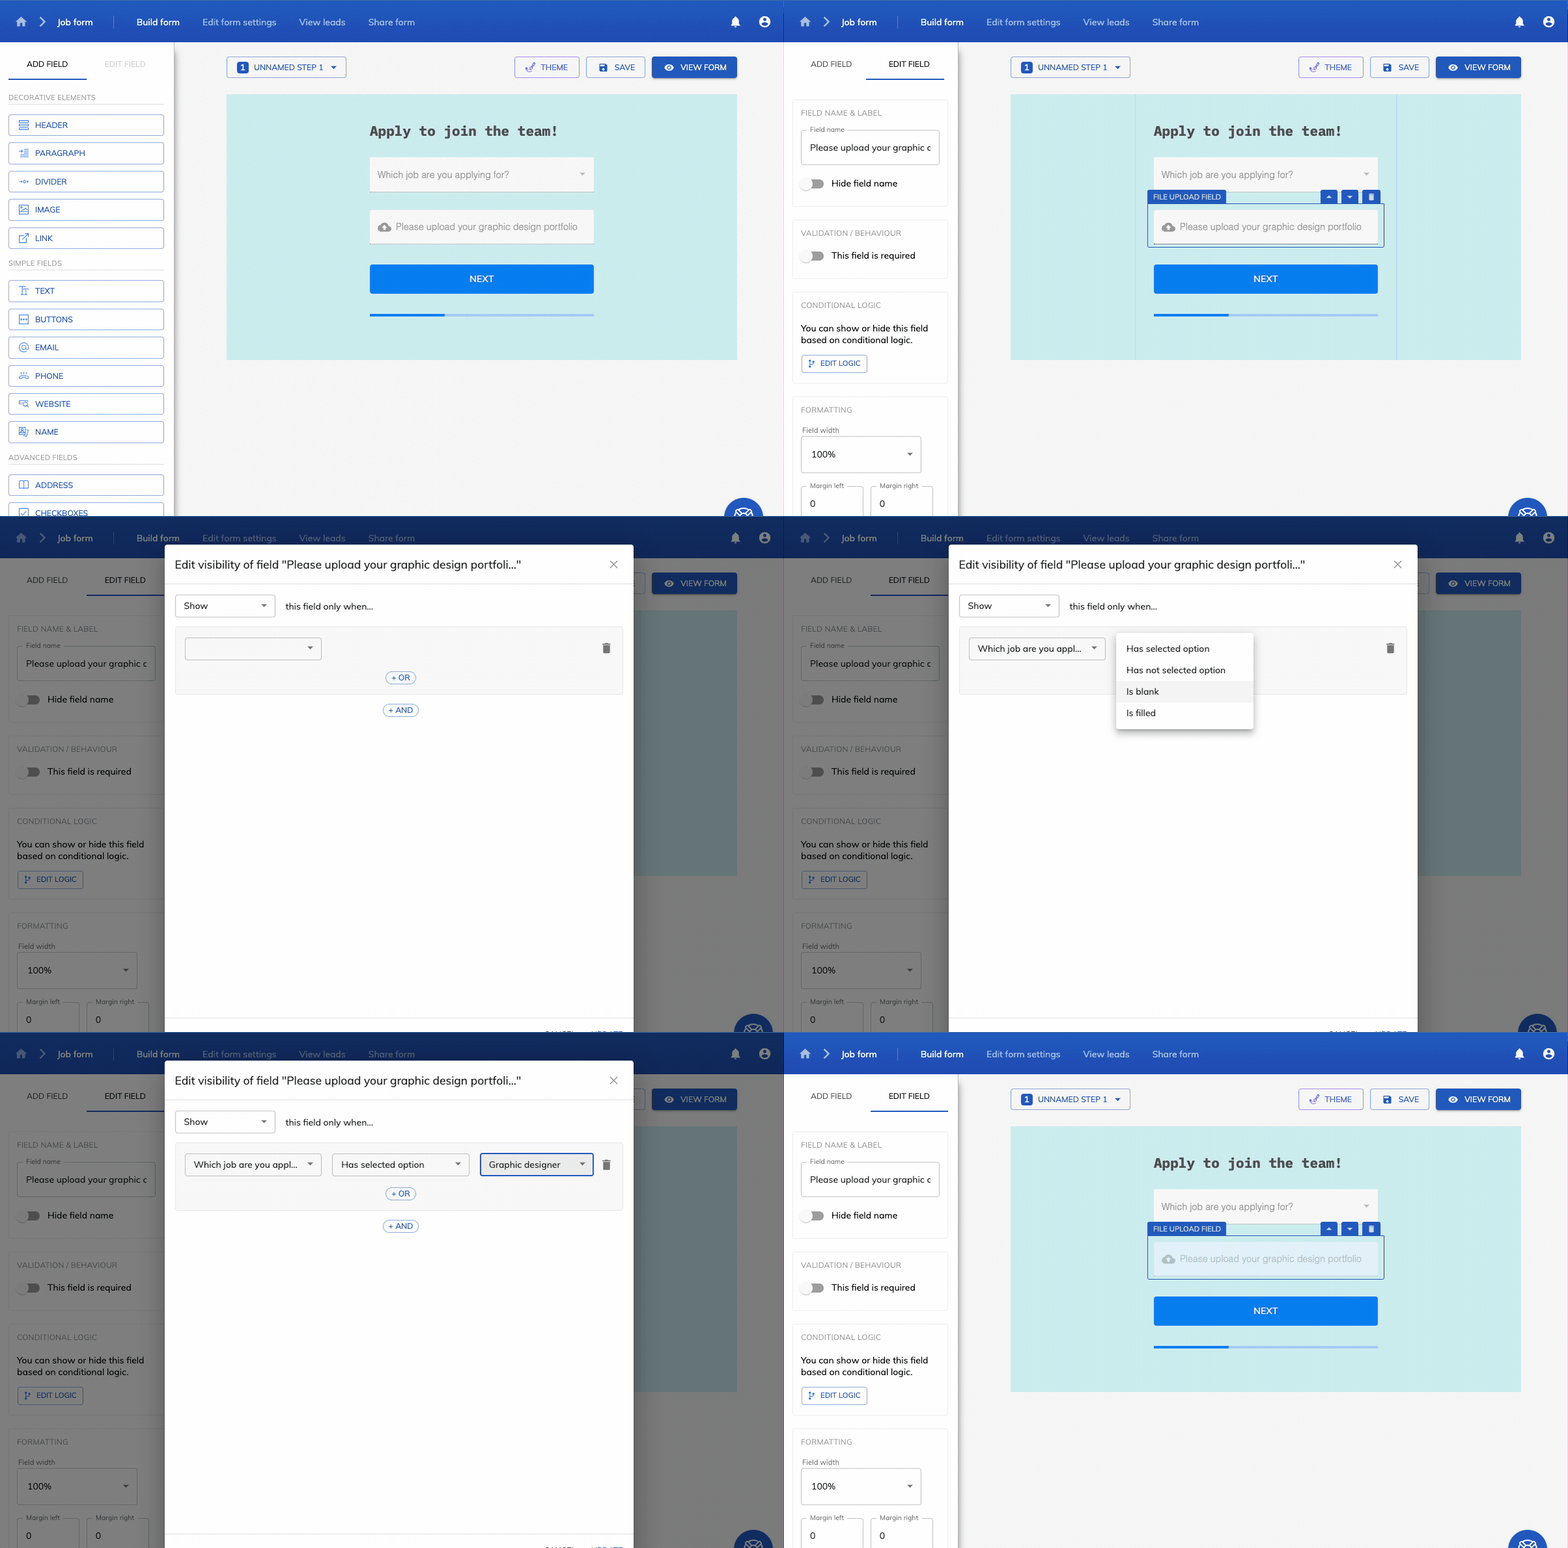
2.) Job application forms: You can use conditional logic to show or hide fields related to specific job positions, qualifications, or requirements based on the user’s inputs.
This ensures that applicants only provide the information that is relevant to the position they are applying for. In this example, we’ll ask the user for their graphic design portfolio, but only if they’re a graphic designer:

3.) Surveys and questionnaires: Conditional logic can be used to create dynamic surveys that adapt to the user’s answers, showing or hiding follow-up questions based on their responses. This makes the survey-taking experience more engaging and efficient, while also ensuring that you collect more relevant and accurate data.
The 3 types of conditional logic
When designing conditional logic forms, there are three main types of logic you can apply:
1. Show/hide entire steps:
This type of logic allows you to show or hide an entire section or step of the form based on the user’s input:

This is useful for multi-step forms or when you have a large number of fields that depend on a specific response.
2. Show/hide individual fields:
This type of logic allows you to show or hide individual form fields based on user input:

This is useful for creating more personalized and dynamic forms without overwhelming users with unnecessary fields.
3. Different thank-you pages:
Conditional logic can also be used to display different thank-you pages based on the user’s input. This allows you to provide more personalized and targeted messaging, such as special offers, recommendations, or follow-up actions based on the user’s responses.
Tips for designing effective and user-friendly conditional logic forms
To make the most of conditional logic forms, keep these tips in mind:
- Keep it simple: Avoid creating overly complex forms with too many conditions and rules, as this can be confusing for users and difficult to manage. Stick to the most essential conditions and fields to provide a streamlined and user-friendly experience.
- Test your forms: Thoroughly test your forms to ensure that the conditional logic rules work as intended and that users can complete the form without encountering any issues or confusion.
- Use clear and concise language: Make sure your form fields, labels, and instructions are clear, concise, and easy to understand. This ensures that users know exactly what information they need to provide and how to complete the form.
- Provide help and support: Include help text or tooltips in your forms to guide users through the process and address any potential questions or concerns.
Step-by-step guide to creating a basic conditional logic form
First, sign up for Growform: If you don’t already have an account, visit Growform to get a free 14 day free trial.
Once you’ve created an account, hit “Create new form” and choose a template that suits you:
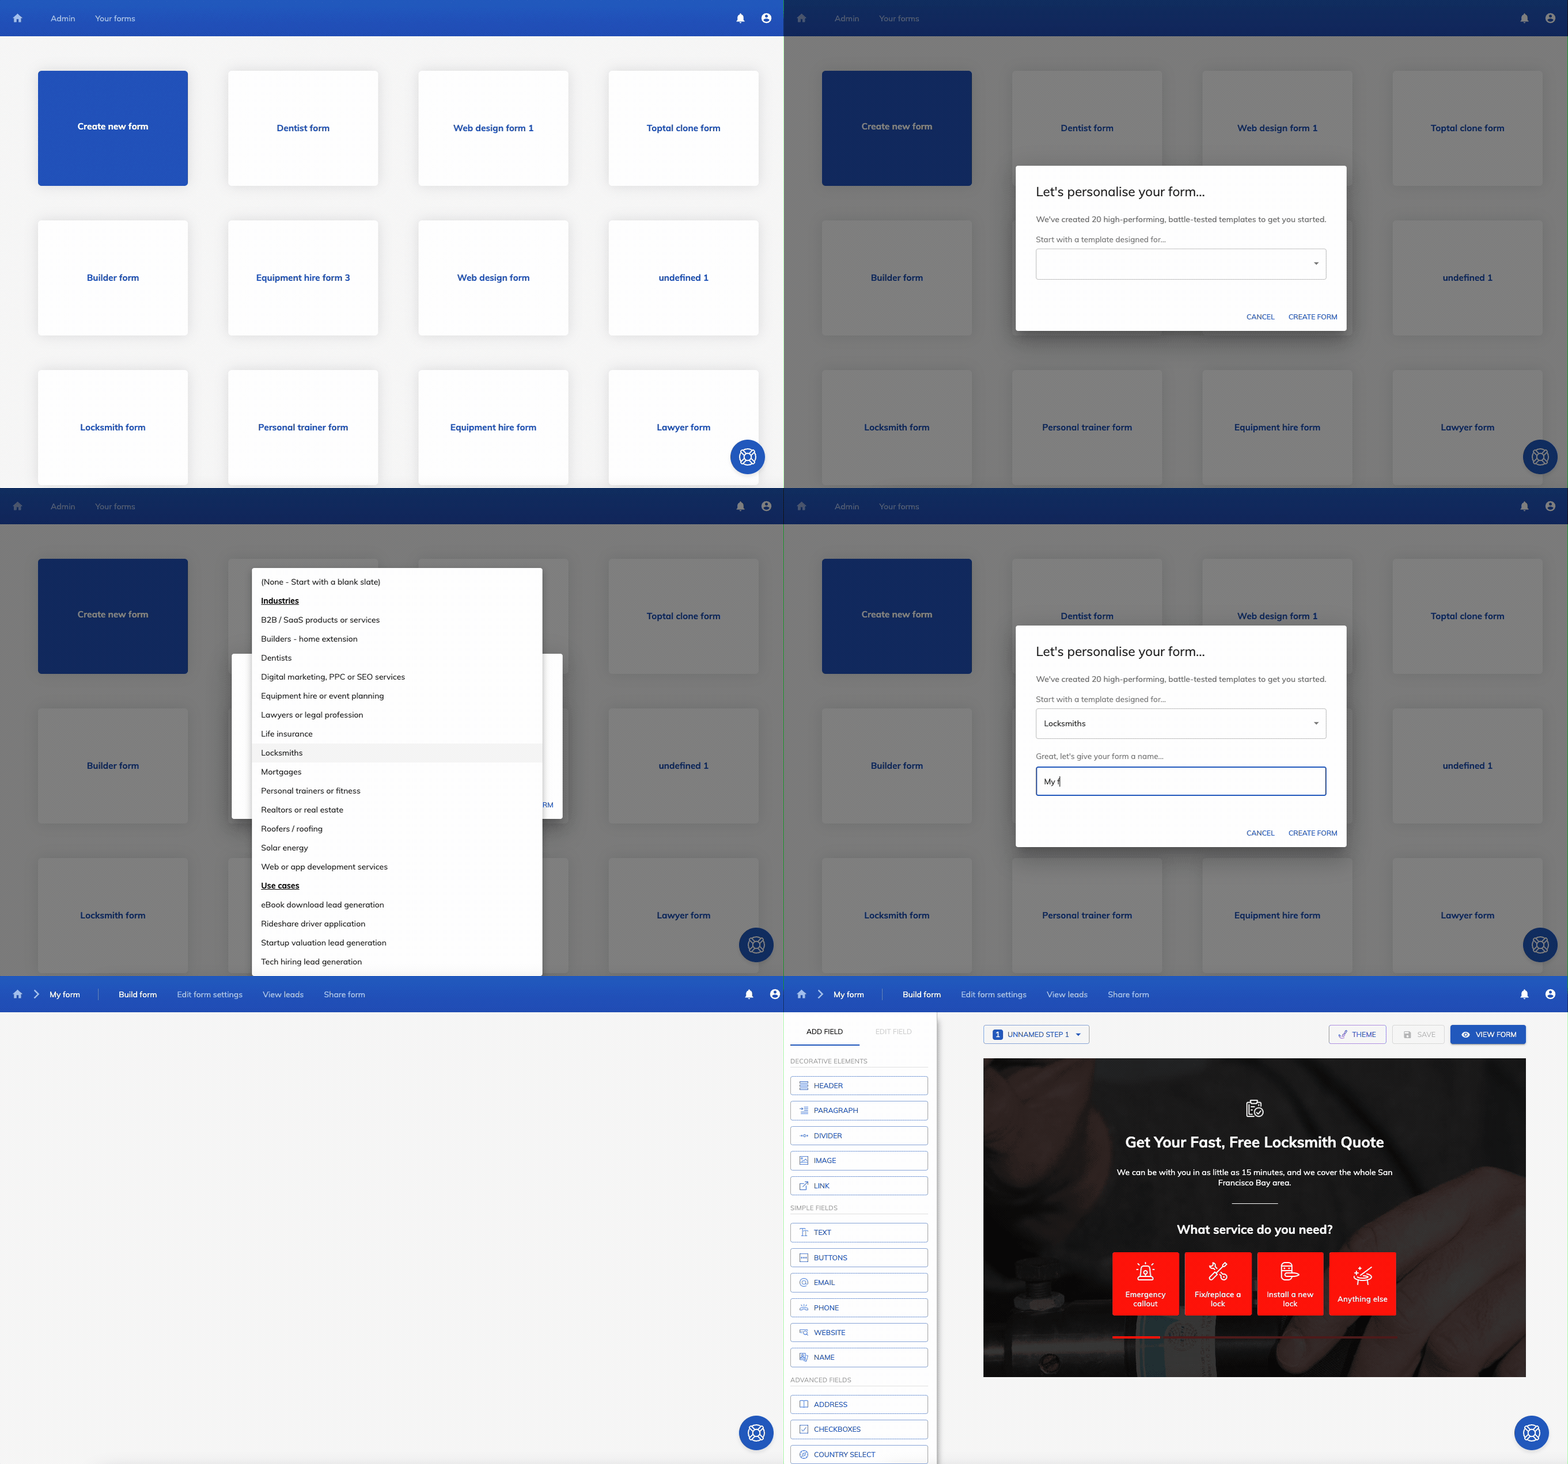
In this example, we’ll choose “Locksmiths”.
Add conditional logic to a step: In this example, we’ll make step 2 show only if the user selects “Install a new lock” in step one. Open the step dropdown, hit “Edit steps” and then “Edit conditional logic” on the second step:
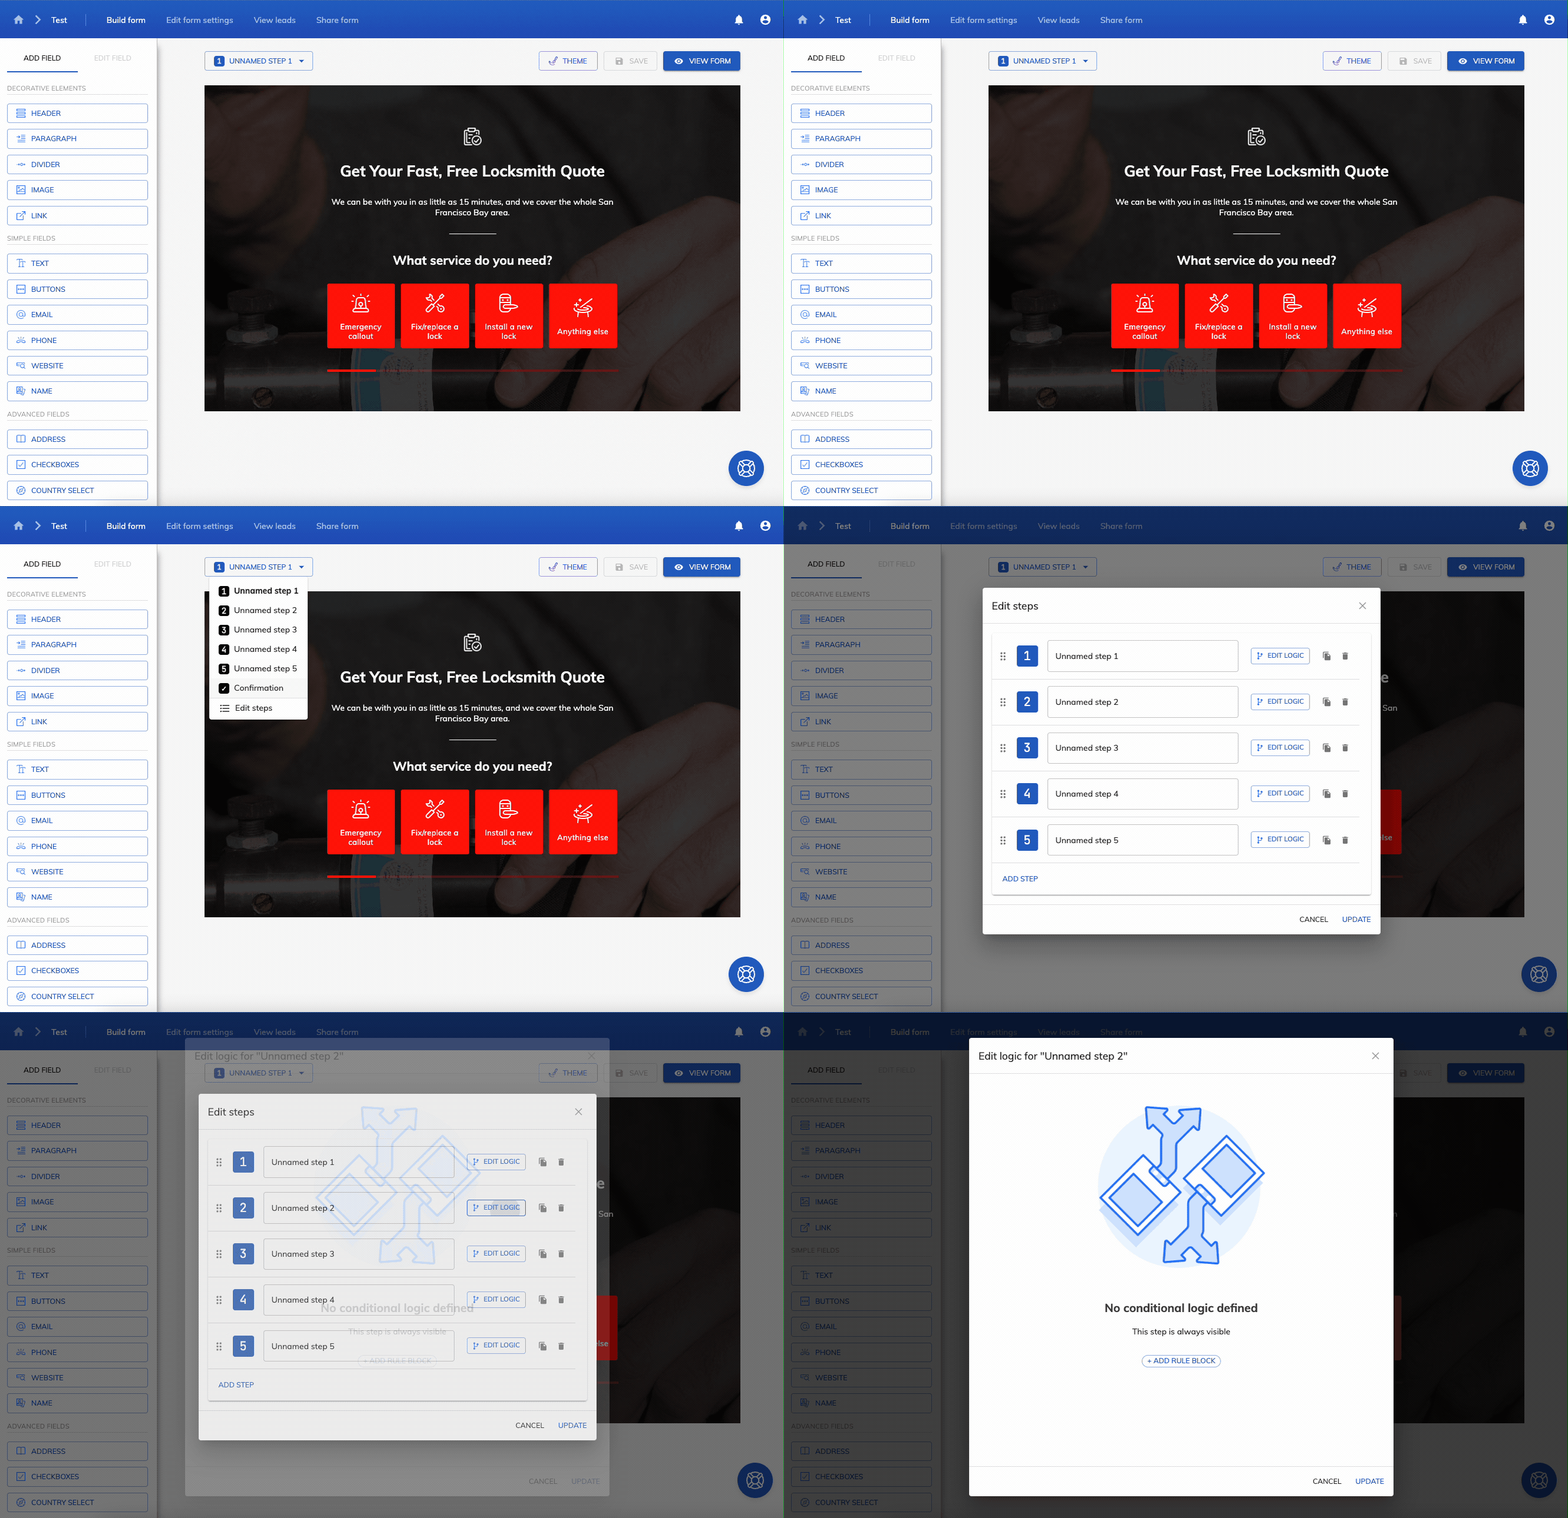
Then, let’s add some conditional logic to this step, so it only shows when the user selects “Install a new lock”. Here, we choose “What service do you need?” > “Has selected option” > “Install a new lock”, before hitting update:

That’s it! We’ve successfully set the second step to only show on certain answers:

Finally, let’s show or hide a field based on conditional logic.
To do this, find the relevant field and hit “Edit logic”:
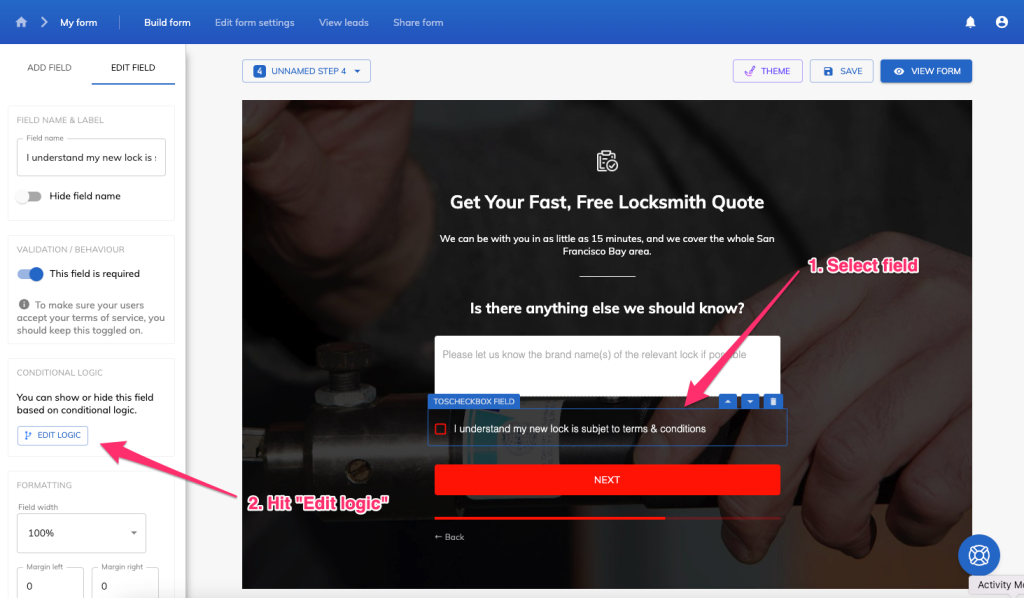
Then, follow the exact same steps as before: choose the relevant field and scenario you’d like this field to be shown:

That’s it! We’ve successfully created a form that shows/hides an entire step, as well as an individual field with conditional logic.
Troubleshooting your conditional logic form
If you encounter issues with your conditional logic form, consider the following troubleshooting steps:
- Check your conditions and rules: Ensure that you apply conditional logic rules correctly and conditions are set up with no conflicts or errors.
- Test your form: Test your form thoroughly to identify any issues or areas that may be causing confusion for users.
- Review user feedback: Pay attention to user feedback and complaints, as these can help you identify issueswith your form’s conditional logic and make necessary adjustments.
- Consult support resources: If you’re using a form builder tool, consult their support resources or community forums for guidance on troubleshooting common issues or errors.
- Consider simplifying your form: If your form is overly complex or has too many conditional logic rules, consider simplifying it to streamline the user experience and reduce the likelihood of errors or confusion.
Introducing Growform, the conditional logic form builder that gets you more leads
Growform is a powerful conditional logic form builder, designed to get you more leads.
In fact, it was used to create every example in this guide, and the tool supports every use-case mentioned, including and/or logic that can show or hide individual fields or entire steps:
Growform offers a 14 day free trial, so there’s plenty of time to try out its advanced conditional logic functionality.
Recent Posts
- We List 9 Landing Page Best Practices to Maximize Conversions
- We Review the Best Lead Qualification Tools to Identify High-Intent Prospects
- We Breakdown 5 Lead Magnet Landing Page Examples (Plus Actionable Tips)
- Our Top Picks for Real Estate Lead Generation Companies to Boost Your Business
- How To Send Conversions To Facebook/Meta via Conversion API (CAPI)
