
Meta Conversions API: how to send form conversions to Facebook

Updated Published 12 min read
This guide shows how to send a conversion to Facebook through the Meta Conversions API, usually shortened to CAPI, each time someone submits a Growform form. It uses Zapier, so there is no code to write and no server to run.
The Meta Conversions API is a server-to-server connection that sends conversion events from an advertiser's server, CRM or form tool directly to Meta, so a conversion is recorded even when the Meta Pixel in the visitor's browser is blocked or its cookies are restricted.
Update (October 2026): Meta now deduplicates browser and server events that share an event ID and arrive within 48 hours, scores every server event for match quality out of 10, and treats the Conversions API as its route for offline events as well, with the older Offline Conversions API labeled legacy. Growform's own server-side events for Meta and Google are launching soon. Every step below was checked against Meta's and Zapier's documentation on October 9, 2026.
Why send conversions through the Conversions API?
Browsers block cookies and scripts more than they used to, so Facebook's pixel misses a share of the leads a form produces. In Growform accounts, a gap of 10 to 15% between leads and pixel conversions is normal. The Conversions API lets you track conversions from the server as well, which closes most of that gap.
Meta's advice is to run both. Keep the pixel, send the same events from the server, and let Meta match them to people using customer details such as email address, phone number, IP address and browser user agent. Meta reports how well that matching works as an event match quality score out of 10 for each event name. The score is calculated in real time from which customer information parameters your server sends, how good they are and what share of events match a Meta account, according to Meta's dataset quality documentation.
How Growform sends conversions to Meta
Growform offers three routes to Meta, and they work together.
- Meta Pixel, built in. Paste your pixel ID into the form's tracking settings and Growform fires a browser event for every completed step and every completed form, with a switch to fire only for qualified leads. The Meta Pixel option is part of every plan.
- Zapier or a webhook to the Conversions API, today. Every submission can go to Zapier's Facebook Conversions action, which is the route this guide covers, or to any CAPI tool through a webhook.
- Server-side tracking, coming soon. Growform's own server-side conversion tracking will send each conversion to the Meta Conversions API and to Google from Growform's servers the moment a lead is submitted, with no Zap in between. Until it launches, the Zapier route below does the job.
Whichever route you use, start saving Meta's identifiers with each lead now. Growform's hidden field presets include the Facebook pixel cookie (fbp), the Facebook click ID (fbc) and a unique ID, and all three fill themselves in when the form loads. They come with every plan.
1. Capture IP address and user agent in Growform
First, enable IP address and user agent collection in Growform. The user agent is a standardized description of the visitor's browser (for example, Mozilla/5.0 (Windows NT 10.0; Win64; x64) AppleWebKit/537.36), and the IP address is the Internet equivalent of the visitor's phone number.
Meta requires the user agent for every website event sent through the Conversions API, according to its server event parameters, and the IP address is one of the strongest matching signals you can add. Here is how to switch them on:
- Navigate to your form in Growform
- Hit "Edit form settings"
- Choose "Capture system details"
- Hit "Save form settings"
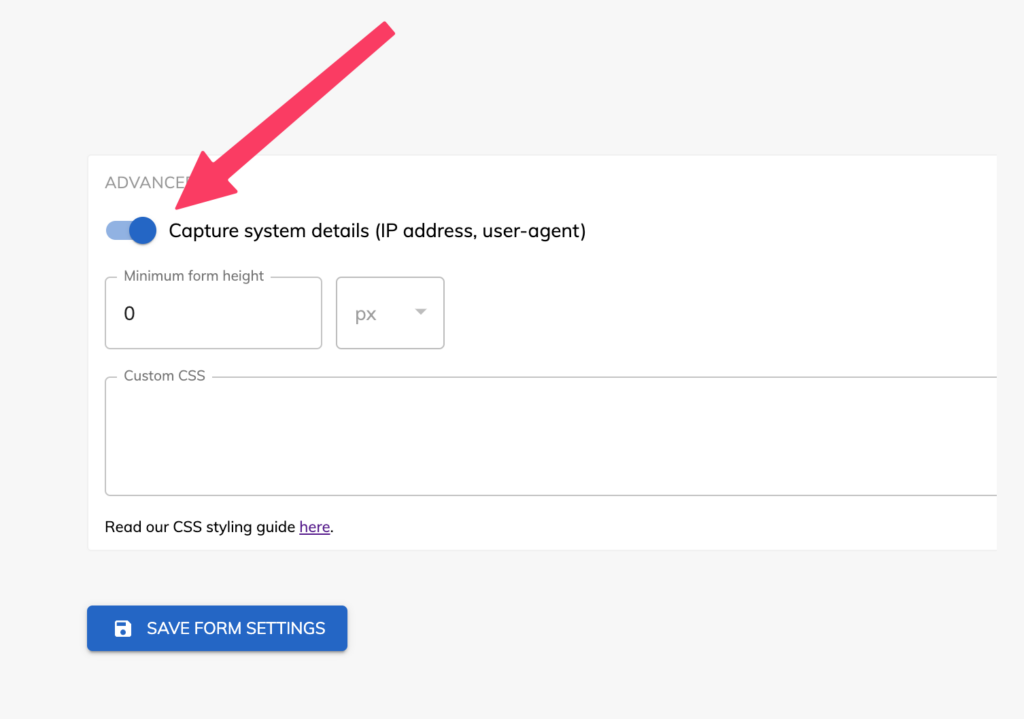
The setting is included on the Professional plan and above. In some jurisdictions you may need the visitor's permission before capturing uniquely identifiable information such as an IP address, so check the rules where your leads live.
With this setting enabled, Growform captures the IP address and user agent with each lead, and both are available alongside the other fields in the next steps.
2. Run a test submission
Once you have enabled IP address and user agent collection, run a test submission. This lets Zapier "see" the new data in the next step.
Test your form by hitting "View form" (or visiting its embed location) and filling it in.
Once you have submitted a lead, you should see the user agent and IP address alongside the other form information on the "View leads" page:
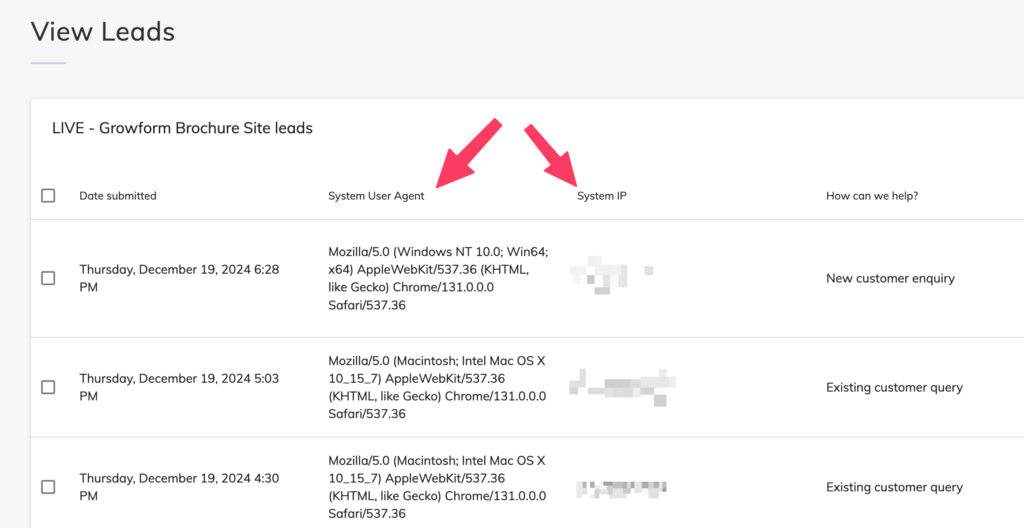
From now on, these fields are selectable in Zapier along with every other field.
3. Create a Zap
Now, log in to Zapier (creating an account if necessary) and hit "Create" to create a new Zap. If you are new to Zapier, we have a guide to using Zapier with Growform.
Set up the Growform trigger, like so:
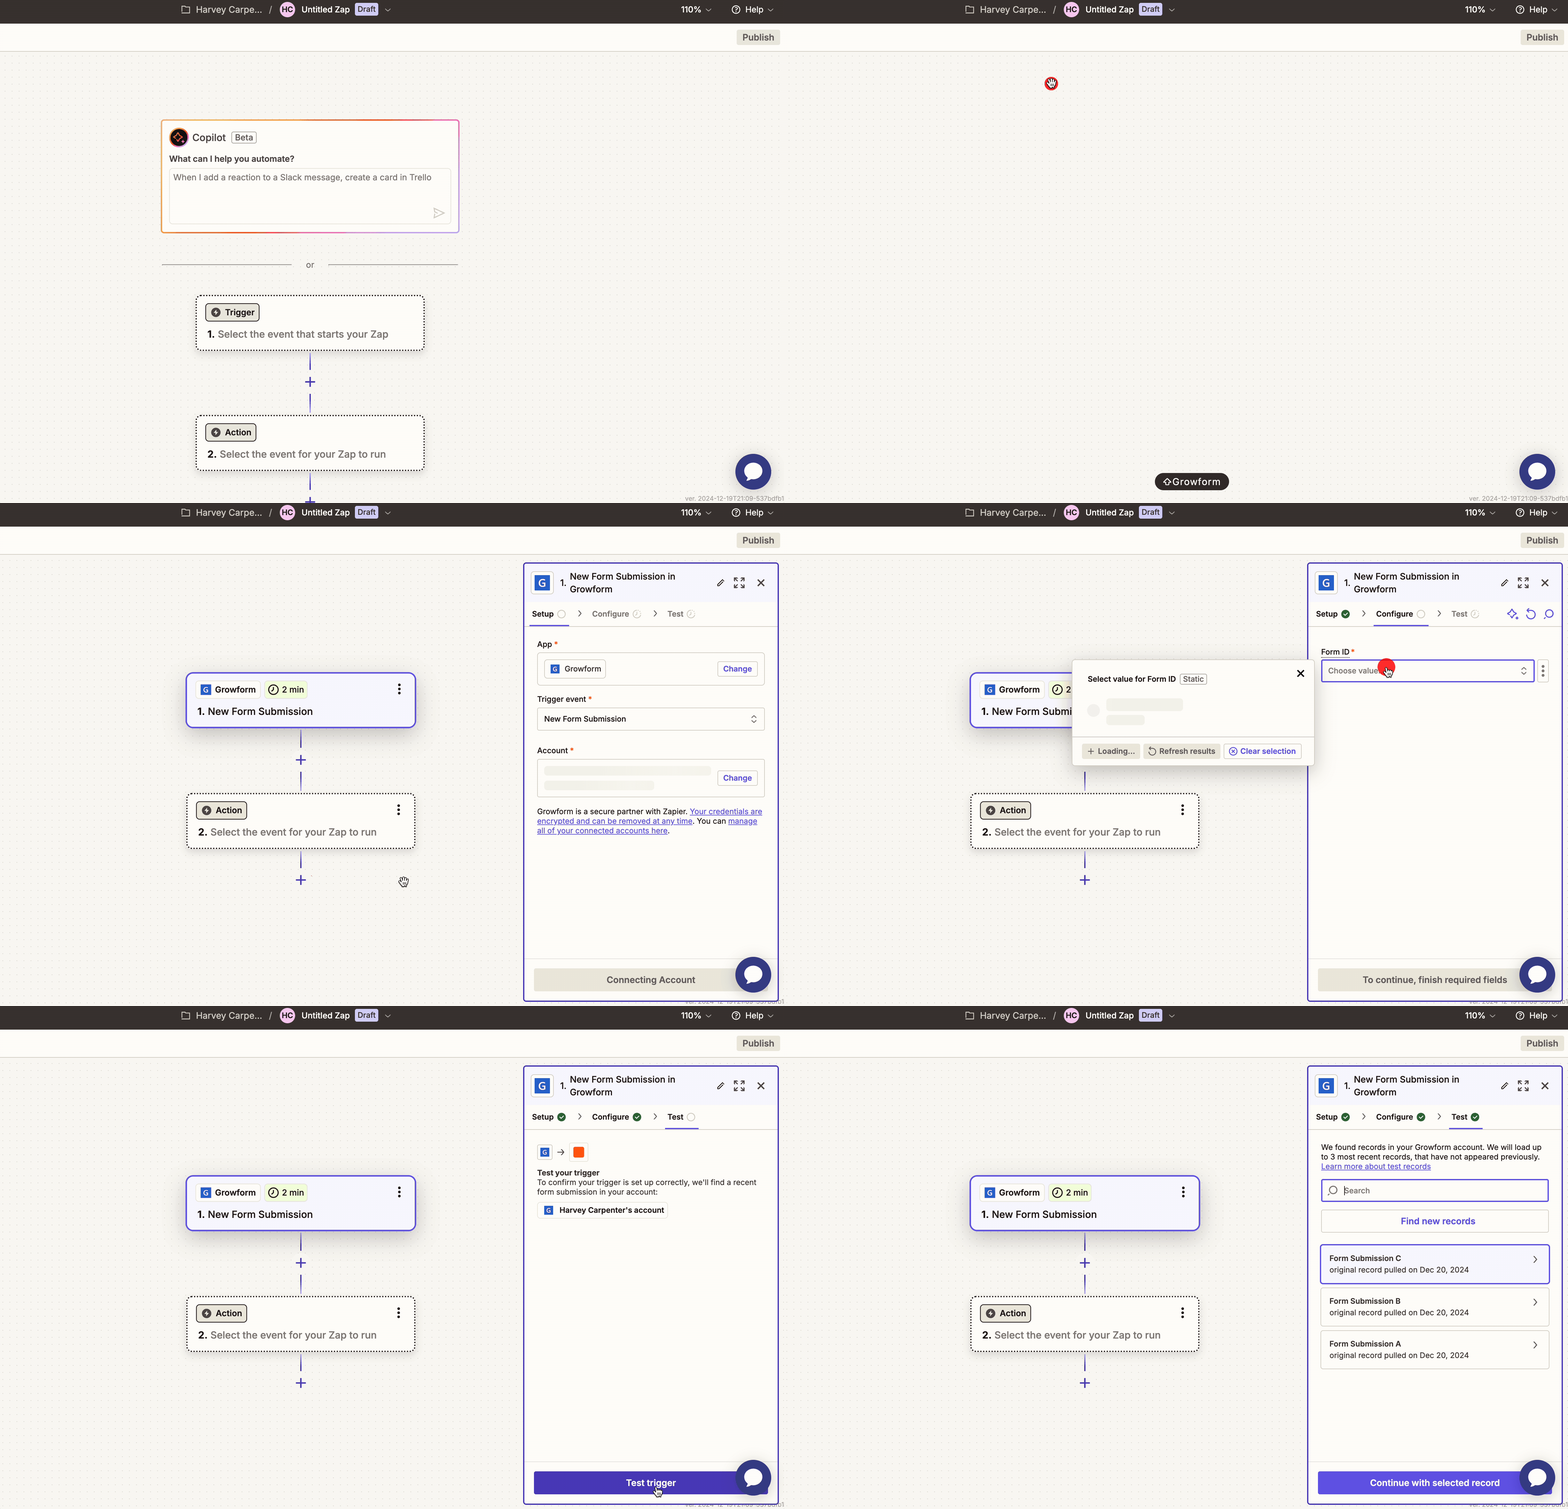
- Set your trigger as Growform
- Set the trigger event as New Form Submission
- Select your Growform account and connect Growform to Zapier if necessary
- Set the Form ID to the relevant form, and hit "Test trigger" to see the last submission in Zapier
Setting up the Facebook / CAPI conversion
Now we have our data from Growform, it is time to send a conversion event to Meta. Here is how:
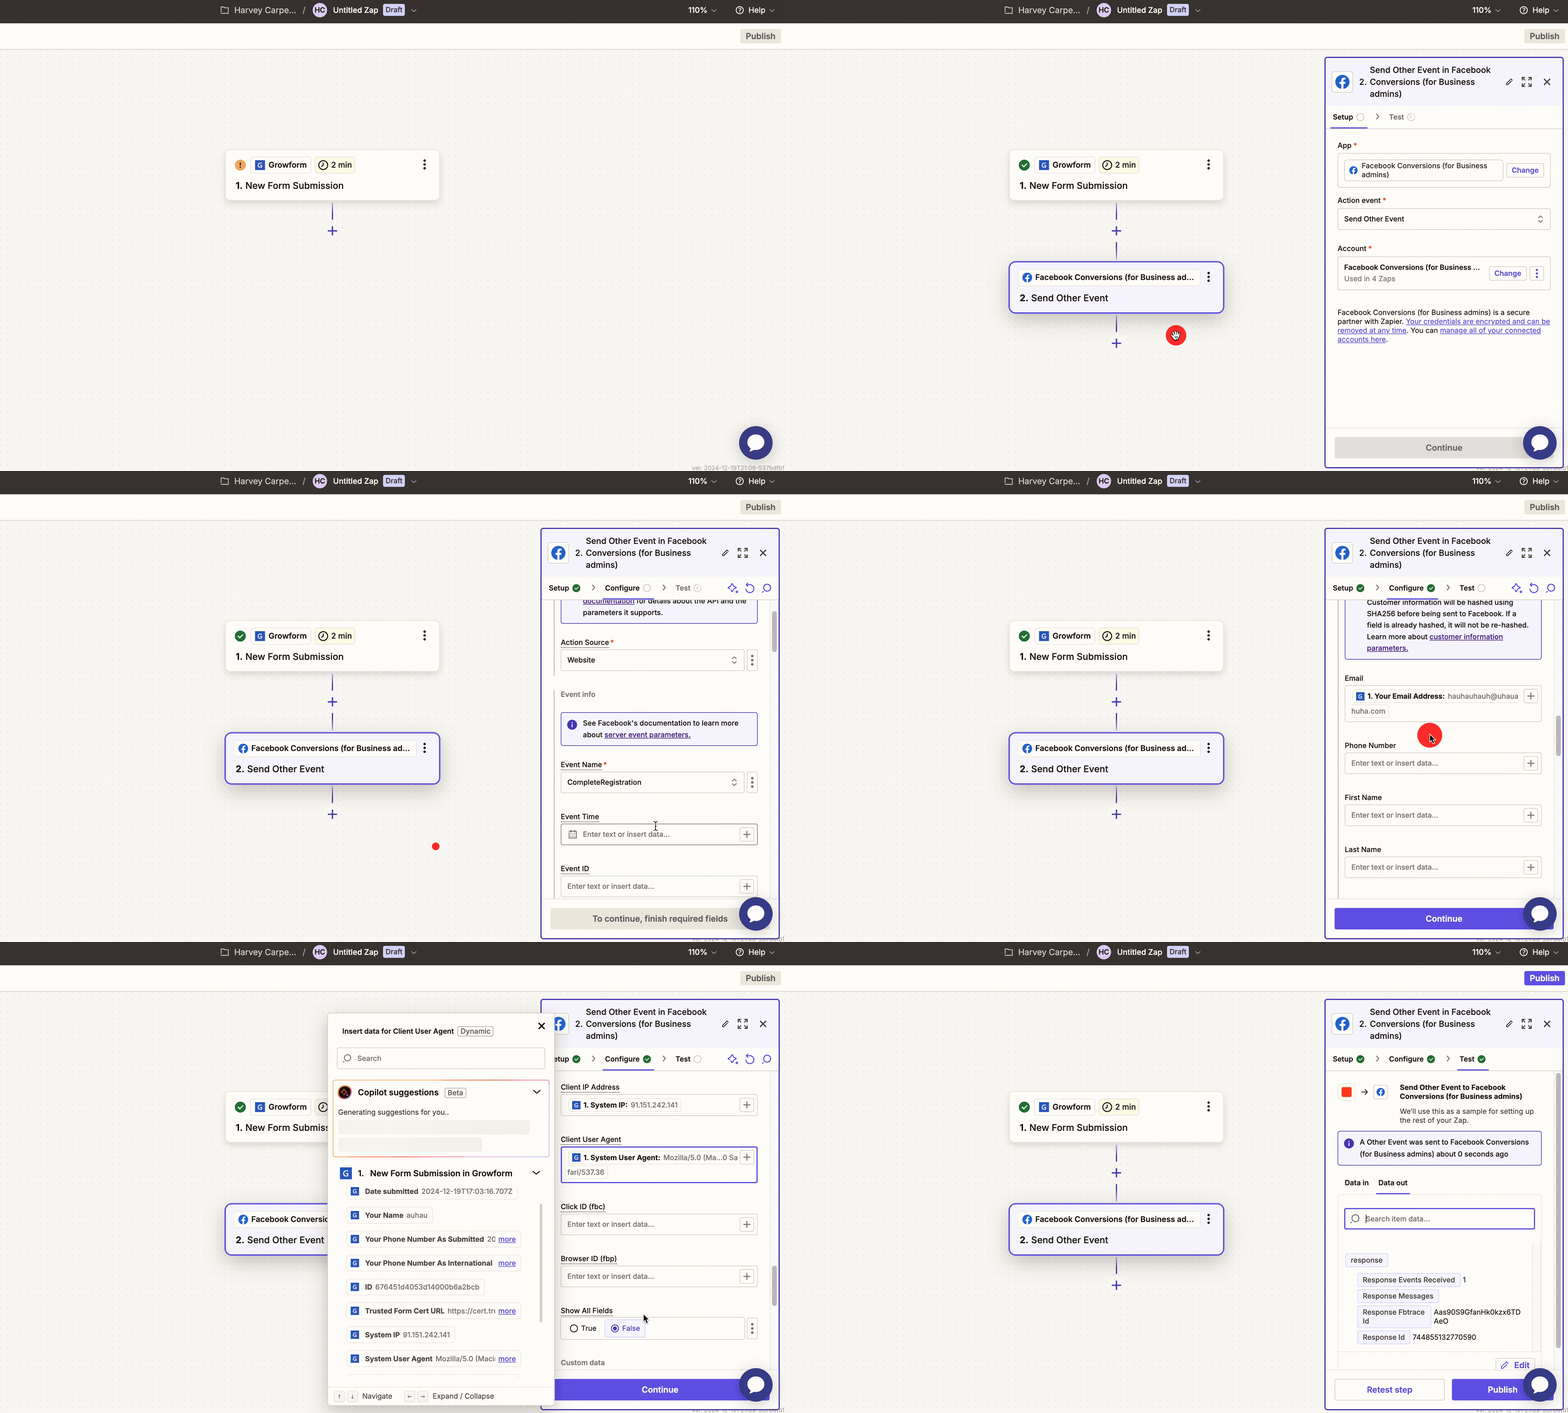
- Hit "Action" and search "Facebook conversions". Zapier lists two apps, Facebook Conversions and Facebook Conversions (for Business admins). Choose the Business admins version if you have full control of the business asset the pixel belongs to, and the standard version if not.
- Both apps offer the same four actions: Send Lead Event, Send Purchase Event, Send Other Event and Send Funnel Event. For most form conversions choose Send Other Event and name the event yourself (for example "CompleteRegistration" or a custom event). If you want Meta's standard "Lead" or "Purchase" event, choose that action instead. This guide continues with Send Other Event.
Hit "Continue", and you will see a list of fields you can send to Facebook. Here are the important ones:
- Action source: Should be set to "Website". Meta's documented values are website, app, email, phone_call, chat, physical_store, system_generated, business_messaging and other, and a form on your site is a website event.
- Event name: The event you wish to send (for example AddToCart or CompleteRegistration). Do not type "Purchase" or "Lead" here if you chose Send Other Event, as those names belong to their own actions. Go back and change the action instead.
- Event time: If your Zap runs every two minutes, leave this blank and Zapier uses the time the Zap runs, which is close enough. If you are on 15-minute polling, or are not sure, send the time of the form submission in Unix format (see below). Meta accepts an event time up to seven days before the event is sent.
- Event source URL: The page your form is embedded on. Meta requires this field for every website event.
- Customer information: The details Meta uses for matching. Map as much as you have: email address, phone number, first and last name, and the fbp and fbc values if you saved them in hidden fields. You do not need to hash anything yourself in Zapier. Meta's customer information parameters page lists which values are hashed before they reach Meta (email, phone, name, location) and which never are (IP address, user agent, fbp, fbc).
We'd recommend at least sending:
- Client IP Address
- User-Agent
If you followed steps 1 and 2, you will be able to select the IP address and user agent along with all the other form data:
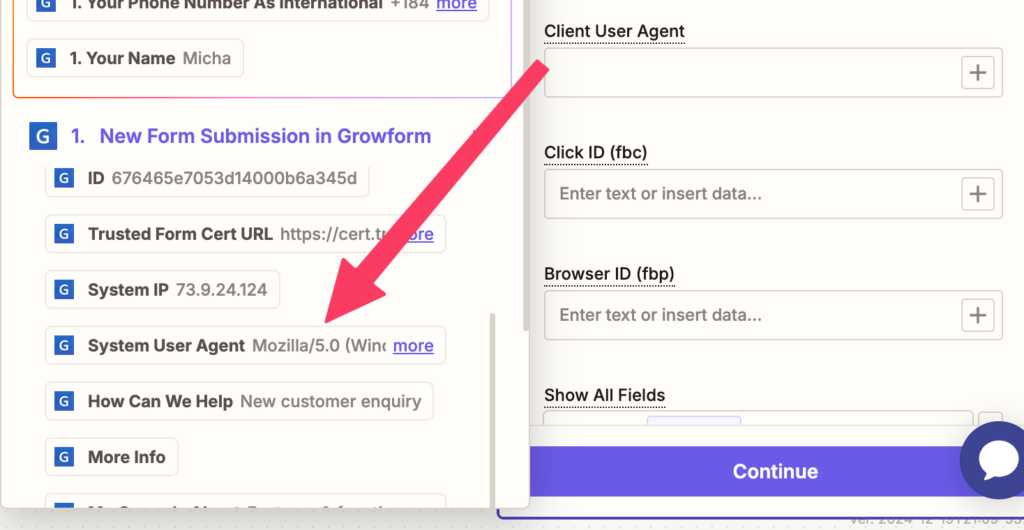
Go ahead and hit "Continue", then "Test step". You should see a response like the following, without any error messages:
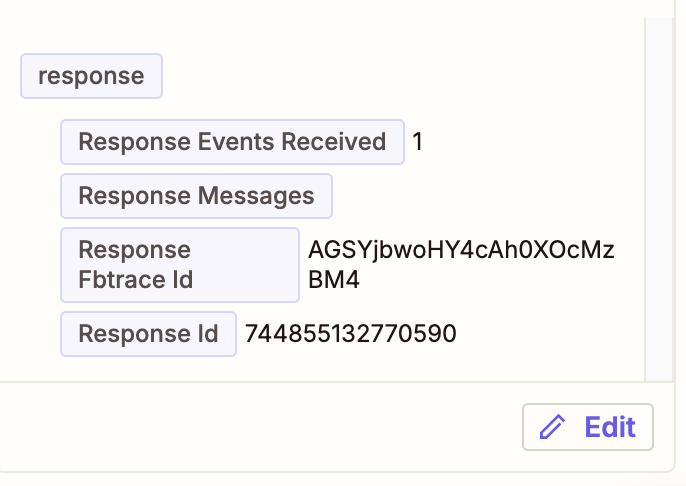
Our event has been sent to Meta. Next, we'll double check it has arrived in Events Manager. If you saw an error at this stage, see "Troubleshooting" below.
A note on deduplication. If the same event name reaches Meta from a pixel on your page and from this Zap, Meta needs a way to tell they are one conversion. Its deduplication rules match on the event name plus an event ID, keep the first event received and discard the second when both arrive within 48 hours. Zapier's Facebook Conversions actions carry an event ID alongside the event name, and Growform's unique ID hidden field preset gives you a value to send. Growform's built-in pixel sends its own event names (growformCompleteStep and growformCompleteForm), so a "CompleteRegistration" event from the Zap does not collide with it. Pick one of the two as the conversion your campaigns optimize toward, so a lead is never counted twice.
4. Check your event in Facebook
If, while in Facebook's Events Manager, you see a warning asking you to allow or block events from Growform or a domain you recognize, you must hit allow for the events to be received.
Meta has an up to 30 minute delay on event processing, so if you sent your event in the previous step but do not yet see it, come back in half an hour. In our experience, events take 15 to 20 minutes to appear.
- Navigate to business.facebook.com and go to "Events Manager". At the time of writing, this is accessed by hitting "All tools", then "Events Manager".
- Ensure you are on the correct account that you sent the data to. Sometimes you need to toggle accounts in the top-right corner, and even hit "See more ad accounts".
- Under "Data sources", choose your pixel and look for the event name you sent earlier. If you see the correct event name, you should see "Multiple" or "Conversions API" under the "Integration" column, which means the event was received through the API.
Here is the server event, shown in our own account:
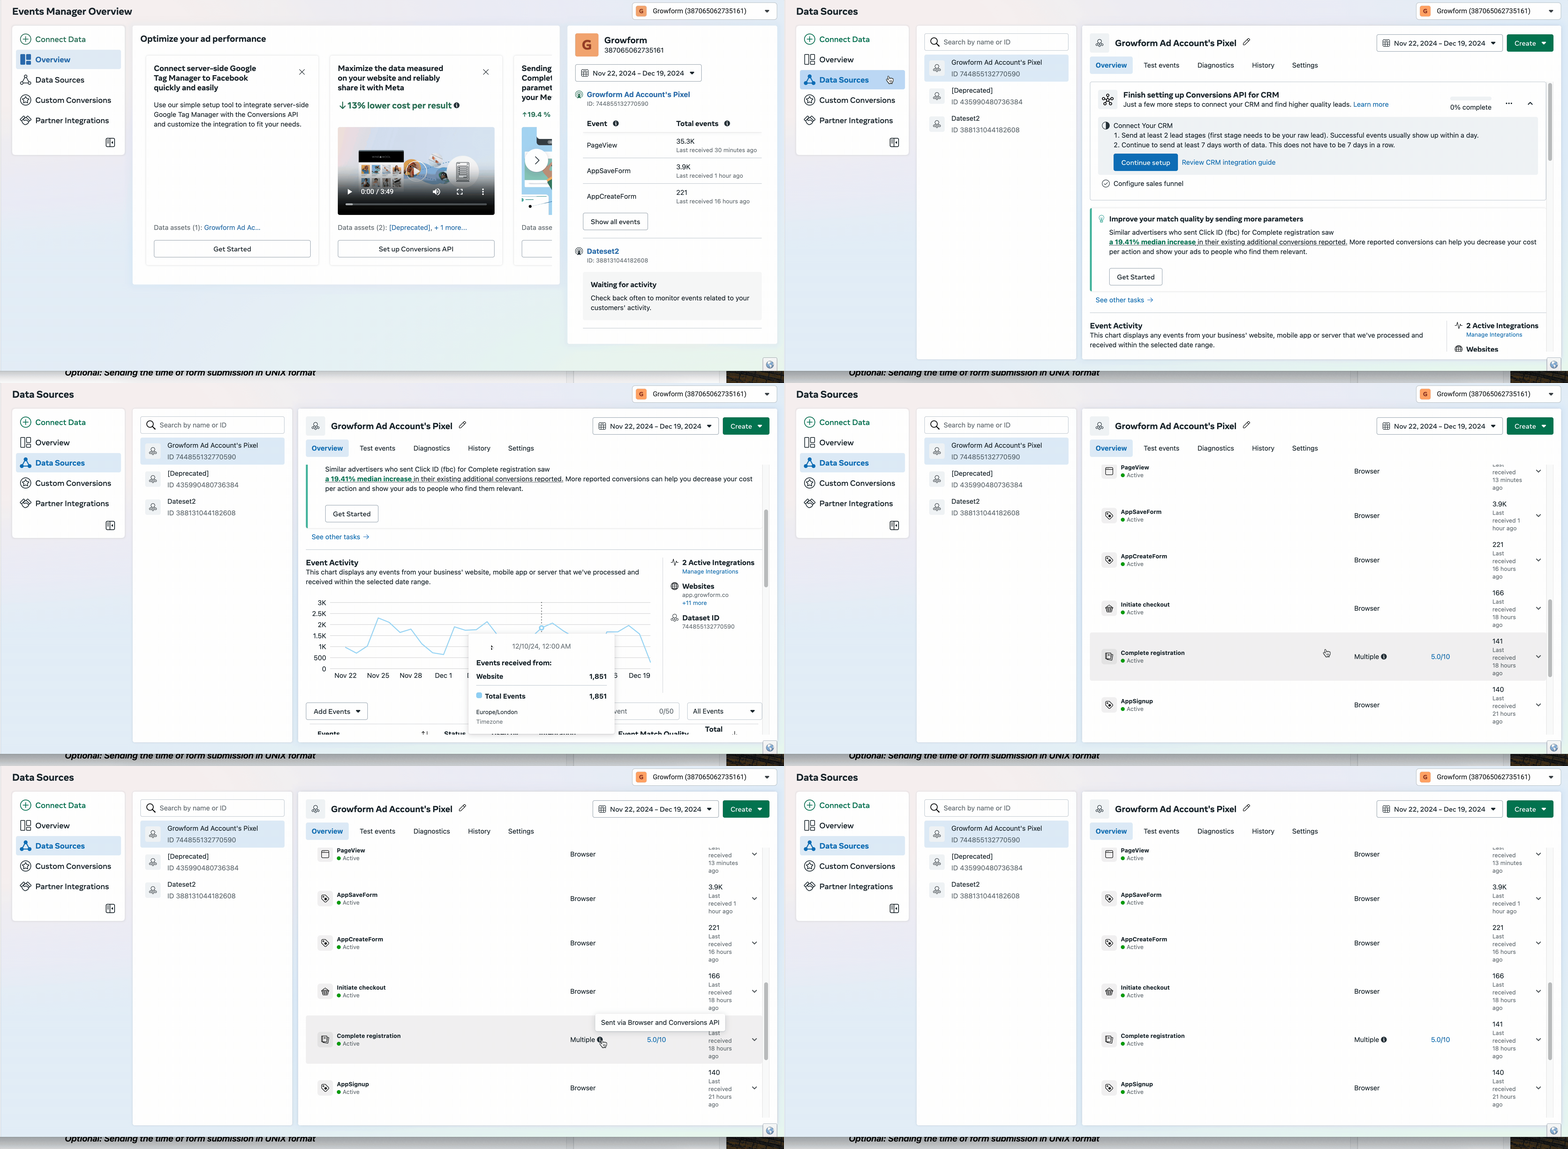
While you are here, open the event and check its event match quality. Meta scores each server event name out of 10, and adding the phone number, name and the fbp and fbc values to the customer information in your Zap is the quickest way to raise a low score.
Optional: sending the time of form submission in Unix format
If you want to send the time of the form submission through to Meta, convert it to "X" or "Unix" format, which is the format Facebook expects.
Unix format is a long number, which is the number of seconds since 1970.
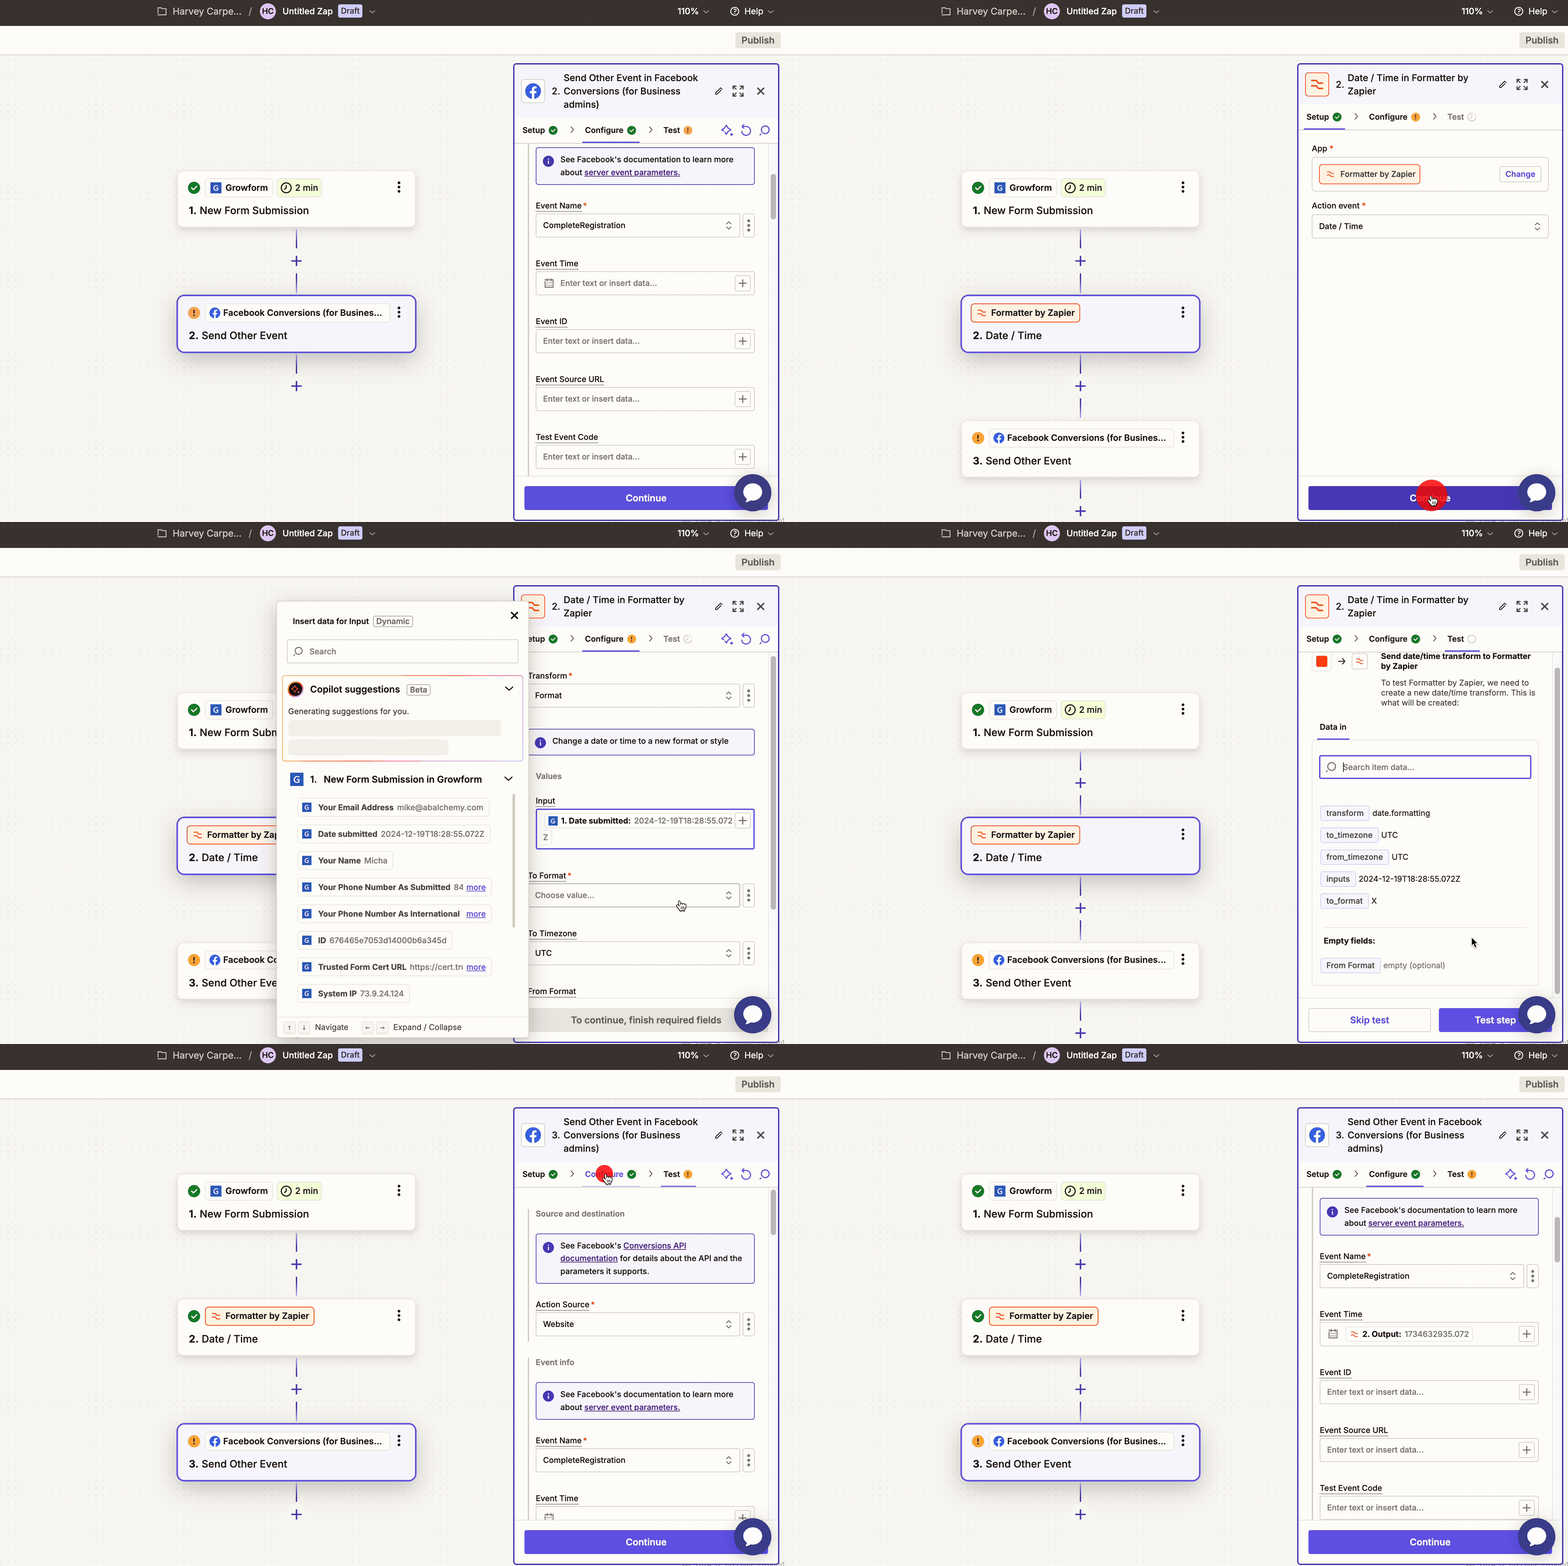
Here is how:
- Add a step above the Facebook conversion step
- Choose "Formatter"
- As the action event, choose Date/Time
- In "Transform", choose Format
- As the input, choose Date submitted from Growform
- As "To format", choose X (the last option at the time of writing), then hit "Continue"
- Hit continue, and you should see the output of this step in seconds
- Back in "Event time" under the Facebook conversions step, insert the value you just made available
What about the Conversions API Gateway?
The Conversions API Gateway is Meta's self-serve way to add server events without a developer, and it is worth knowing how it differs from the Zapier route above. According to Meta's gateway documentation, it is a server you provision inside your own AWS or Google Cloud account from Events Manager, with no coding needed. Your pixel JavaScript then sends each browser event to Meta and to the gateway at the same time, and the gateway forwards it to the Conversions API with an event ID generated for deduplication. The cost is the cloud resources it runs on, billed by your cloud provider, and several tracking vendors offer to host it for a monthly fee.
Because the gateway mirrors what the pixel fires, it is a good fit when you want redundancy for existing pixel events across a whole website. The Zapier route sends from the lead record instead, which is why it can carry the IP address, user agent and every field the lead typed, and why it works for a form embedded on any page. Growform's forthcoming server-side tracking sends from the lead record in the same way, without the Zap.
Lead ads, CRM stages and offline conversions
Three other things Meta files under the Conversions API come up when people search for CAPI, and none of them changes the steps above.
- Conversion Leads for lead ads. Meta's Conversion Leads integration sends CRM stage changes back to Meta so lead ads can optimize toward leads that become customers. It applies only to Instant Forms on Facebook and Instagram, carries Meta's lead ID with each event and uses the action source system_generated. A form on your own landing page is a website event, which is what this guide sends.
- Offline conversions. Meta's offline events documentation now calls the Offline Conversions API its legacy API and recommends the Conversions API for store and offline events, with the action source set to physical_store. If a lead from your form later buys in person, that sale can be sent the same way.
- Event timing. Meta accepts an event time up to seven days before the event is sent, and it recommends sending in real time or at least daily. A Zap that fires on each submission is well within that.
Troubleshooting
"Invalid parameter" warning seen in Zapier
This is a very common error in early setup, and it means one of the fields Meta expects is not quite right. Facebook does not say which field, so double check the following:
- Your "Action source" is set to Website
- Your event name is NOT set to "Purchase" or "Lead" if you are using the Send Other Event action as described in this tutorial. If you want those events, select the matching action earlier in the Facebook conversion setup.
- The event source URL is set to a valid URL (for example https://www.example.com) and not left blank. Meta requires it for website events.
- Under "Customer information", email is set
- Under "Customer information", the client user agent is set. Meta requires it for every website event.
- The event time, if you send one, is in Unix seconds and no more than seven days old
Event not seen in Facebook
- Wait 30 minutes for the event to come through. Facebook warns that server events can take 30 minutes to process.
- Ensure Facebook is not blocking events. Check Events Manager for a banner that offers to "allow" or "block" events, and choose allow if given the option.
- Check you sent the event to the right pixel ID. An account with several pixels or datasets is the usual cause of an event that "never arrived".
Frequently asked questions
What is the Meta Conversions API?
The Meta Conversions API is a server-to-server connection that sends conversion events from an advertiser's own systems to Meta, instead of relying on the Meta Pixel in the visitor's browser. It is often shortened to CAPI and still widely called the Facebook Conversions API.
Do I still need the Meta Pixel if I use the Conversions API?
Yes. Meta recommends sending the same events from both the pixel and the Conversions API, because each catches conversions the other misses. The pixel also sets the fbp and fbc identifiers that help match server events to people.
How does Meta deduplicate pixel and Conversions API events?
Meta matches a browser event and a server event that share the same event name and the same event ID, keeps the first one it receives and discards the second, as long as both arrive within 48 hours. The event ID has to be generated once, on the page, and sent both ways.
What is the Conversions API Gateway?
The Conversions API Gateway is a server Meta lets you provision in your own AWS or Google Cloud account from Events Manager. Your pixel sends each browser event to it, and it forwards the event to the Conversions API with an event ID, so you get redundant server events without writing code.
Does Growform support the Meta Conversions API?
Growform fires the Meta Pixel from the form today and sends every lead to the Conversions API through Zapier or a webhook, which is the setup in this guide. Growform's own server-side tracking, which sends each conversion to Meta and Google from Growform's servers, is launching soon.
Every Growform plan starts with a 14-day free trial, and the Meta Pixel and hidden field presets are on all of them. Start free trial.
Related articles

7 Form Builders With Hidden Fields for Attribution
September 30, 2026
Zapier Webhook to Google Sheet How to Connect Fast
You've paid for the click, a prospect has completed a multi-step form, and the sales team is waiting for the lead.
September 30, 2026
8 API Integration Examples for Lead Capture
A lead stack can lose more value after the form is completed than before it.
September 30, 2026