How To Create Hubspot Multi-Step Forms (Without Code)
Table of Contents
Quick Summary
This guide walks you through creating a high-converting HubSpot multi-step form using Growform with no coding required. Learn why multi-step forms boost engagement, how to set one up with Zapier, and explore best practices. Use our pre-built templates to get started fast, and for more lead-gen tips and advanced form strategies, visit the Growform blog.
How to Build Multi-Step Forms That Work Seamlessly With HubSpot
Hubspot is a versatile marketing platform that offers various tools, including forms, to help businesses grow through automation.
It comes with its own form builder that allows for simple data collection, with leads piping straight through to the CRM:

But one question we often get asked is: “Does Hubspot have multi-step forms?”.
As of May 2023, Hubspot does not support multi-step forms. The only ways right now of achieving a multi-step form on Hubspot are:
a.) Create a form that sends users to another Hubspot page (with another form on it), and repeat for each step (not recommended)
b.) Use Hubspot’s “dependent fields” functionality to show a different field in response to each question. The user will be on the same page, but it will somewhat give the impression of a multi-step form (not recommended)
c.) Use a form builder like Growform to create a multi-step form and send the leads to Hubspot (recommended):
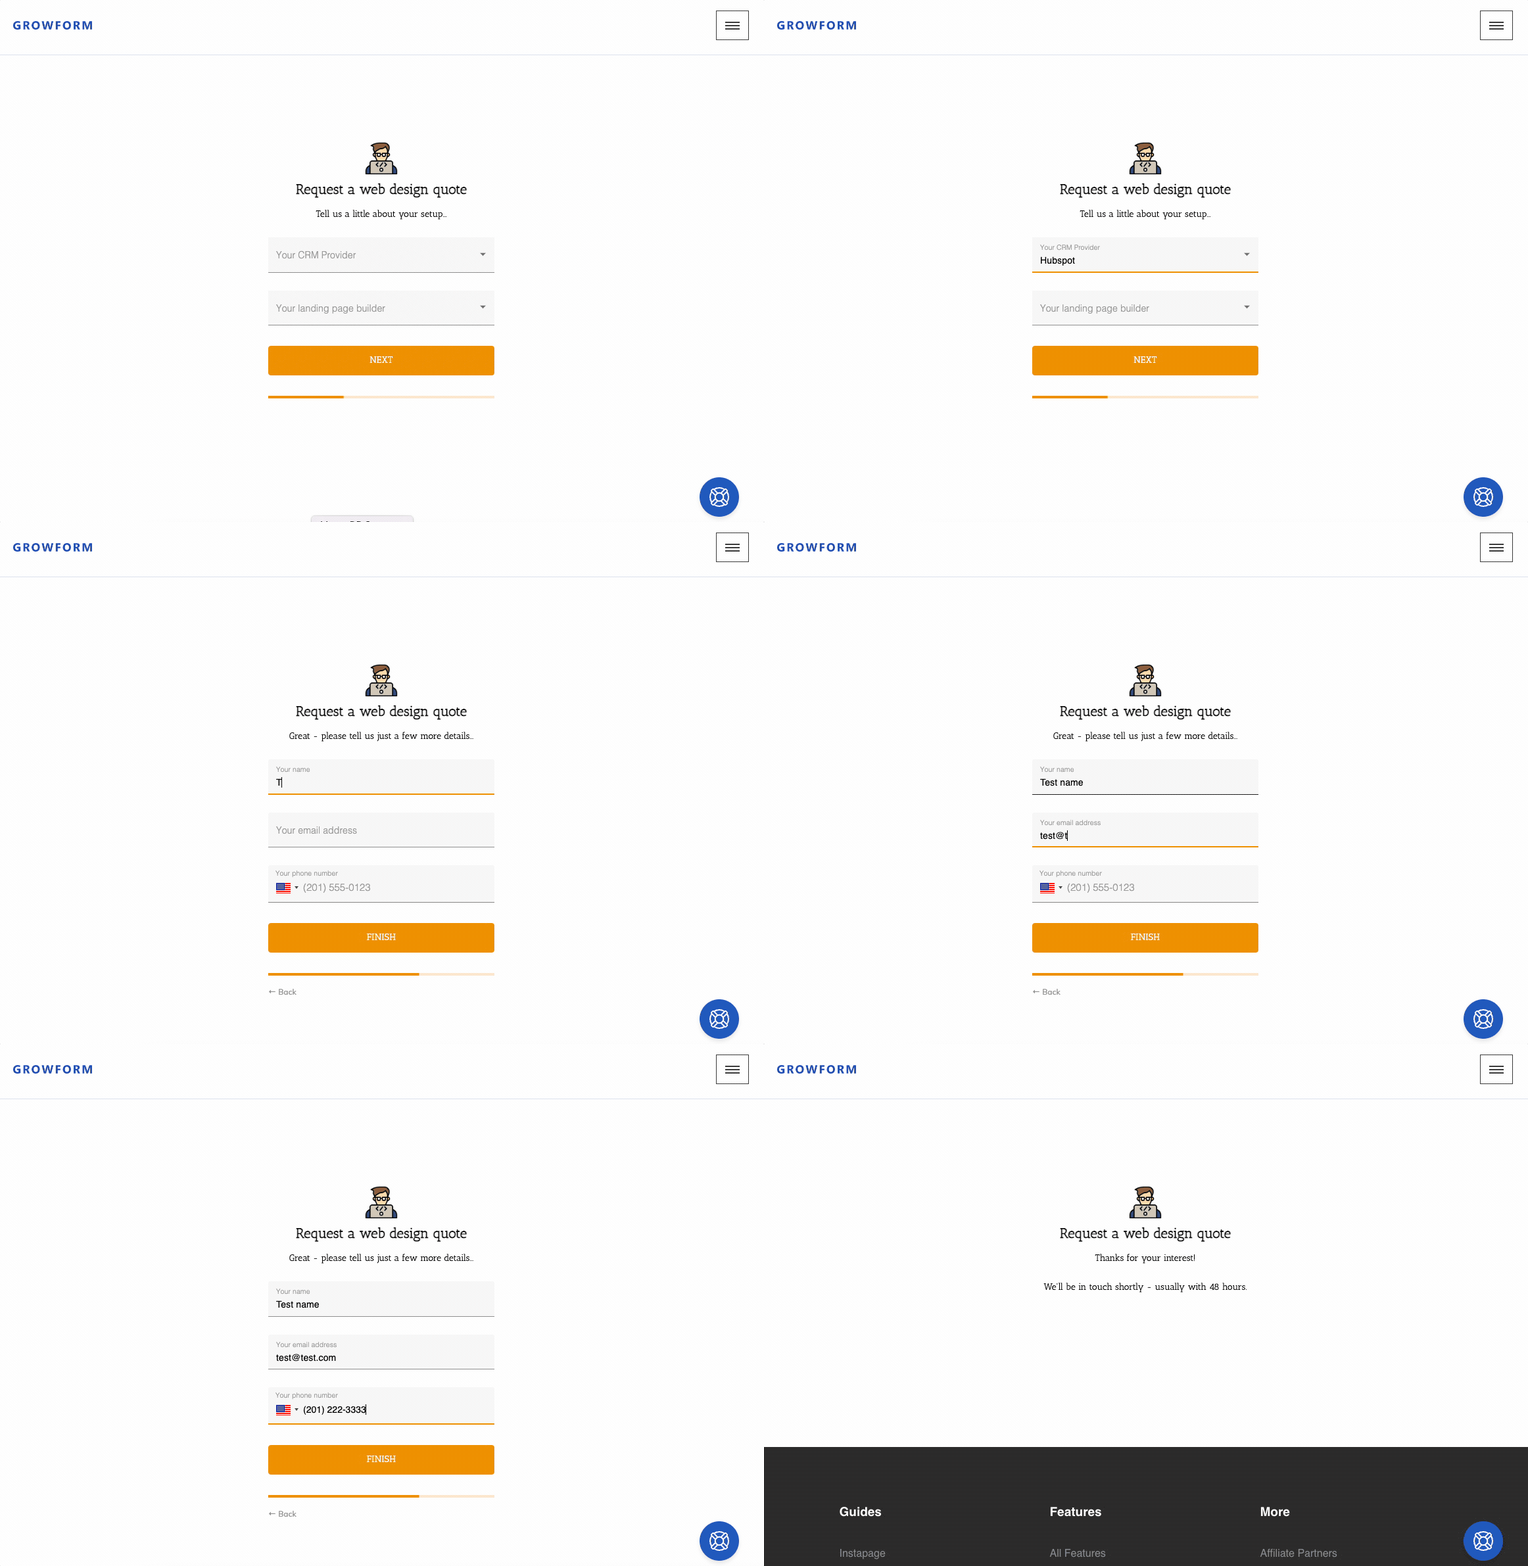
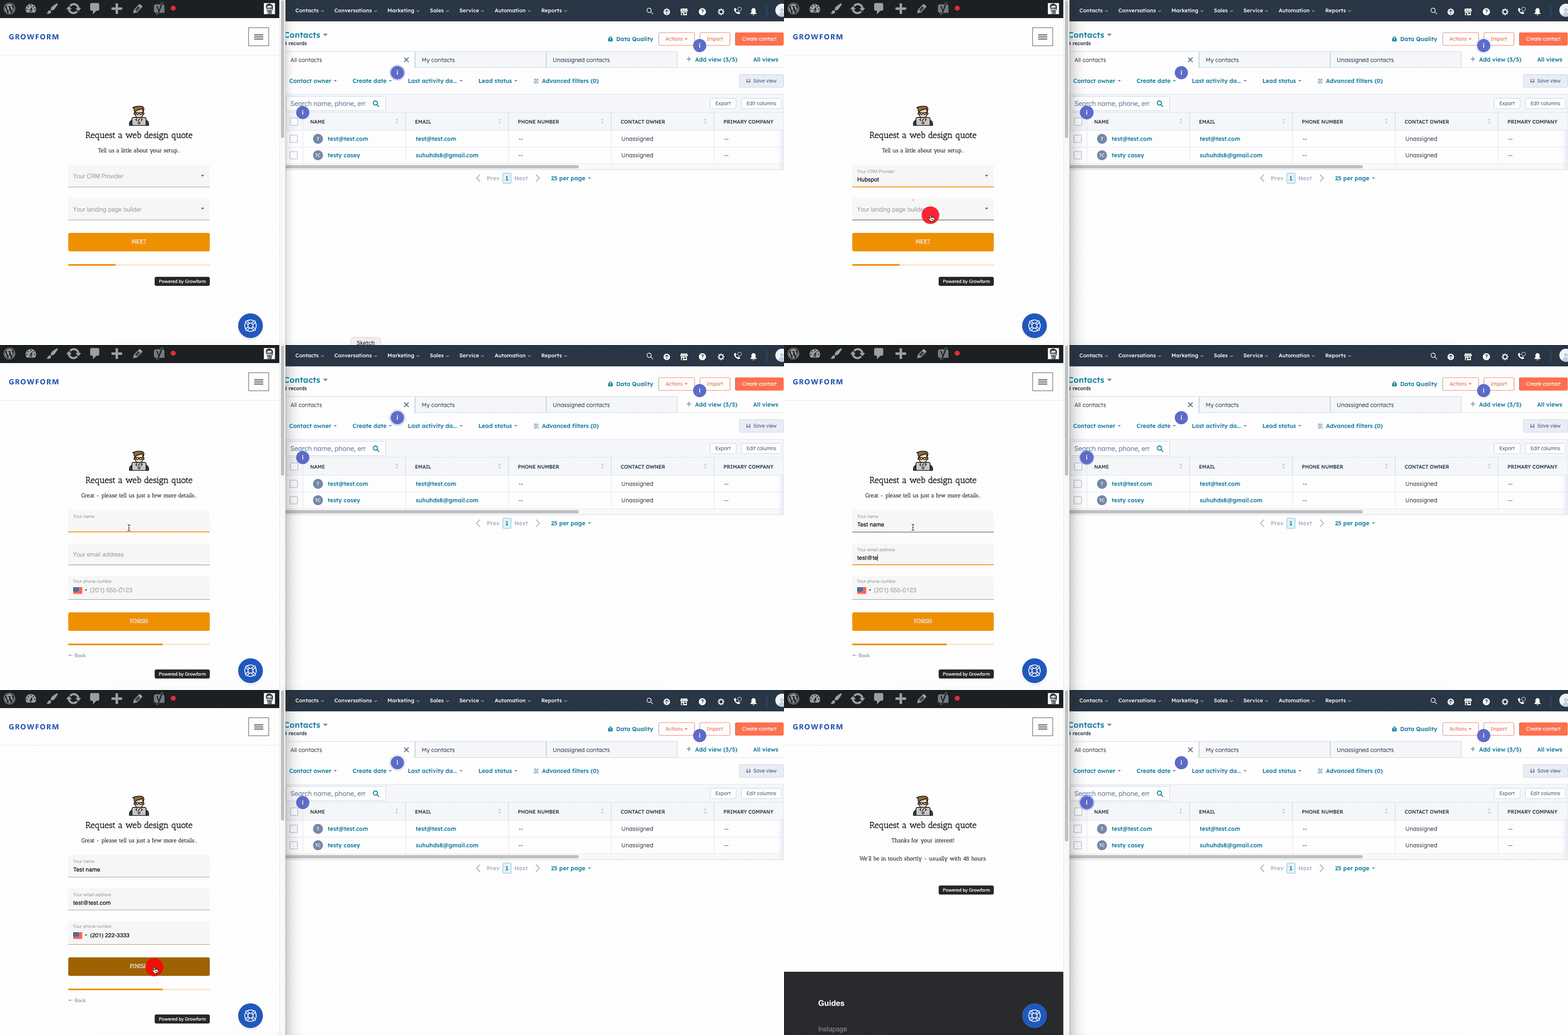
It’s a little puzzling that Hubspot decided not to support multi-step forms in their form builder, given they’re proven to significantly increase conversion rates and Hubspot even advocate for them themselves.
In any case, this guide will show you exactly how to create incredible Hubspot multi-step forms slick enough to make any marketer jealous!
Why Listen to Us?
At Growform, we specialize in helping businesses capture more leads with beautifully designed, high-converting forms. Our platform is built for marketers who need more flexibility than traditional form tools allow, especially when working with CRMs like HubSpot.
With seamless integrations, customizable templates, and powerful features like conditional logic and multi-step layouts, Growform makes it easy to build forms that not only look great, but also sync perfectly with your marketing workflows.

What Are HubSpot Multi-Step Forms?
Multi-step forms break down lengthy forms into manageable sections, improving user experience and increasing conversion rates. While HubSpot’s native form builder doesn’t support this feature, third-party tools can fill this gap by integrating seamlessly with HubSpot.
Why Use a Multi-Step Form in The First Place?
Multi-step forms provide several advantages over traditional single-step or one page forms. These benefits include:
- Improved User Experience: Breaking down a lengthy form into smaller sections can make the form-filling process less intimidating for users. This approach to form design helps to reduce form abandonment rates and increases the likelihood of users completing the form.
- Higher Conversion Rates: By making the form-filling process more manageable, multi-step forms achieve much higher conversion rates than single-step forms. Users are more likely to both start and complete a form if they feel it is not too overwhelming – resulting in more conversions for you!
- Better Data Collection: Multi-step forms allow you to collect more detailed information from users without overwhelming them. By breaking down the form into sections, you allow users to provide more accurate and comprehensive data, leading to better lead qualification and segmentation.
- Reduced Form Abandonment: With a more user-friendly form-filling experience, visitors are less likely to abandon answering questions halfway. This leads to more successful form submissions and a higher number of leads captured.
Why Use a Form Builder Instead of Using Hacks And Workarounds?
It’s been great to see the Hubspot community come together: there are a few hacks and workarounds that make it possible to create an approximation of a multi-step form in Hubspot.
But the problem is, workarounds have a nasty habit of suddenly becoming incompatible, won’t receive official technical support, and can provide a break-y experience to users.
The solution? Growform was built specifically to build multi-step forms, can be embedded into your website, and will send leads to your CRM via Hubspot integration.

By using a third party tool like this, you’ll still see leads appear in Hubspot, but you’ll also enjoy all of the benefits of a purpose-built form builder including:
- Conditional logic: Use conditional or “jump” logic to show or hide fields or entire steps based on users’ responses. This will help your forms feel far more interactive and personalized, letting you build impressive and high-converting experiences.
- More styling options: Hubspot’s forms don’t provide a tonne of customization options (color schemes, custom fonts or background colors), while third party form builders do. With a more visually appealing form that looks like your brand, users are more likely to have a positive impression of your brand and start filling out your form.
- Progress bars: Including a progress bar in your multi-step form will help give your users a sense of accomplishment and keep them engaged.
- Best-practices templates: Hubspot’s form builder lets you build simple forms from scratch, but doesn’t provide much in the way of templating. Form builders like Growform offer 20+ templates for a number of industries that that help you follow multi-step best practices from the start.
- Better ease of use: The process of creating a multi-step form with the proper tools will be much simpler than hacking together different forms and using workarounds. It’ll likely be more reliable and maintainable, too.
Alternatives to HubSpot for Multi-Step Forms
While HubSpot is a leading marketing platform, some businesses may look for alternative tools specifically designed for creating multi-step forms with advanced features. Here are a few popular options to consider:
- Growform: A dedicated multi-step form builder that integrates smoothly with HubSpot via Zapier. It offers conditional logic, customizable themes, and templates tailored to various industries. It’s perfect if you want to keep using HubSpot CRM but need more powerful form capabilities.
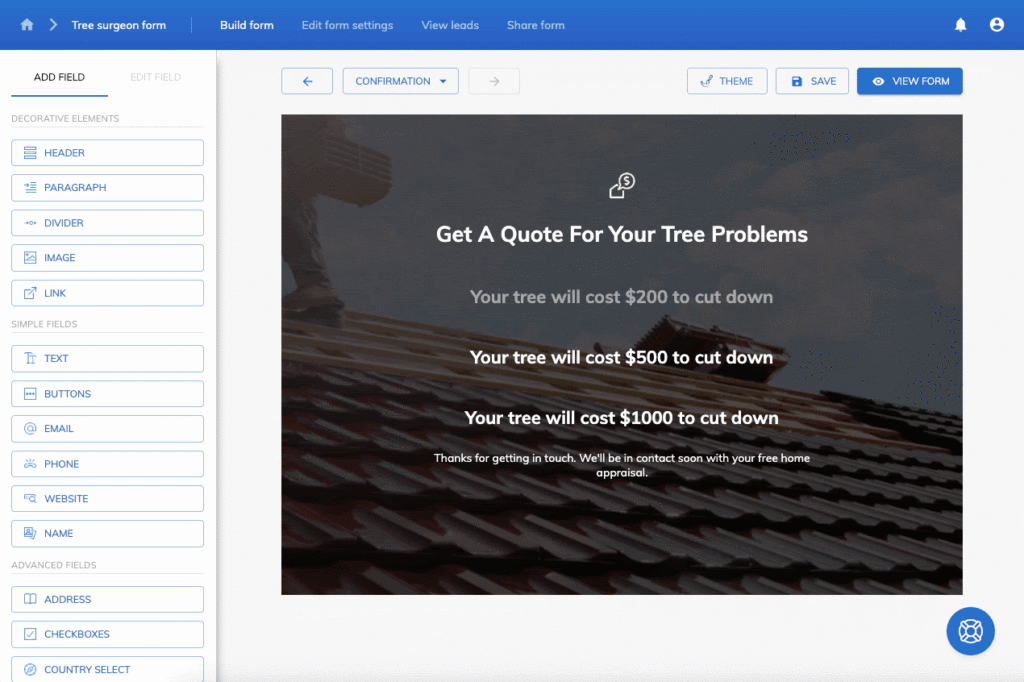
- Typeform: Known for its conversational, user-friendly forms with multi-step flow and logic jumps. Typeform integrates with HubSpot but often requires third-party connectors like Zapier.
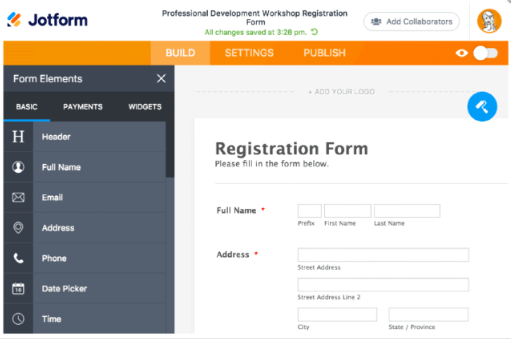
- Jotform: Provides drag-and-drop multi-step forms with many integrations, including HubSpot. It offers a variety of pre-built templates and customization options.
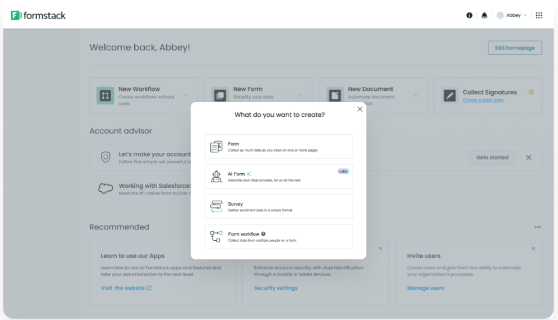
- Formstack: A standard form builder that supports multi-step forms, conditional logic, and advanced workflows. It integrates with HubSpot and other CRM tools.
Step-by-Step Guide to Create a Hubspot Multi Step Form with Growform
In this section, we will provide a step-by-step guide on how to create a Hubspot multi-step form using Growform.
By the end of the tutorial, you’ll have a beautiful form capable of conditional logic, progress bar and advanced styling options – with leads landing right in Hubspot!

For this tutorial, we’ll assume you already have a Hubspot account.
Step 1: Sign up and create a new form
To get started, you will need to sign up for a Growform account.
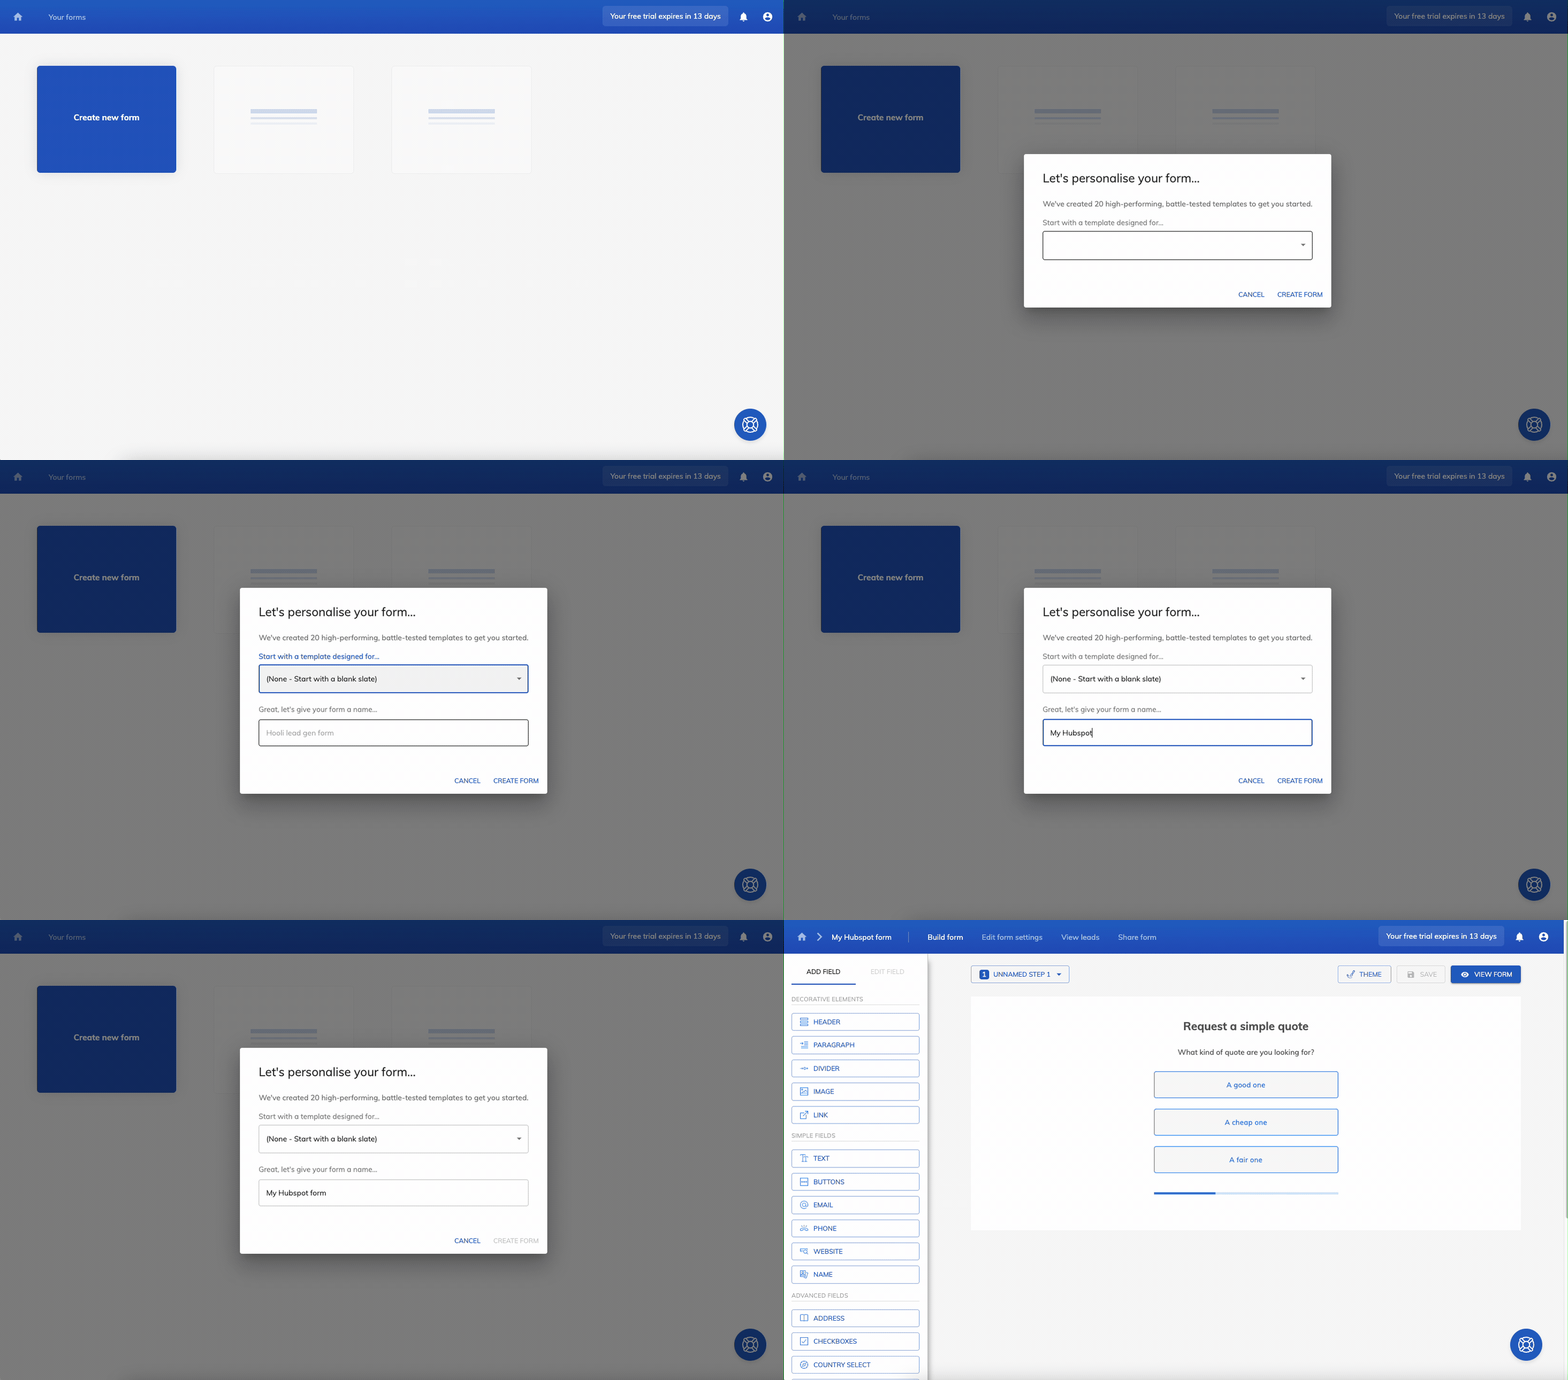
Once you have created an account and logged in, you will be directed to the Growform dashboard. Now, hit “Create new form” and choose a template that suits you.
We’ll go for “None – start with a blank slate”:
Step 2: Edit your fields
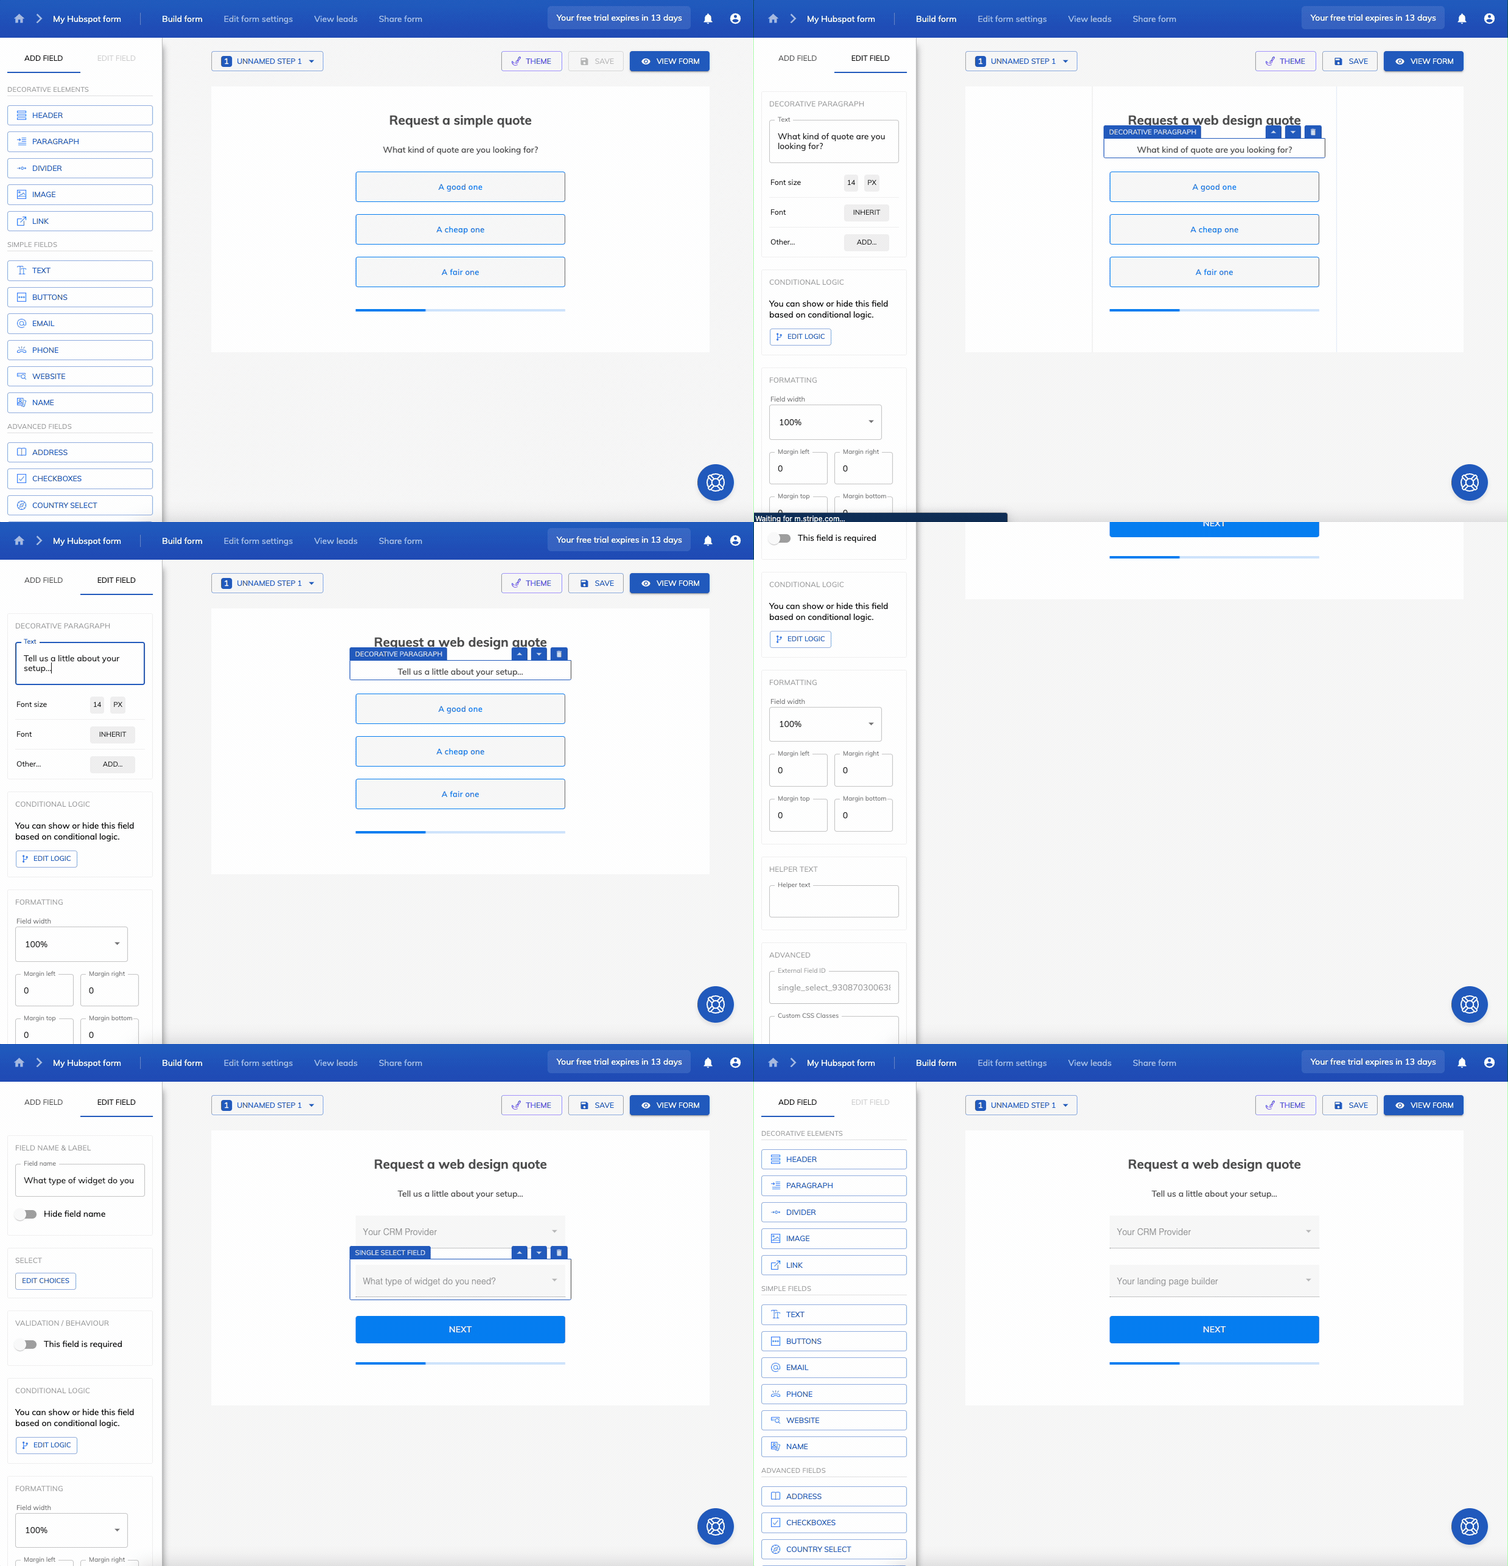
With just a few clicks, we can delete any fields we don’t need and add any new fields that make sense:
Here’s how:
- Select a field by clicking it
- Delete a field by hitting the “delete” / “trash can” icon
- Add a field by choosing one from the left-hand side
- Edit a field by clicking it and editing the settings on the left
At the end of this step, we’ll have something like this:

Step 3: Edit your theme settings
If the blue color scheme doesn’t suit, we can easily edit the theme options to tidy things up a bit:
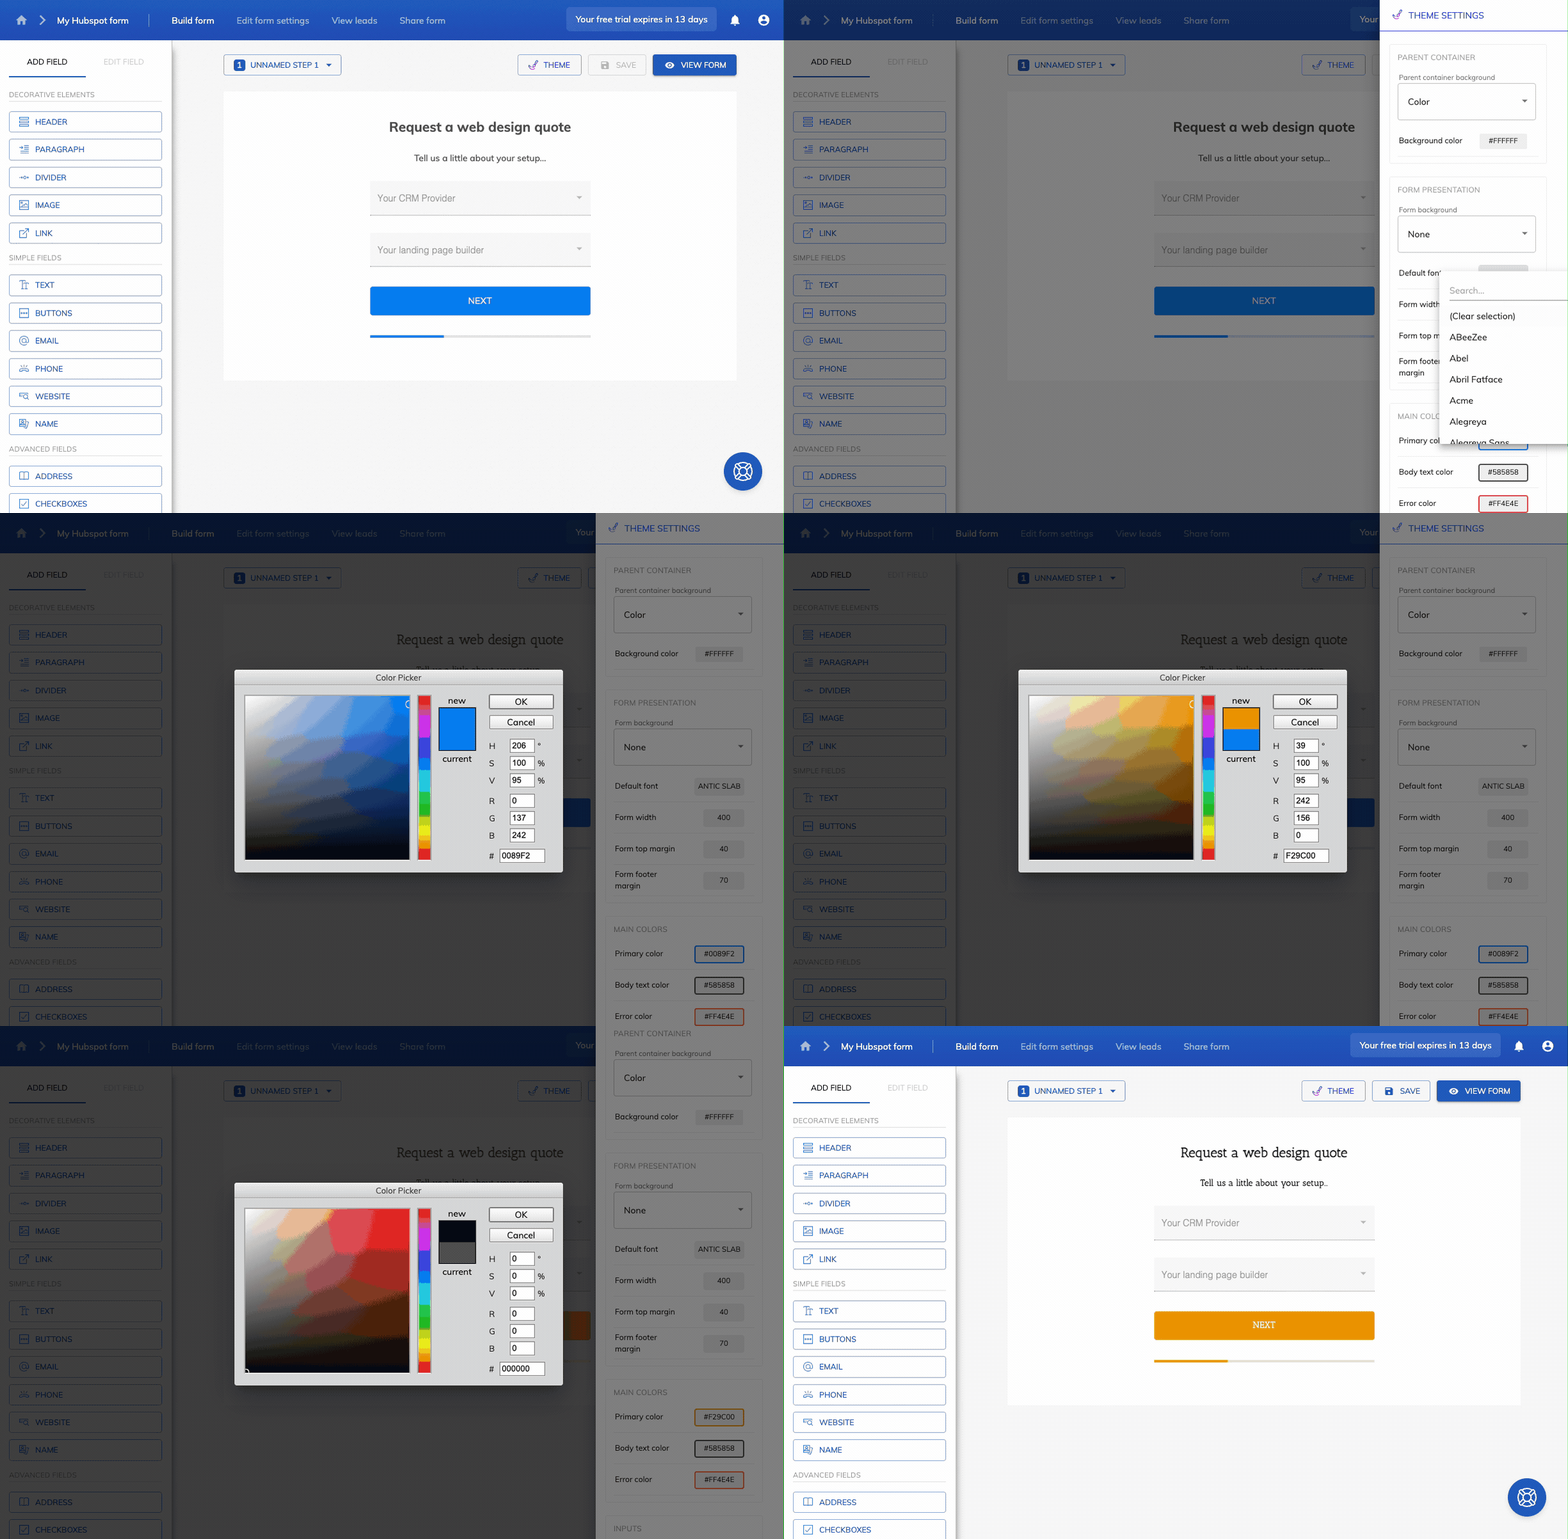
Here’s how we did it:
- Click “Theme” in the top right corner
- Adjust the default font, primary color and body text color to your choosing
After adding an image to the top of the form and adjusting the margins of each field a little, we can get to a great looking form like this:

No matter what your brand guidelines, you should be able to come up with a form that looks great and will fit in anywhere.
If you wish to add and edit steps, you can easily do so by using the step navigation dropdown in the top-left corner.
Don’t forget to hit “Save” once you’re done building!
Step 4: Embed our form in your website
Now we’ve built a basic form, we need to grab the embed code that’ll let us place it on our landing page or website.
First, let’s grab the embed code given to us by Growform. Still in the builder, navigate to “Share form” and open the first option.
Click inside the box and copy the embed code to your clipboard:
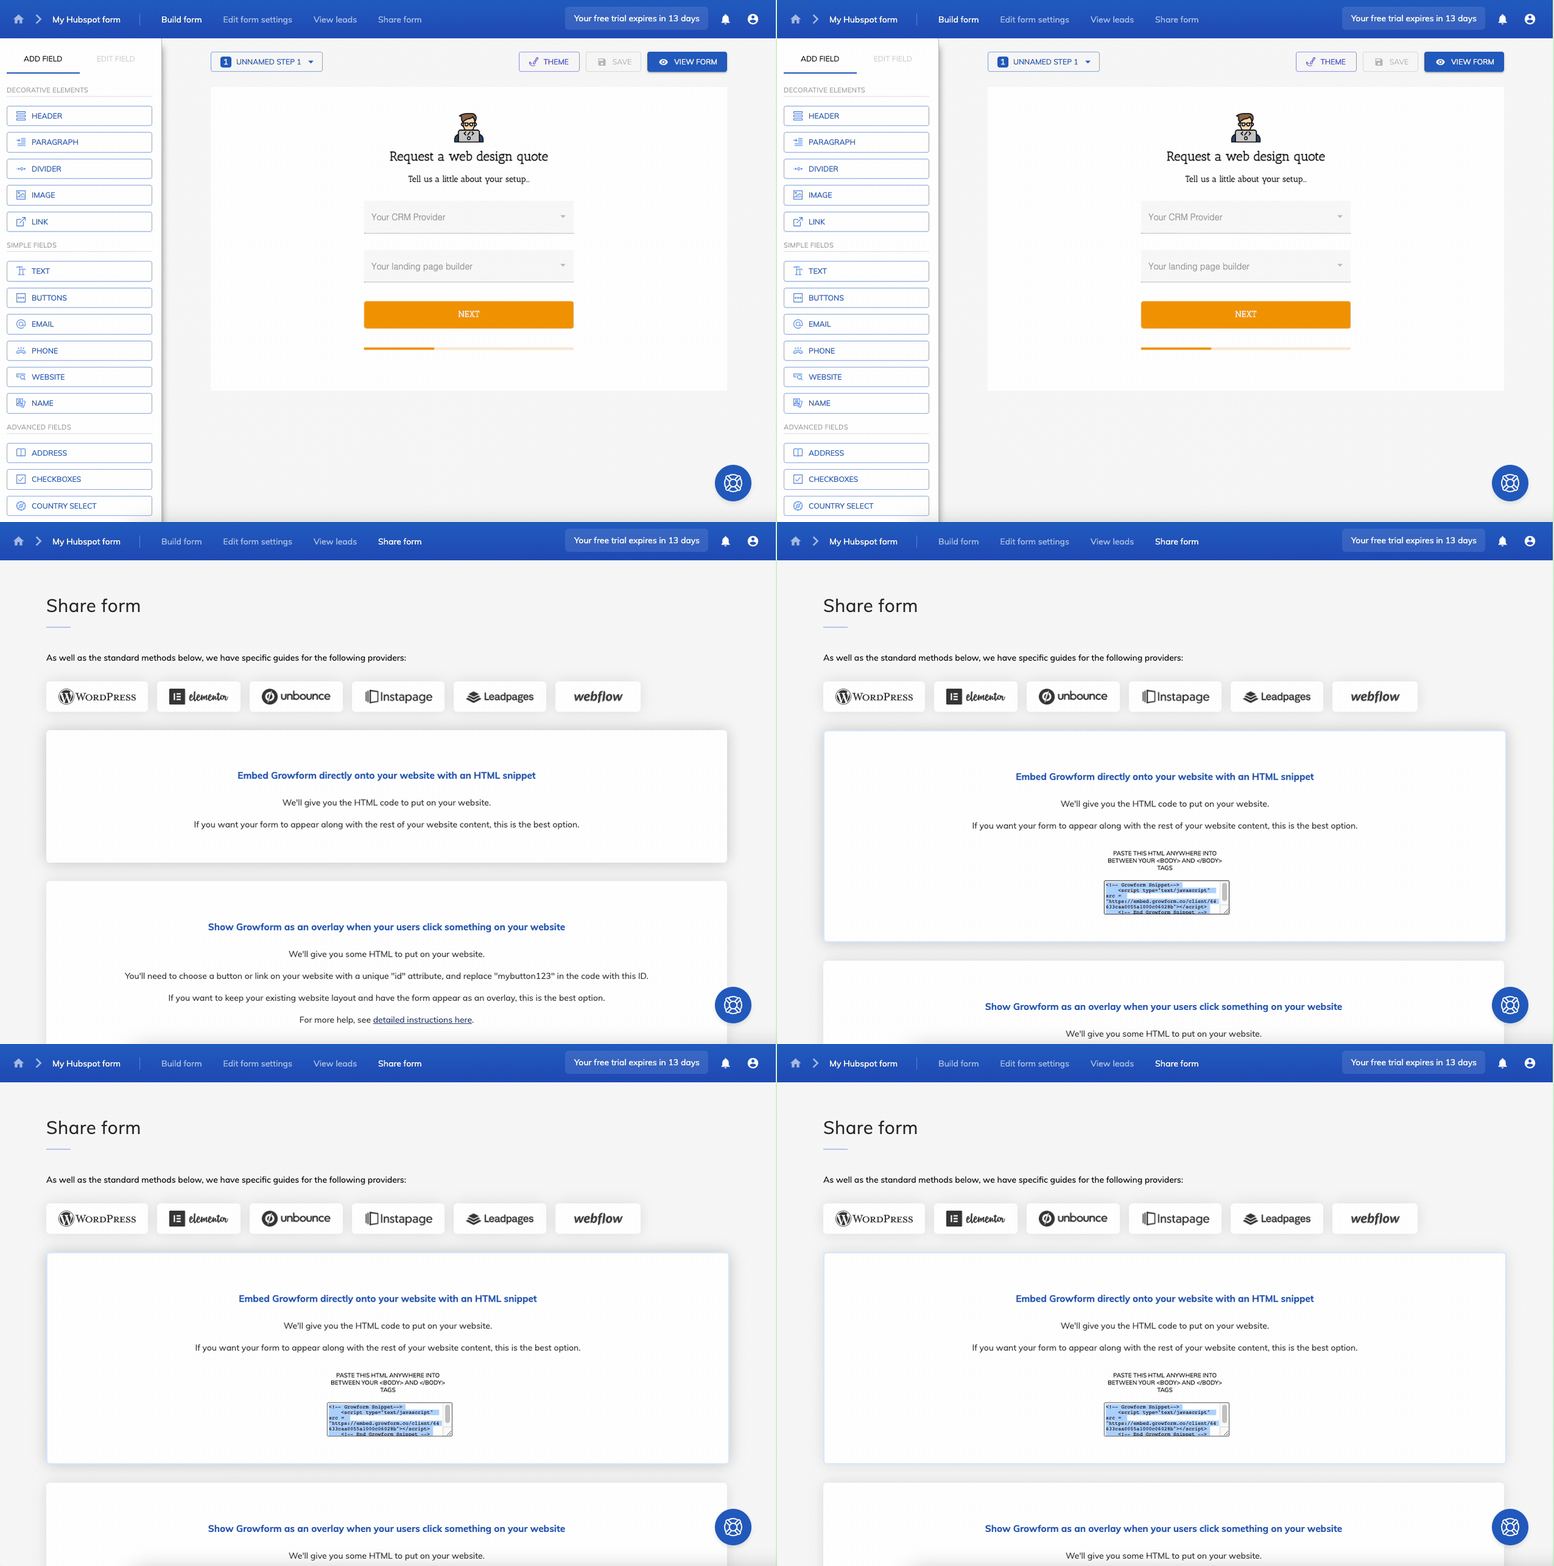
Great – we’ve copied the embed code. You’ll now need to paste it into your landing page or website builder’s custom HTML area.
Often, the landing page builder will provide a widget or tool that allows for “custom HTML” – just paste the code in there and save your changes.
There are more specific guides for each major landing page builder below:
Nice! We pasted the code into our WordPress site and now have a multi-step form!
If you don’t want to embed the form in your website, or if you’d rather simply share a link to the form, this is perfectly possible – there is a shareable link on the “Share form” page too.
Step 5: Fire off a test lead
Let’s fill our form in to make sure everything works OK:

This is an important step – it not only lets us see the form in action, but will allow Zapier to “see” an example lead when we configure the Hubspot integration in step 5.
Step 6: Send your leads to Hubspot
At this point, our form is embedded on our website and is collecting leads – but the leads just stay in Growform!
Let’s send our leads over to Hubspot using Zapier.
Zapier is the “glue” that holds together Growform and thousands of integrations. If you don’t already have an account, you’ll be prompted to create one. It comes with a 14 day free trial, and allows for 100 leads per month with no need for a paid plan.
Once you’ve signed up or logged in to Zapier, open up your dashboard to connect the Growform app to Hubspot.
We’ll configure it so that on “New Form Submission“, it will “Create Contact” in Hubspot:
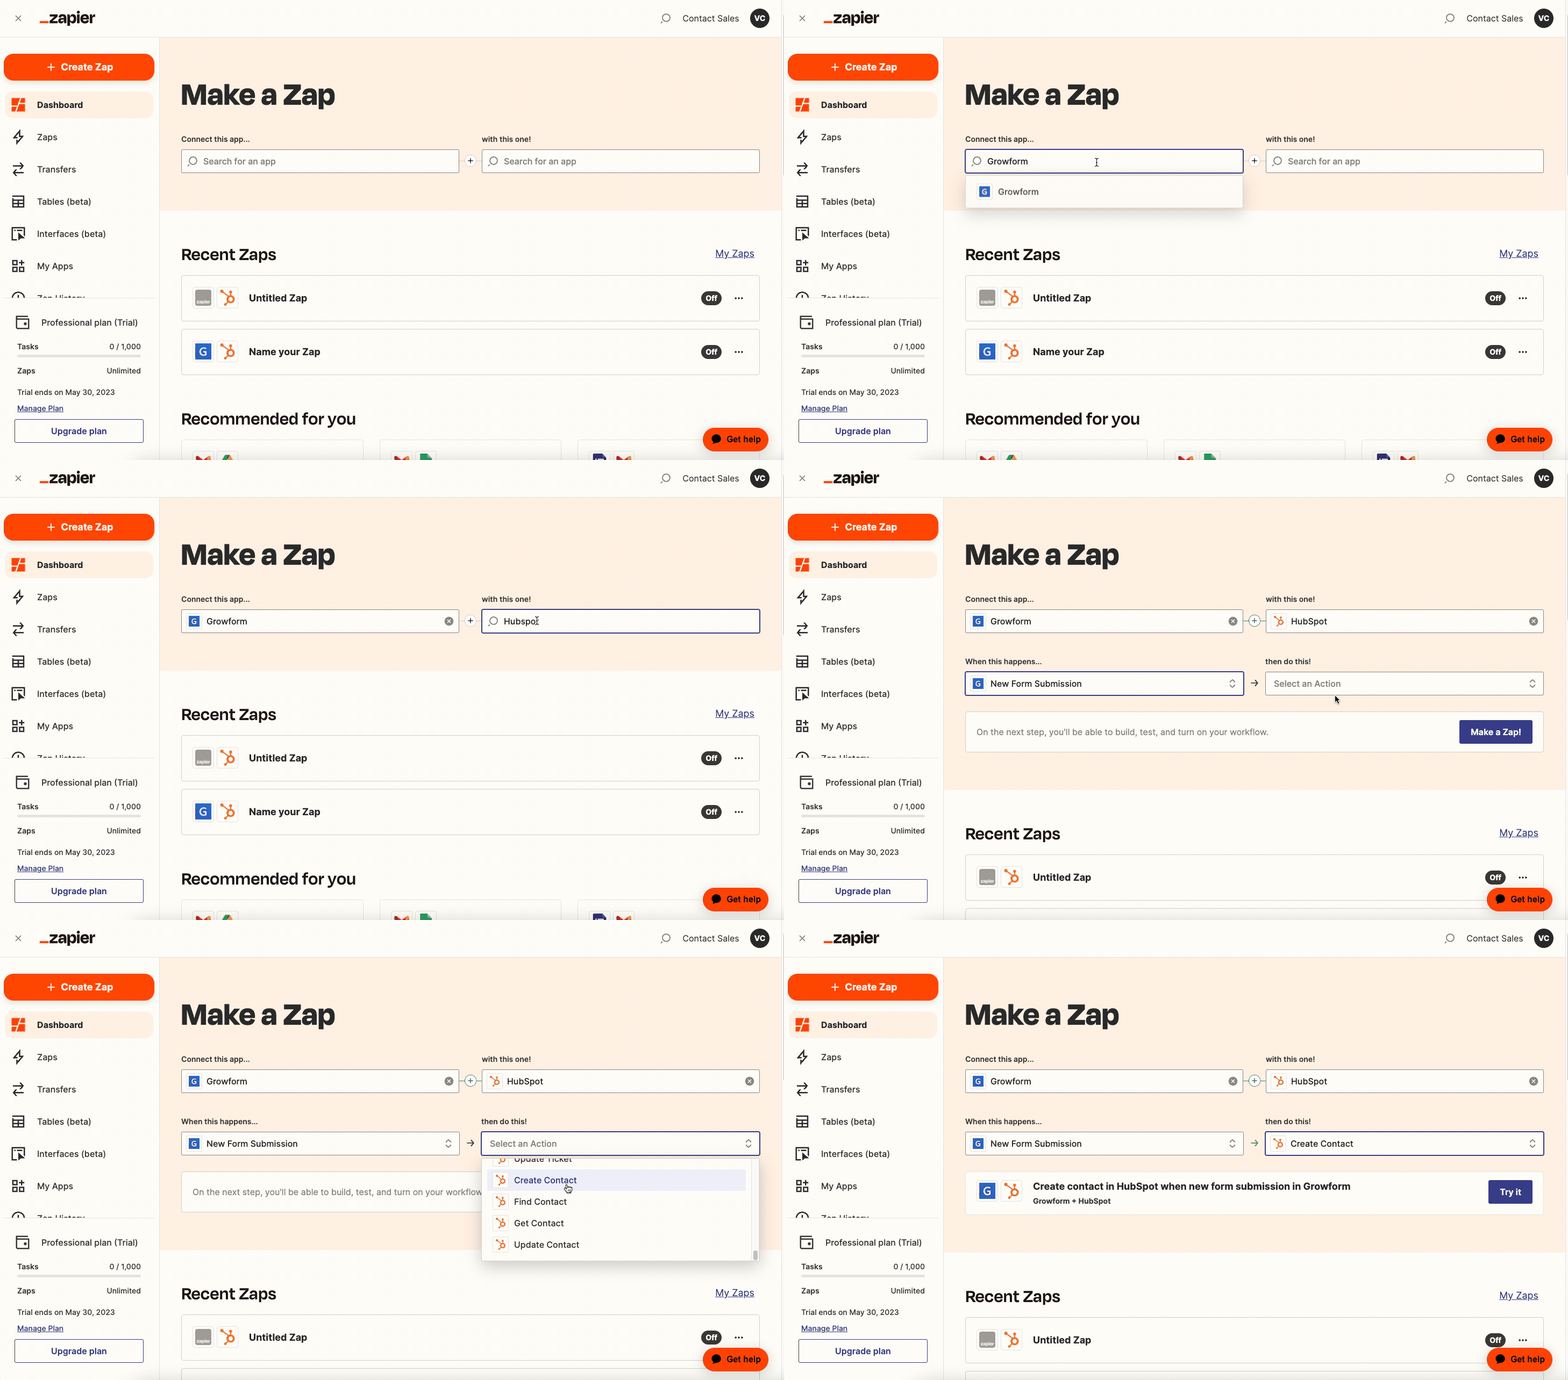
Great! Once you’ve selected the right options, hit “Try it” to be taken to the Zap builder.
On the next screen, hit the first box on the page, and then “Sign in”. Follow the link to your Growform account, copy your API key, paste it into the box and save your changes:
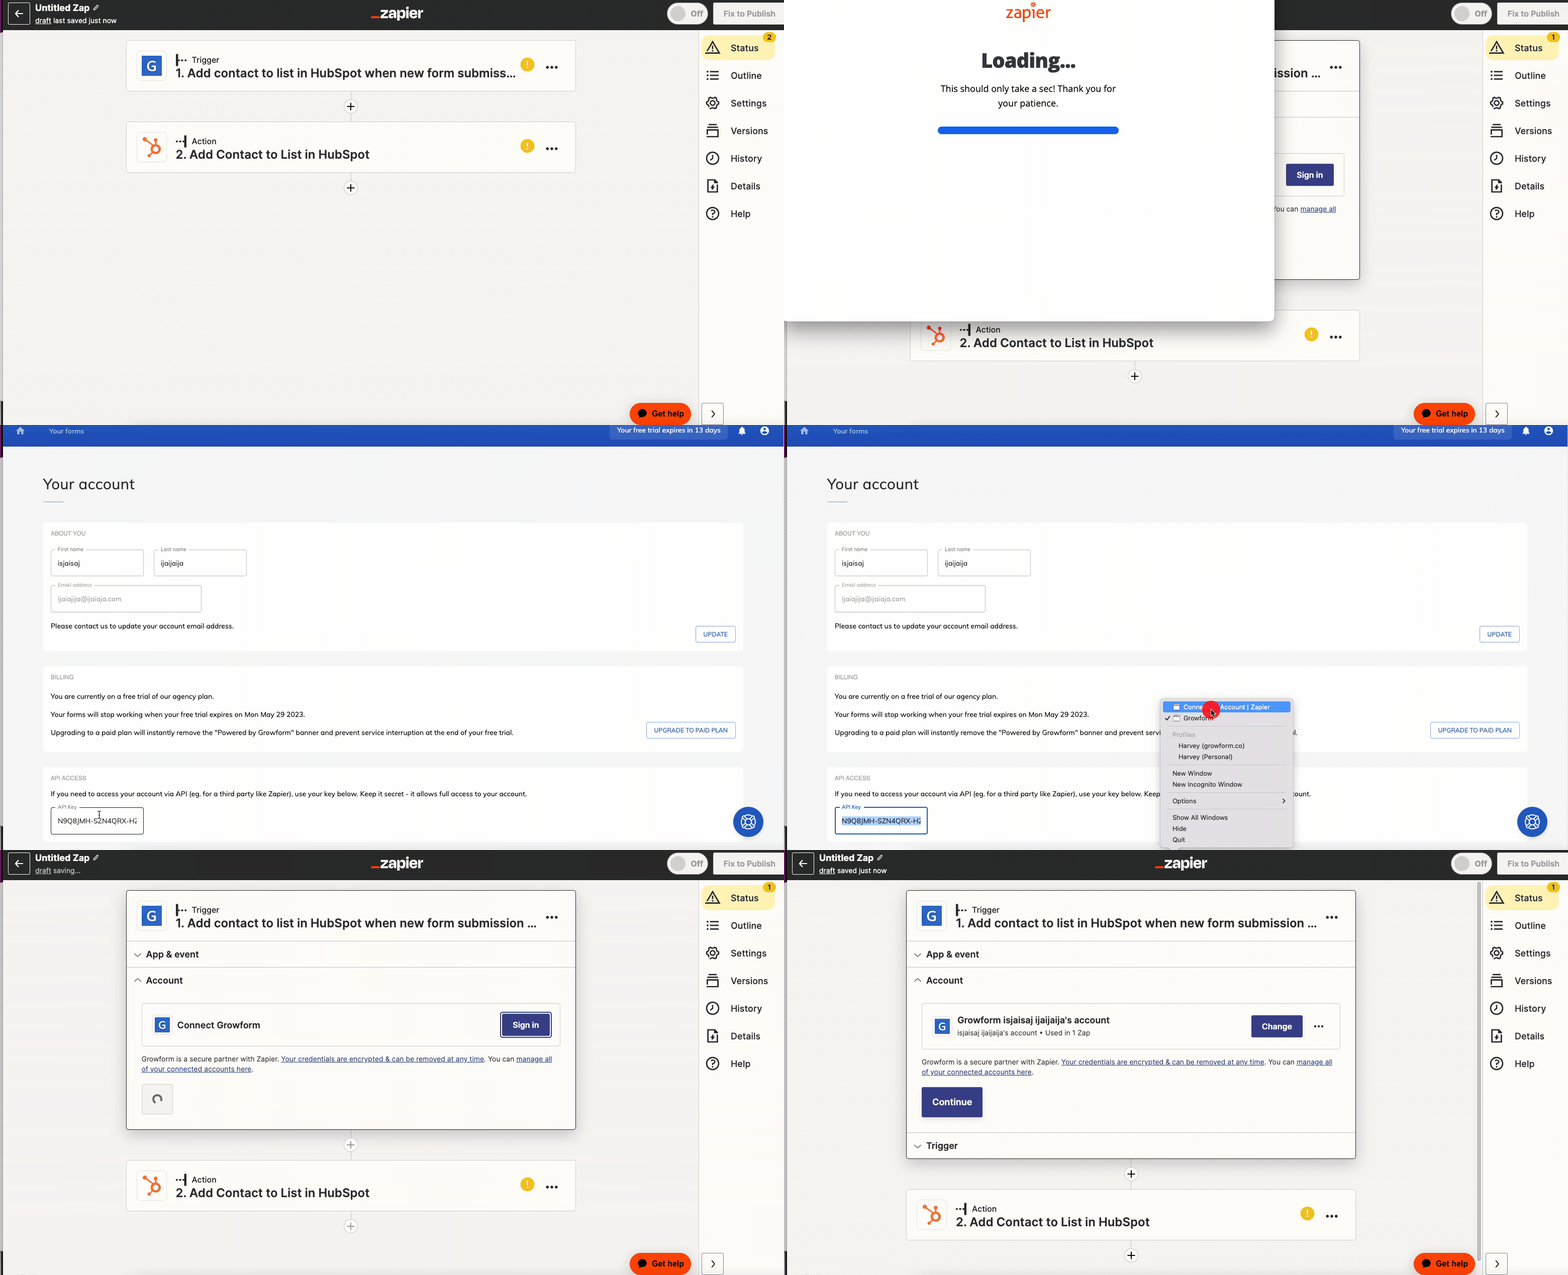
Once you’ve added your API key, you should see a green tick next to “account” and your Growform account information in Zapier:

Hit “Continue” to move to the “Trigger” step.
At this point, simply select your form and hit “Test trigger”.
Zapier will now find the test form submission you submitted earlier – hit “Continue” to move to the next step.
(If you didn’t create a test submission in Growform, go ahead and do that now before hitting “Test trigger” again).
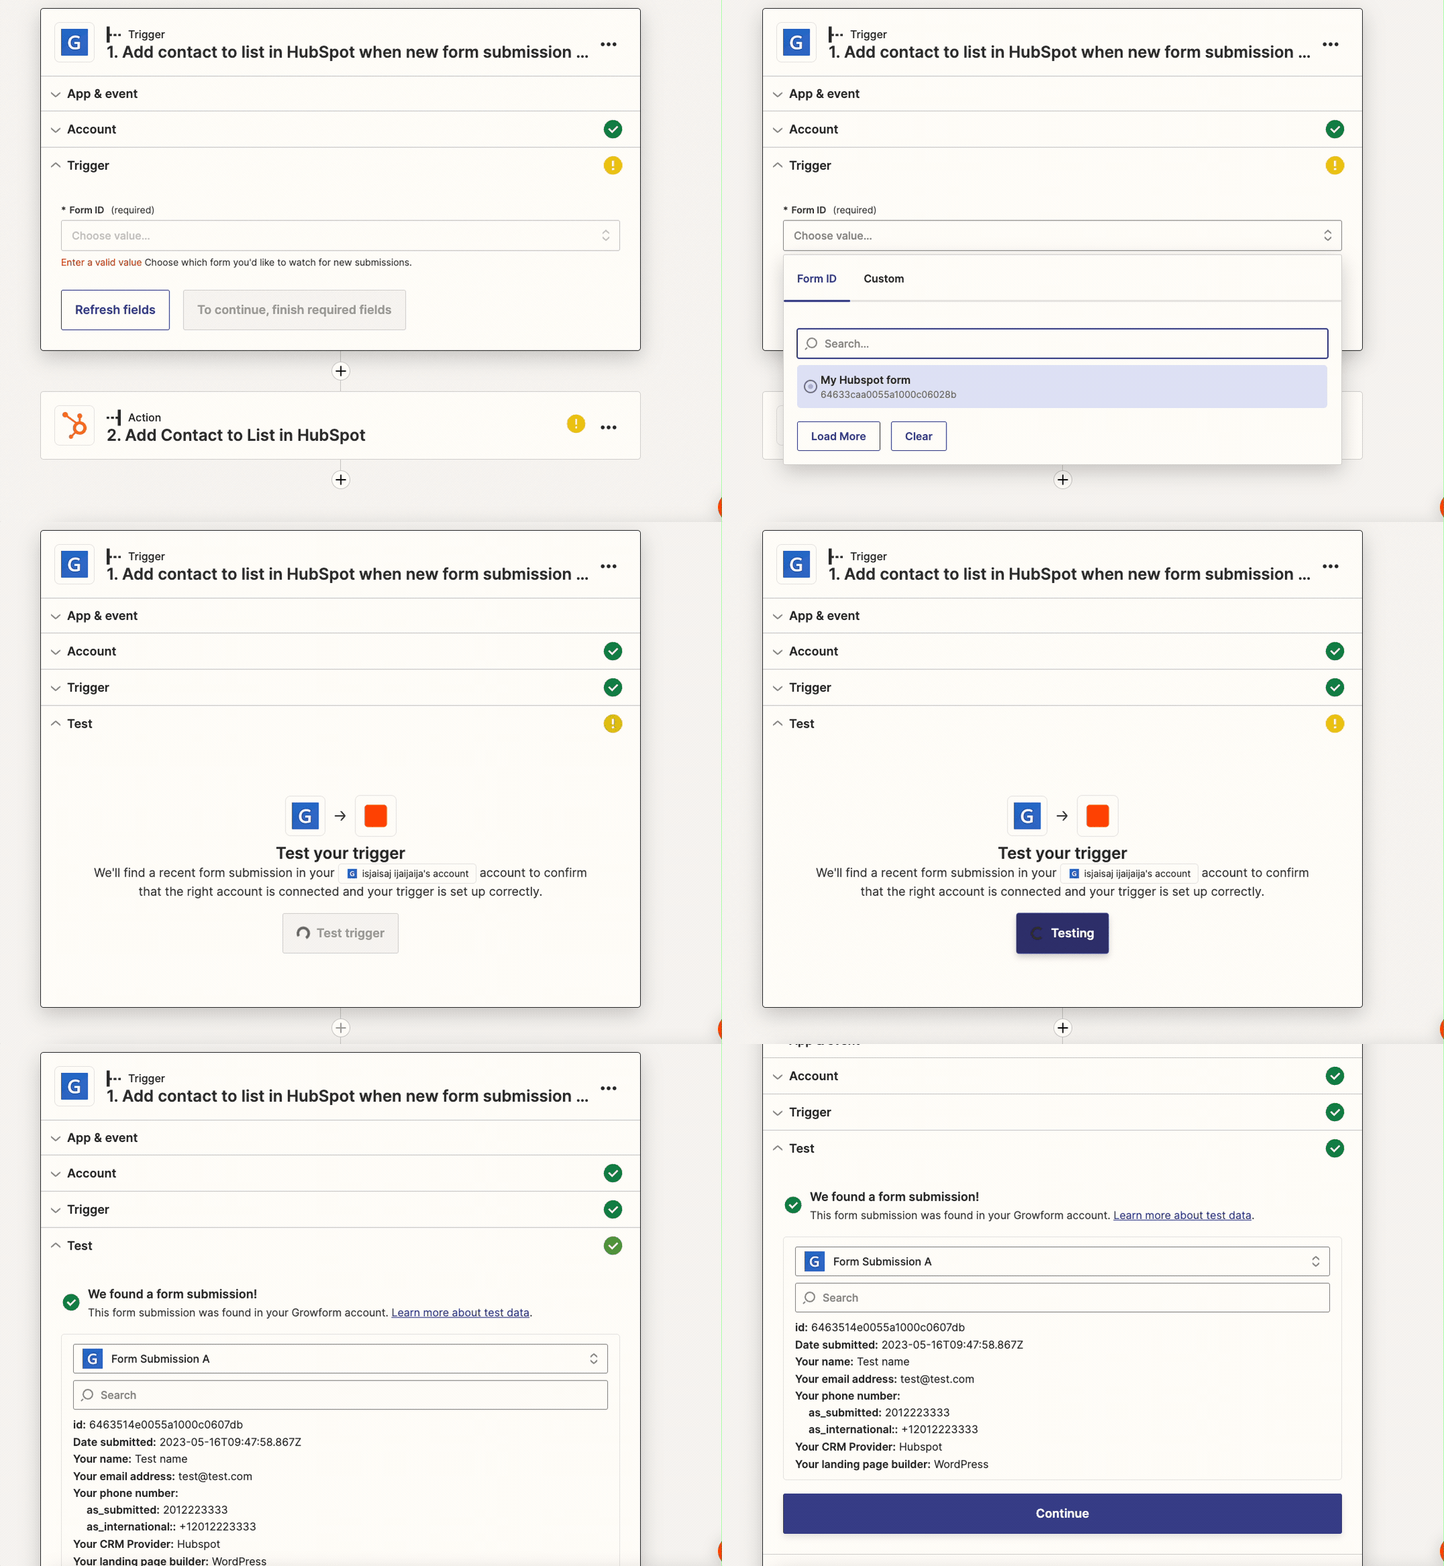
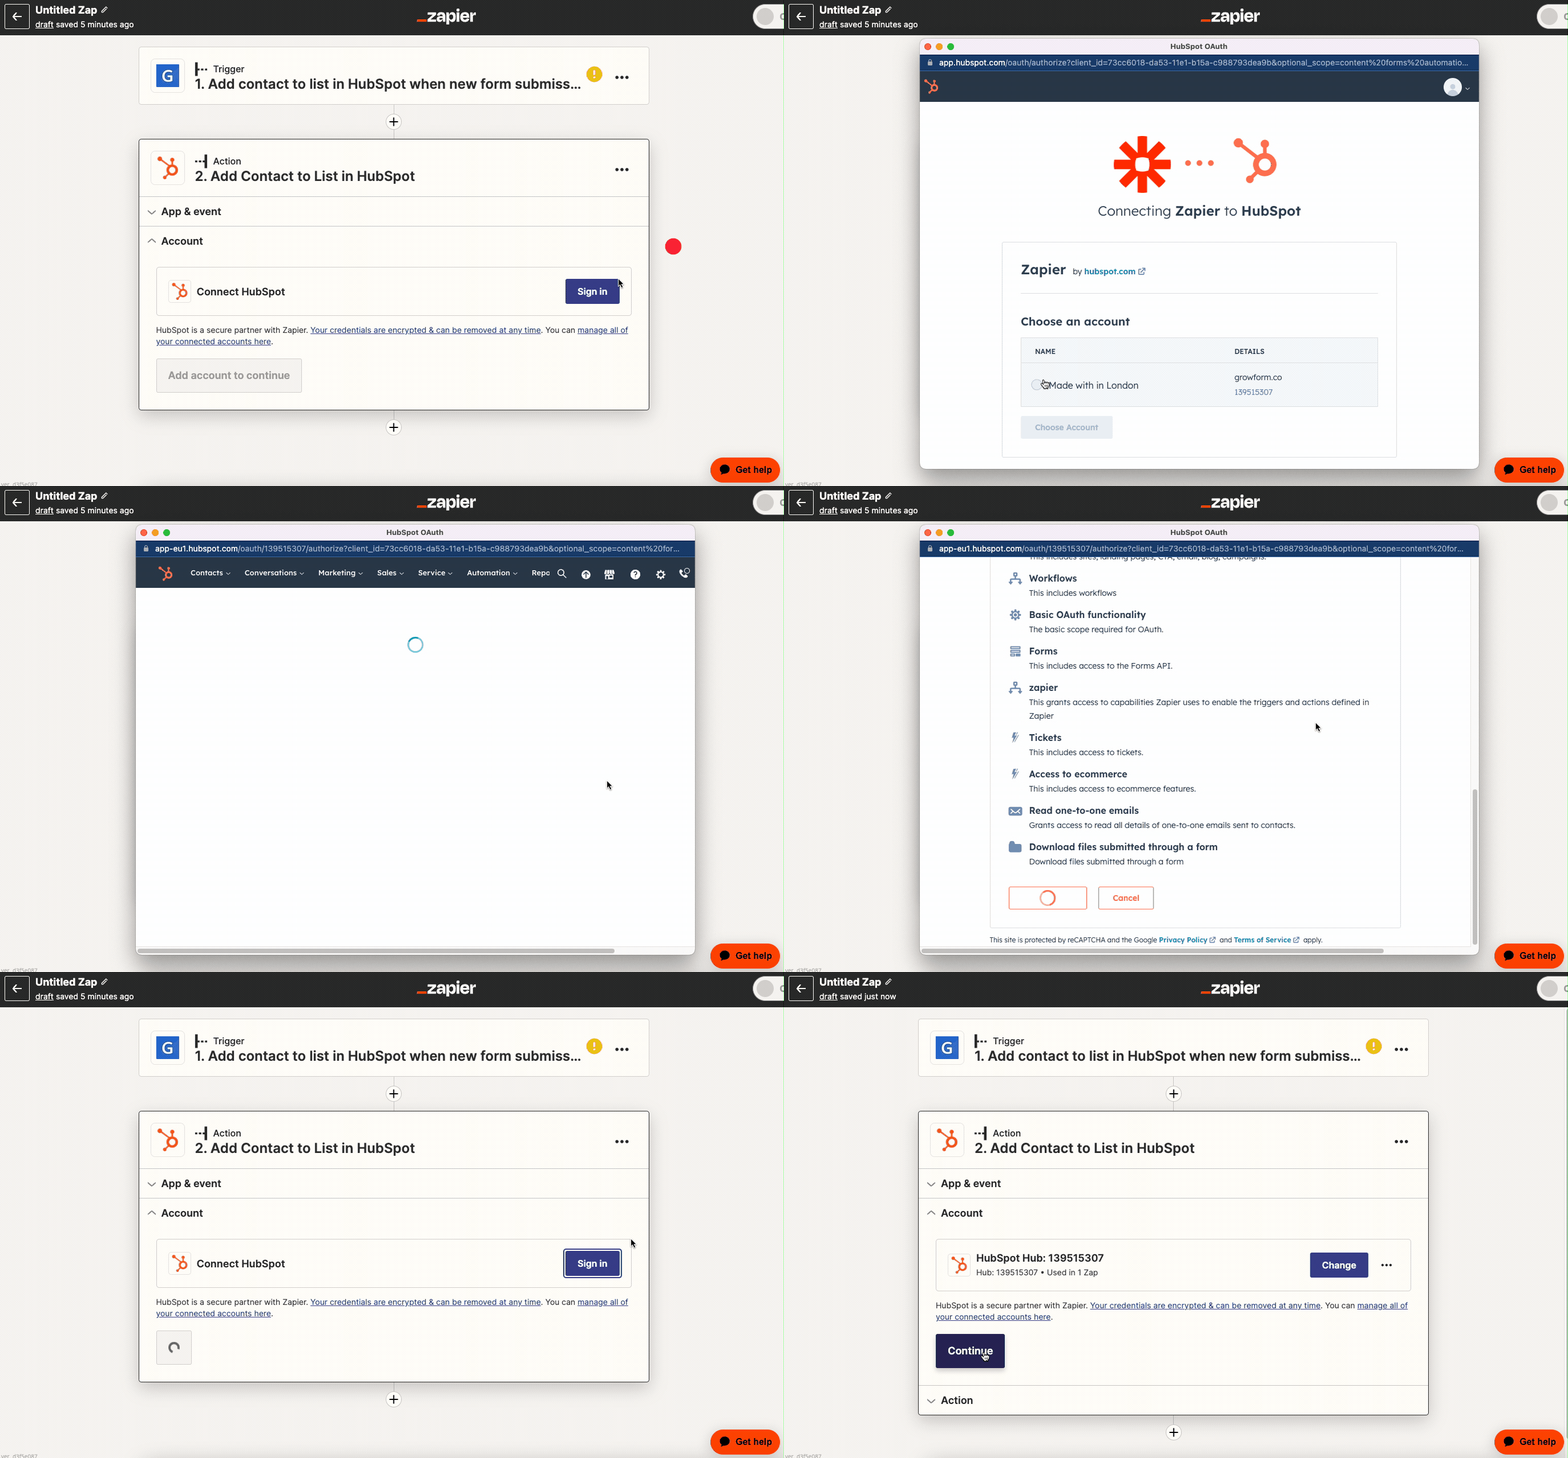
At this point, Zapier is connected to Growform – we just need to map the fields to Hubspot.
Connecting Zapier to Hubspot is a simple process – under “Action”, just hit “Sign in” and choose the relevant account before hitting “Connect app”:
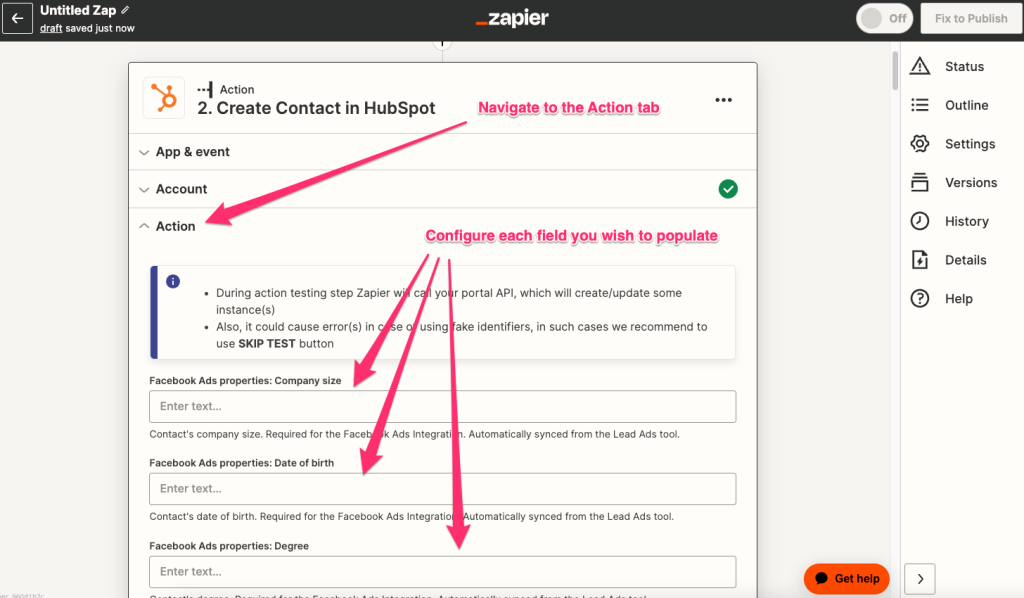
Now we’re connected to Hubspot, we just need to navigate to the “Action” details and configure each Hubspot field we wish to send data to:
For example, to populate a user’s email address, find “Contact information: Email”, enter the field and map the relevant Growform field to it:
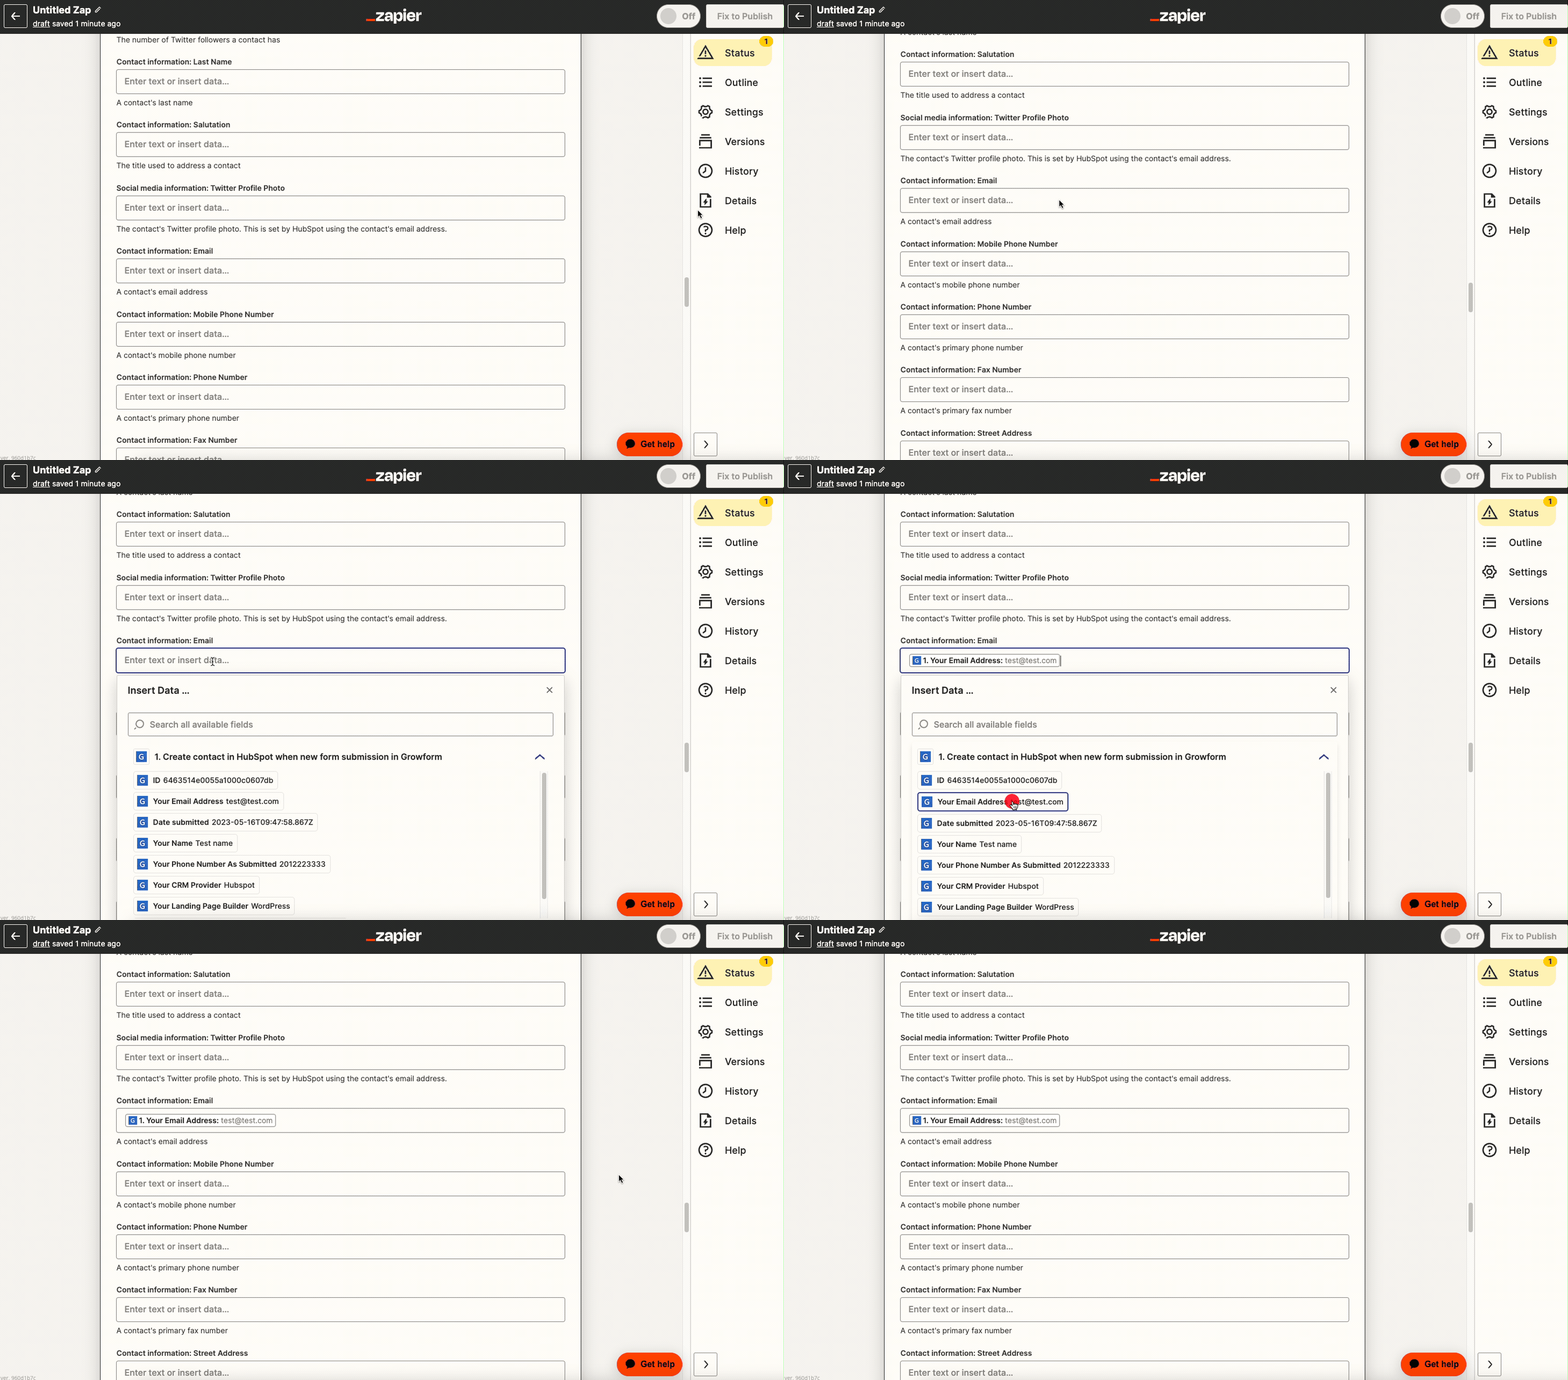
Tip: Use “ctrl+f” (or the equivalent on your keyboard) to find the field you’re looking for – there are lots of Hubspot fields to sort through! Custom fields will appear here also.
Repeat this for each field you wish to populate, and then test your Zap:
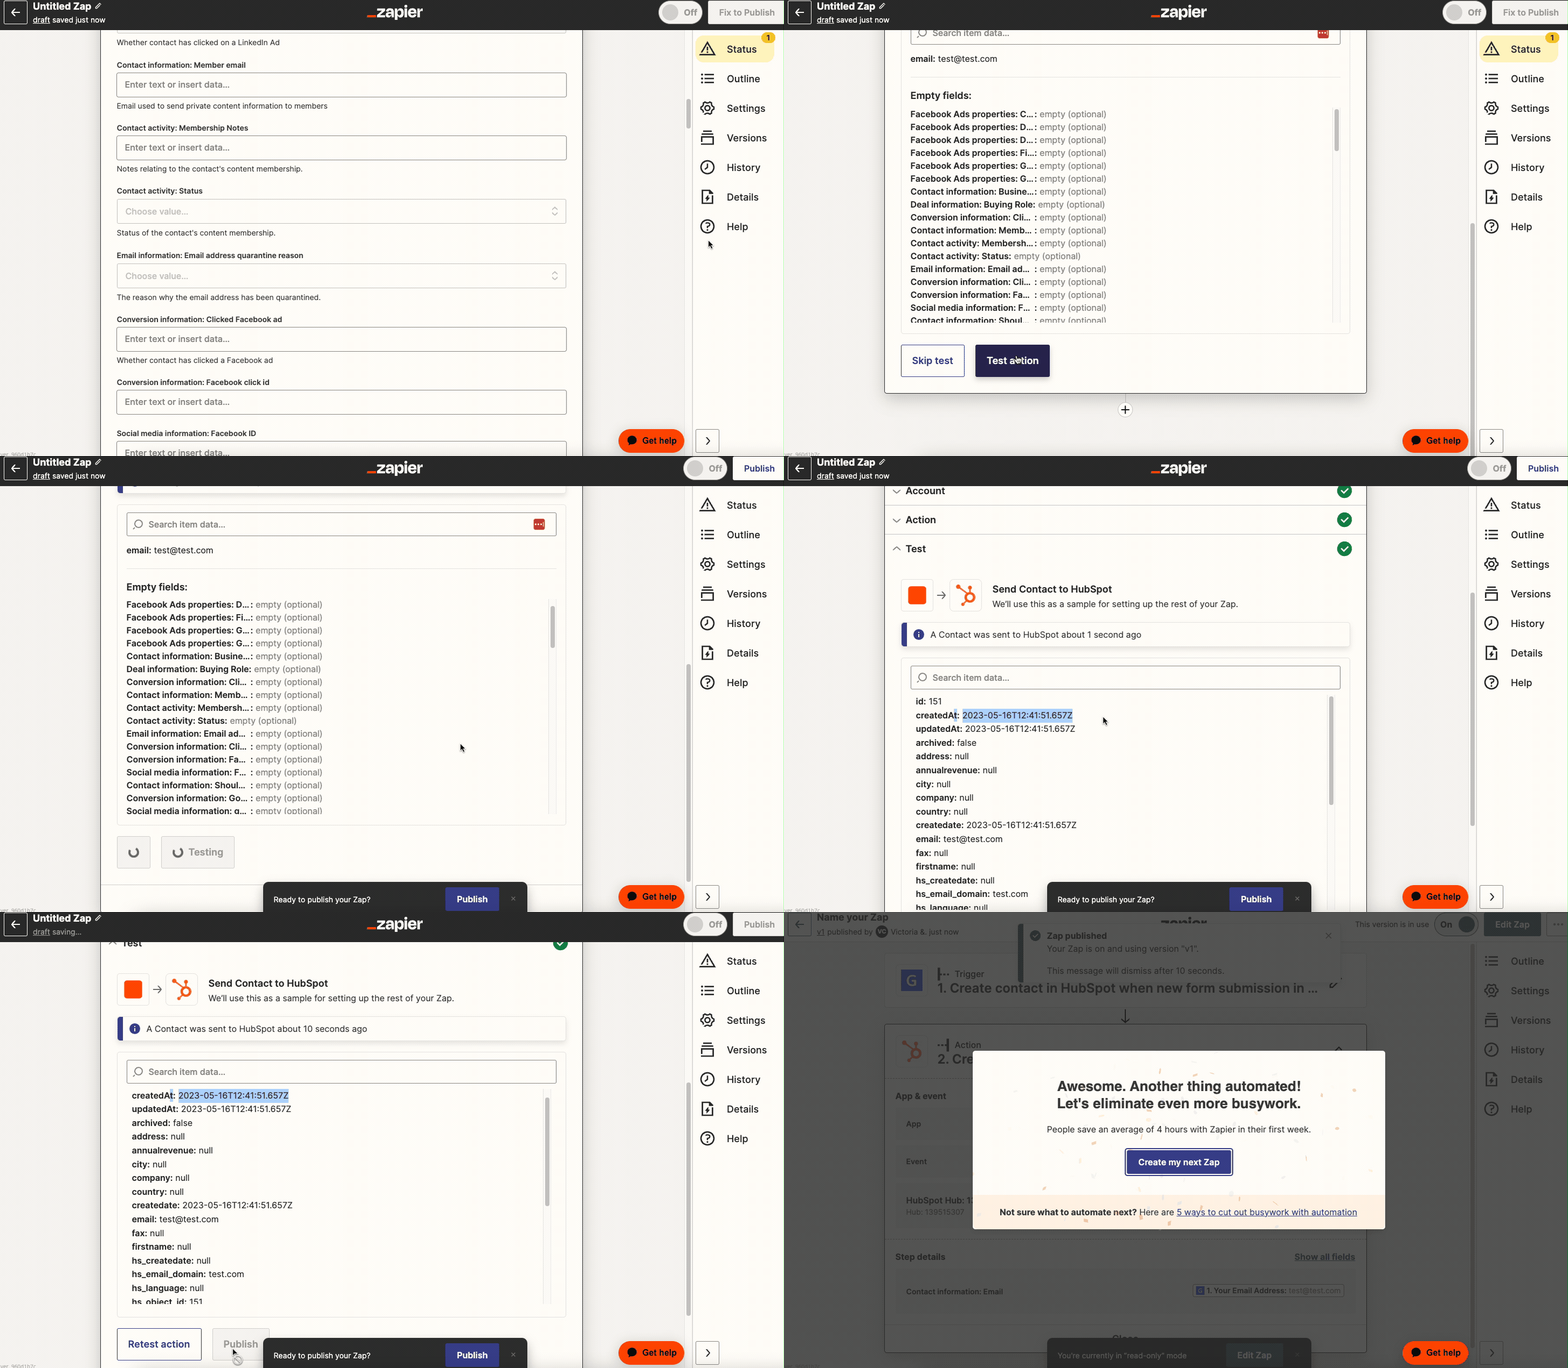
If the Hubspot lead is created properly, you should see a response like this:

Once you’re happy with your integration, don’t forget to hit “Publish” to ensure it’s active.
You will then see your contact created inside your Hubspot account under Contacts:
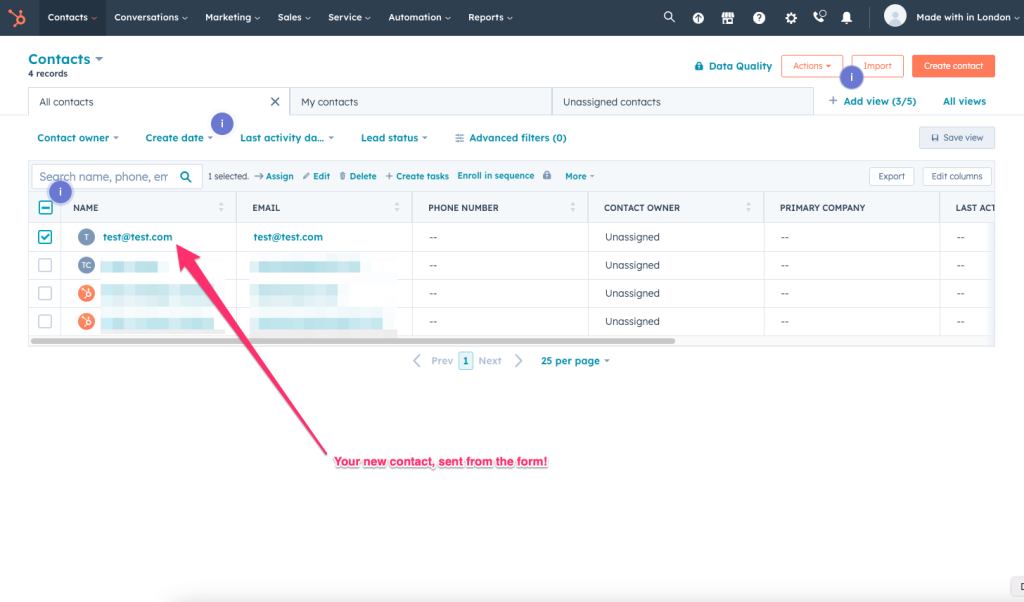
That’s it – you’ve successfully created a Hubspot multi step form with Growform!
Now, every time a new prospect fills in your form, it will create a new contact in Hubspot.
Growform Multi-Step Form Templates to Give You a Perfect Starting Point
Explore these top Growform templates tailored to different industries and use cases, designed to boost conversions and simplify lead capture:
- B2B / SaaS: Capture qualified leads with tailored questions to understand your prospects better.
- Finance: Secure sensitive financial leads through step-by-step forms that build trust.
- Healthcare: Collect patient intake or appointment information easily and compliantly.
- Events: Streamline registrations with multi-step flows for better user experience.
- Home Improvement: Gather project details for accurate estimates with minimal friction.
- Education: Engage prospective students with interactive application forms.
Discover these and many more templates on our templates page to find the perfect form for your needs.
FAQs and Advanced Tips
How do I send form data over to Hubspot’s custom fields?
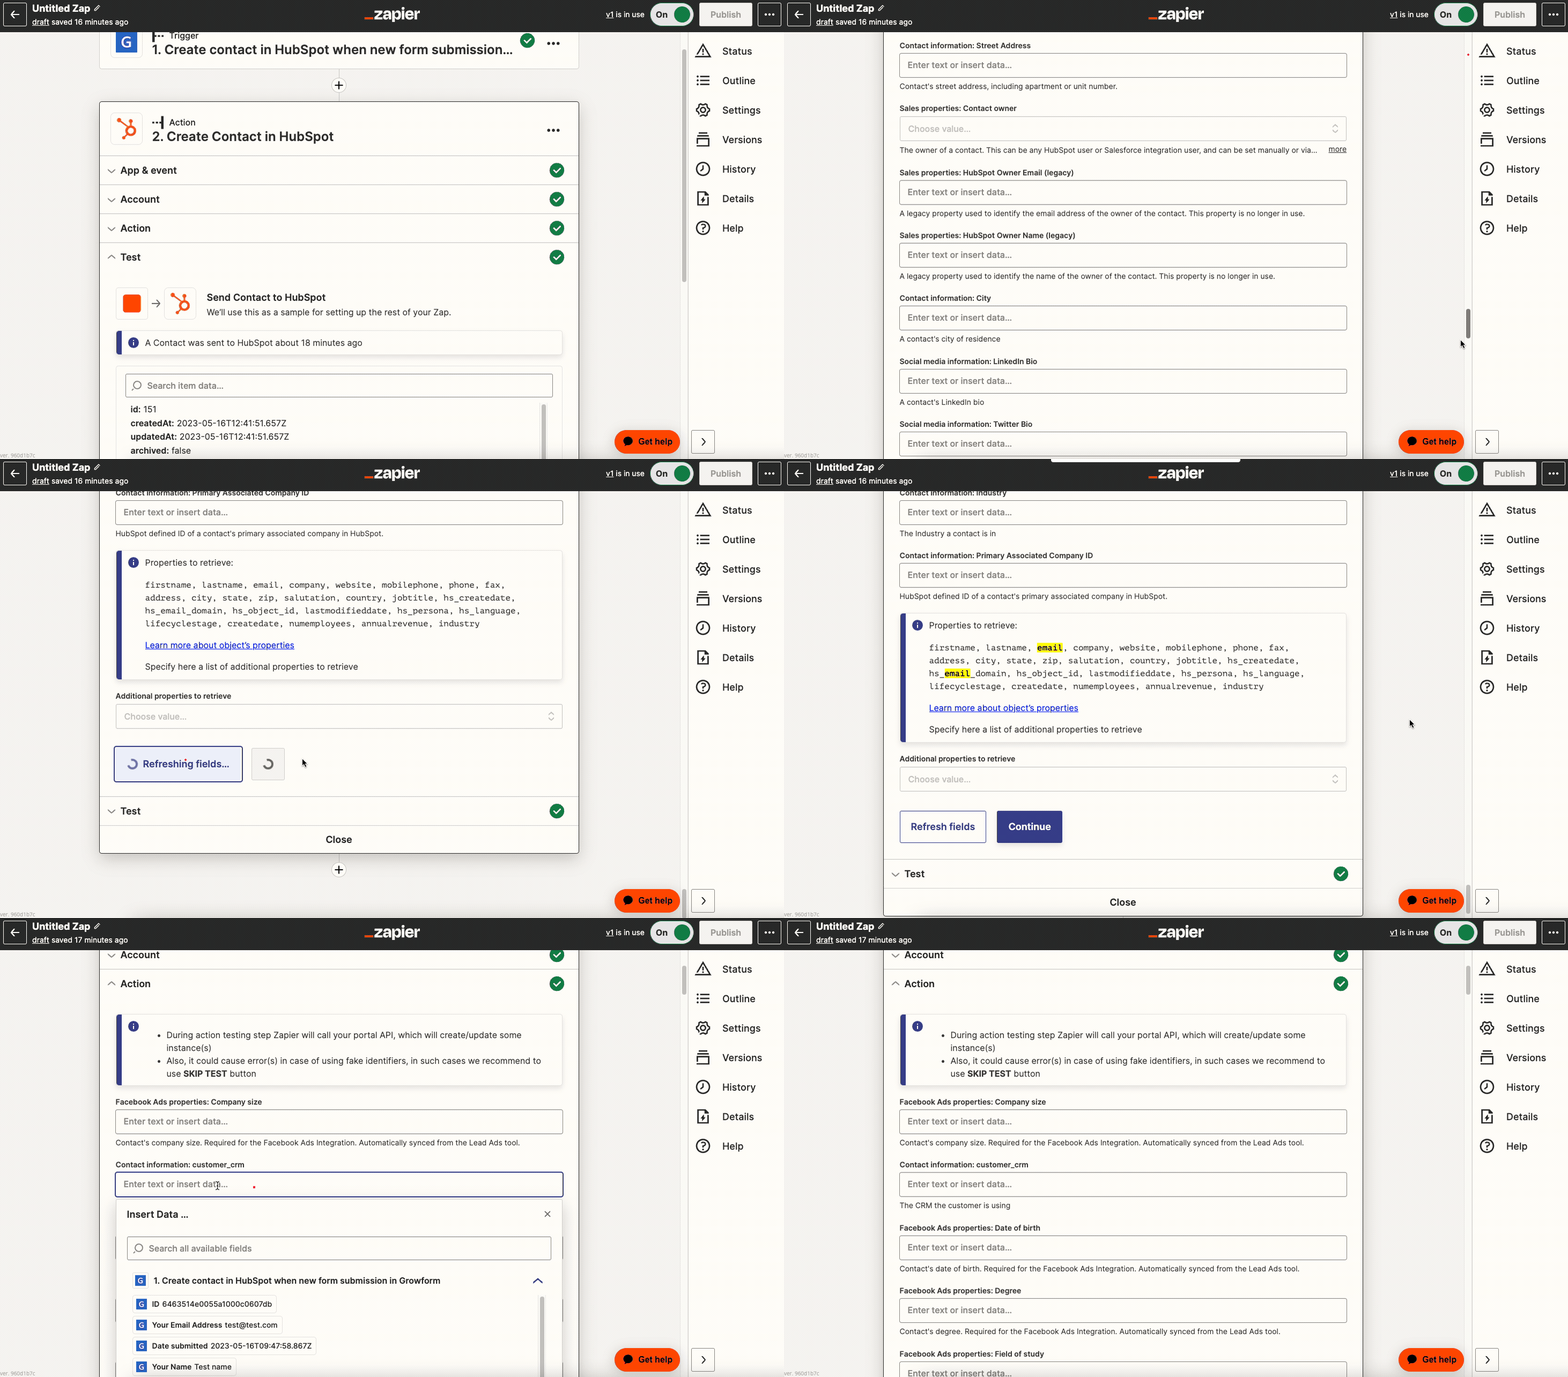
Sending form data from Growform to Hubspot’s custom fields via Zapier is the same process as populating the email address as we did in the final step of the guide.
First, you’ll need to Create a Custom Field in Hubspot. To do this, navigate to your Hubspot dashboard, go to “Settings” (cog icon) > “Properties” > “Create property”. Fill in the necessary details including the field name, field type (text, number, date, etc.), and the group where you want the field to be located (usually “Contact information”).
For example, we’ll create a property called “customer_landing_page_builder” to take note of the landing page builder they customer is using:

Once you’ve added the field, just go back to Zapier and hit “Refresh fields” under the action to see your new field there, and map it in the same way as before:
Can I automatically add contacts to a list instead of just creating them?
Yes! Whilst this is possible to do with Zapier, the easy way is to simply edit your list criteria such that any contacts that come in through this form are added to the Hubspot list.
For example, you could create a custom field called “customer_source” and always set this to “website” using the mapping rules above. Then, adjust your list criteria so that any customers with a “customer_source” of “website” are automatically added to this list.
Can I run an email automation when contacts are received in Hubspot?
Yes, you absolutely can! To achieve this, you would create a new workflow in Hubspot, and set the criteria in a similar way to the above question. Then, add an action (in this case an email) to your workflow and publish!
Is this a reliable way of receiving leads in Hubspot?
Yes, this is a popular and rock-solid way of receiving leads in Hubspot. Growform is a popular online form builder used by hundreds of businesses, and Zapier is the best-practices integration tool to connect the tools together. Once everything’s set up, it’s simple to edit the form and update the integration.
Conclusion & next steps
With this guide, you’ve learned to create a beautiful multi-step form that sends leads straight to Hubspot:

We’ve covered the basics, from creating the form to connecting it to Hubspot via Zapier.
Next, why not add more steps to your form, add some conditional logic, or adjust theme settings further to really make it your own?
If you haven’t already, you can start your 14 day free trial here.
Recent Posts
- Landing Page vs. Website: When to Use Each & What Works Best
- What Makes a Good Landing Page: 10 Key Elements That Turn Visitors Into Leads
- The Ultimate Guide to Conversational Form Builders for Higher Engagement
- We Review 7 Best Dynamic Form Builders to Transform Your Data Collection
- We Review the Best Drag and Drop Form Builders for High-Converting Lead Capture
